
Updated 05-16-23 – How Much Food Can You Grow in a 10 X 10 Grow Tent or Extra Bedroom?

 by
EzekielDiet.com
by
EzekielDiet.comPosted on May 16, 2023
I bought a 10 X 10 grow tent to conduct an experiment to see how much food I could grow in that much space. There are probably a dozen different ways to use 100 square feet of grow area. I’m going to show you how I’ve decided to try my hand at an indoor garden.
Index of 10 X 10 Grow Tent Diary
Because this is an ongoing diary style blog post I’m including an index of most recent additions on top so you can jump to the most recent posts. Use your BACK button to come back to the Index.
Update Harvest Photos May 16, 2023
Drill Pump to Remove Excess Water
Fungus Gnat Update May 16, 2023
Killing Fungus Gnats Permanently
Apartment Indoor Garden Vegetable Seeds – Container Friendly – Heirloom
Harvested Root Bound Carrots from Peat Pellets 4-11
Picking Seeds for Indoor Container Growing 4-10
Solitary Backyard Bee Help Wanted
Panda Film instead of Grow Tent
March 09, 2023 Update First Harvest
Off Grid Garden Tower for Lettuce
Be the Bee – Hand-Pollinating Indoor Vegetables
Water Level Float Stick Concept
Walmart 10 ft x 10 ft Grow Tent Just $343
Update February 28, 2023 Pictures
Understanding Grow Light Terminology: PAR PPFD PPF PBAR Spectrum Wattage
How Many Watts Can I Safely Operate on a 15 AMP Breaker?
Nearly two-thirds of gardeners play music to their plants, research claims
Update February 15, 2023 pictures
Update February 14, 2023 pictures
Electricity Cost for 7 – 100 watt Grow Lights
Electroculture Gardening Techniques
HooYan $35 100w LED Grow Light Review
Do You Change Soil In Wicking Grow Tub?
Seveka 100w $50 LED Grow Light Review
Cost of 10×10 Grow Tent Project So Far
Gardening with Leon’s Fertilizers to Add to Grow Tub Water
Enough Fertilizer for 3 Years of Grows
HLG 100w $153 LED Grow Light Review
Leon’s Fertilizer Formula for Grow Tub
Gardening with Leon – Grow Tubs & Fertilizer
Organic Potting Mix from Home Depot
17 Gallon Self-Watering Grow Tub Components
How Much Food Can You Produce in a 10 X 10 Grow Tent
The Benefits of an Indoor Garden
I put the tent up in an unfinished basement. I have the basement build-out on indefinite hold to see what the economic collapse and Great Reset looks like. An indoor grow tent or grow room in a basement, spare room or garage has been a recurring image in my mind for several years.
I tapped an excess AC/Heat air duct with a 4 inch metal dryer vent pipe to bring heat into the tent. Outside the tent is 63 degrees. Inside is 69.5 degrees Fahrenheit. The grow lights will also add a few degrees later. This vent also keeps a new supply of fresh oxygen in the tent. Plants need oxygen.
For all the guys out there who end up funding and building this system because your wife or girlfriend saw it and wants one just like it. I’m sorry : )
Regarding the benefits of indoor gardening, look at it this way. No outside tilling and preparing chem-trail soaked earth. No weeding the garden. No insects, bugs, slugs, squirrels, deer, snakes, birds, rabbits, neighbors and thieves competing for the food. No harsh chemicals to kill every bug on your property. No daily watering. No split tomatoes from too much water. Up to 4 grows a year rotating vegetables. Full 16 hours of light all day, every day. You control the temperature, water, light, darkness, wind, soil and fertilizer quality. You become Mother Nature in the grow tent. And one other thing, you get to choose the quality of the sea minerals going into your vegetables. And the chicken poop. : )
How much food can you grow in a 10 x 10 grow tent?
Or a 10 x 10 extra bedroom. I don’t have the answer to that right now. But stay tuned and I will along with a picture diary.
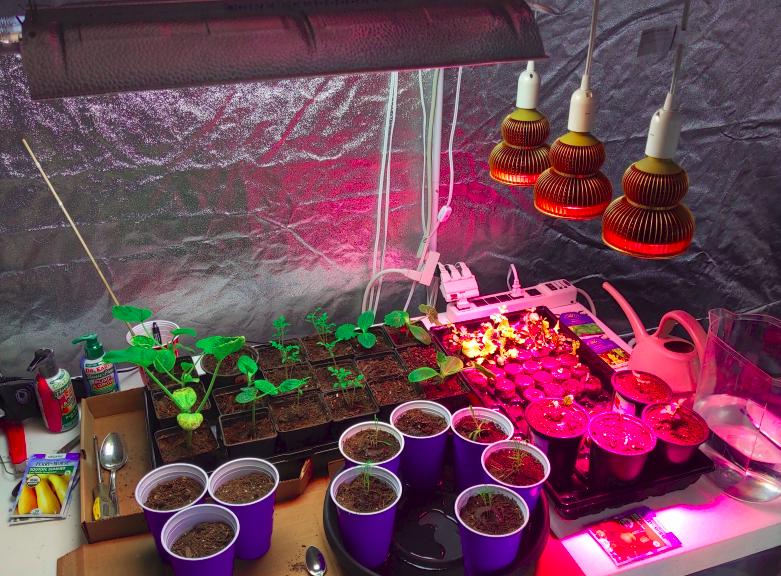
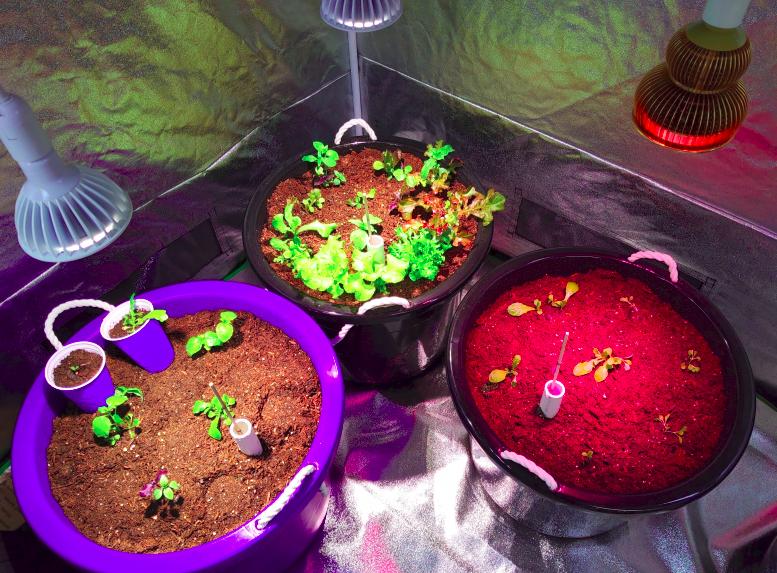
I’m planting: 2 different types of Tomatoes, Yellow Squash, Zucchini, Cucumber, 2 different Lettuce, Basil, Beets, Green Onions and Yellow Onions, Carrots and Sweet Potatoes. I may try to squeeze in some strawberries around the bottom of a couple tubs. This picture below is about 2 weeks of growth from seed. Yellow squash on the left shot right up. Tomatoes in the center. Green zucchini on the right. The Dixie cups have carrots. That’s basil and lettuce in the sprout tray. Those are beets bleached out with the purple light.
I bought the 10 X 10 grow tent for only $329 on a Black Friday sale with free shipping from GrowAce ($356 w tax). I actually bought it as a Christmas gift for someone else. It never occurred to me she wouldn’t have a clue about how to use a grow tent. After several years competing with insects, bugs, slugs, squirrels, rabbits, deer, snakes and birds in the yard she had given up on gardening. I would kid her about the occasional $500 tomato the bugs left for us. So it looks like this grow tent turned into my project until it’s up and running, then she’ll most likely takeover.
If you just do a little here and a little there, a few minutes this week, a couple hours next week will add up to an elaborate grow room in just a few weeks. Plus, there’s something therapeutic about working with soil and caring for plants.
See the tent at: https://growace.com/products/yield-lab-120-x-120-x-80-reflective-grow-tent
Once all this is in place and finished I really only plan to check on this garden grow tent once a week for watering, nutrients, training, pruning, picking vegetables, etc.
17 Gallon Self-Watering Grow Tubs
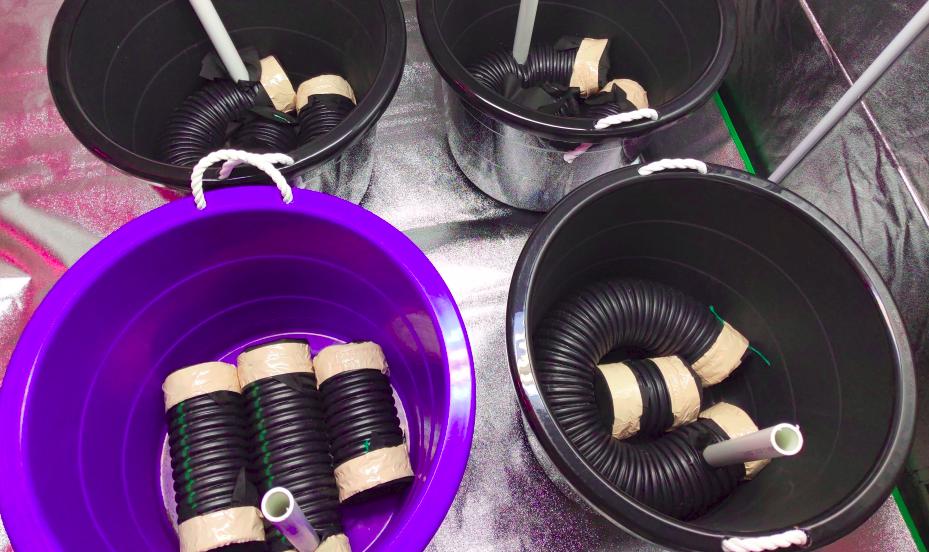
I intend to have 12 – 17 gallon self-watering grow tubs. The tubs are $7.98 at Walmart. I used 4 inch plastic perforated (holes) flexible drain pipe ($14 for 10 ft pc Home Depot it takes 4 for 12 tubs). There’s about 40 inches of drain pipe in the bottom of each tub (water reservoir) with 1 inch PVC watering pipes stabbed into one of the drain pipes. The tubs you get at Walmart are smaller than the ones used in Gardening with Leon’s example videos below. His tubs take a 48 inch piece of 4″ pipe. My tubs take a 36″ piece and a 4″ piece of 4 inch drain pipe.
The picture below is the water reservoir. It will hold a couple gallons of water each and last up to 10 days depending on the plant. The ends of the drain pipe are covered in landscape weed mat cloth. I duct taped it after using a rubber band to hold it in place. I didn’t think the rubber band would hold the weed mat by itself once filled with dirt. The last 6 tubs I used 2 – 8 inch plastic zip ties connected and pulled tight around the weed mat in one of the pipe grooves.
Water Level Float Gauge
Below Picture: These are the float water level dip sticks that float inside the 1 inch white PVC watering pipe. I’ll paint lines on the wooden dowel showing the empty mark and full marks (3 inches down) similar to a dip stick, except this stick floats. It’s a 4 inch reservoir pipe, so 3 inches of water when full leaves enough air in the tub to wick the water throughout.
The fishing floats are $1.16 for 3 at Walmart (get the bigger ones pictured) and the dowels are 3/16 inch (green tip) and cost .42 each at Walmart in the hobby section. I used a water proof glue to glue the dowel and the black tip to protect the other end of the Styrofoam fishing float. You’ll cut a foot or more off of the 36″ dowel.


The 1 inch white PVC watering pipe is cut square on the top end; and at a 45 degree angle on the bottom end. This keeps the pipe open at the bottom for adding water. If it was cut square it would sit on the bottom and block adding water. Also, as long as the bottom of the PVC white pipe is submerged additional air can’t get into the tub. That trapped air is what creates the wicking action of water into the Potting Mix.
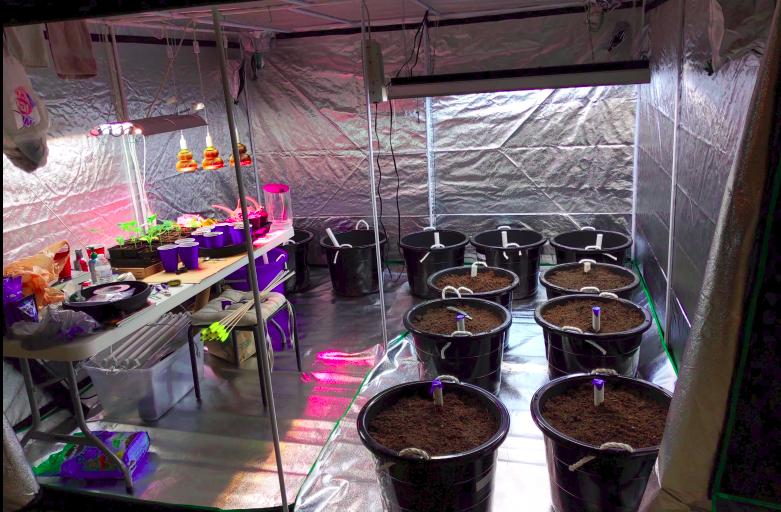
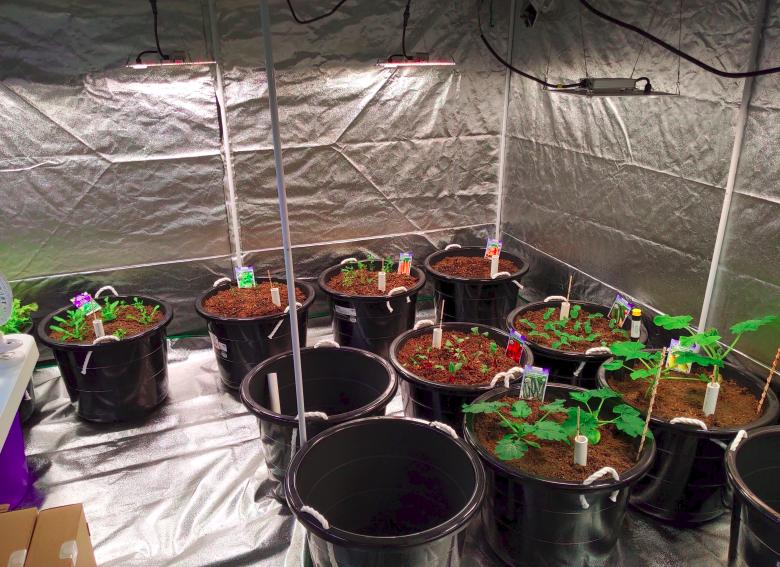
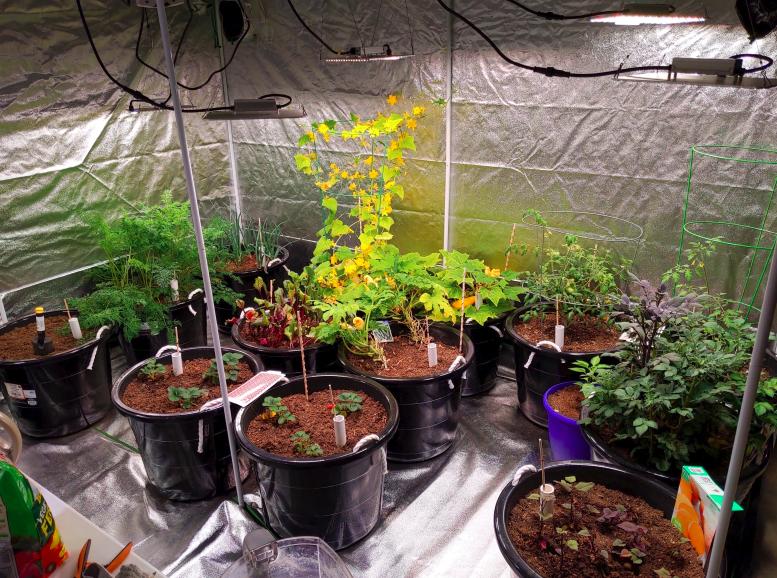
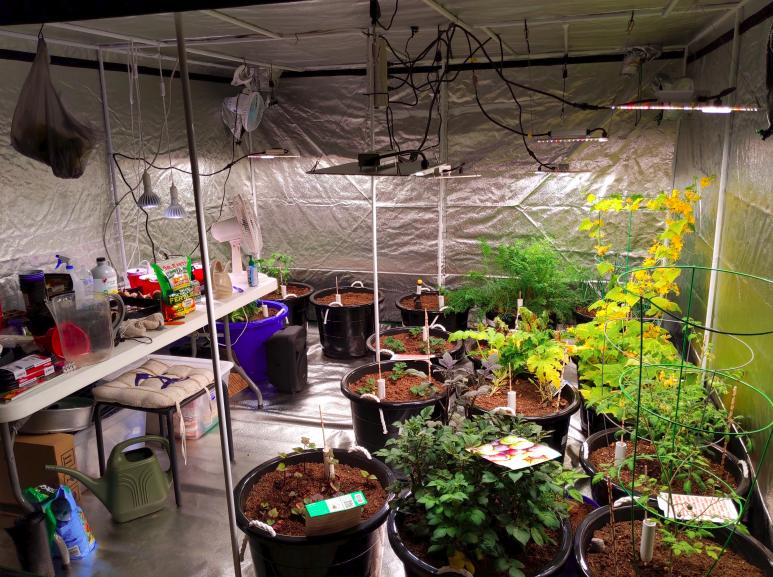
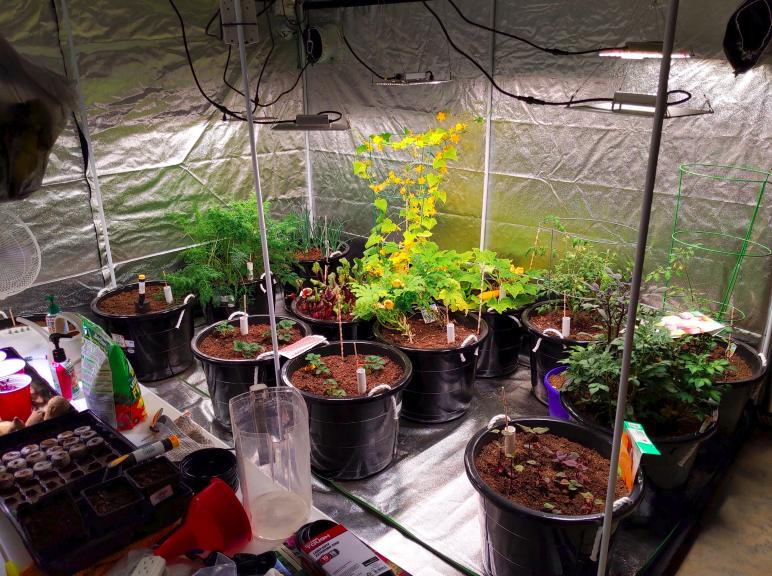
I have room for a total of 12 tubs, 6 across the back, 4 in the center area, 2 more on the front wall of the tent. This leaves me room to get to each plant with a walkway. I bought a couple tubs full of grow lights on Craig’s List at half price to supplement basic fluorescent lights with correct bulbs for grow and bloom.
I’m planning on 16 hours of lights on and 8 hours off.
There’s always a lot of used grow lights, equipment and tents in the secondary market. Now would be a good time to start looking at what’s available.

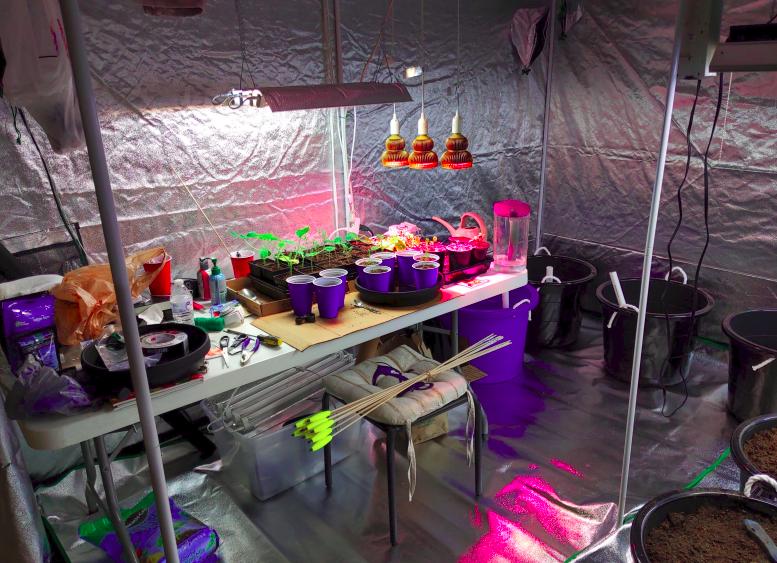
Work Bench
I added a 6 foot plastic desk, table for germination and working with plants. Later I’ll add wire shelves on top of the table at the back for LED flat lights above herbs and maybe sprouts. Tub storage under the table.

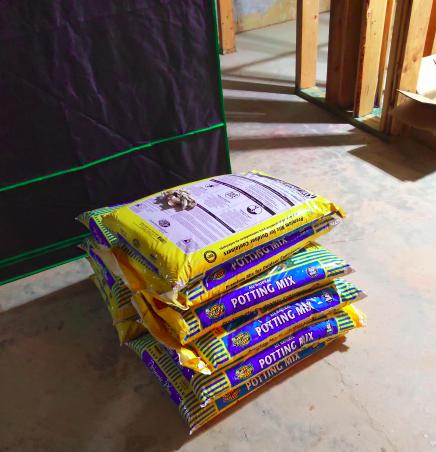
Organic Potting Mix from Home Depot
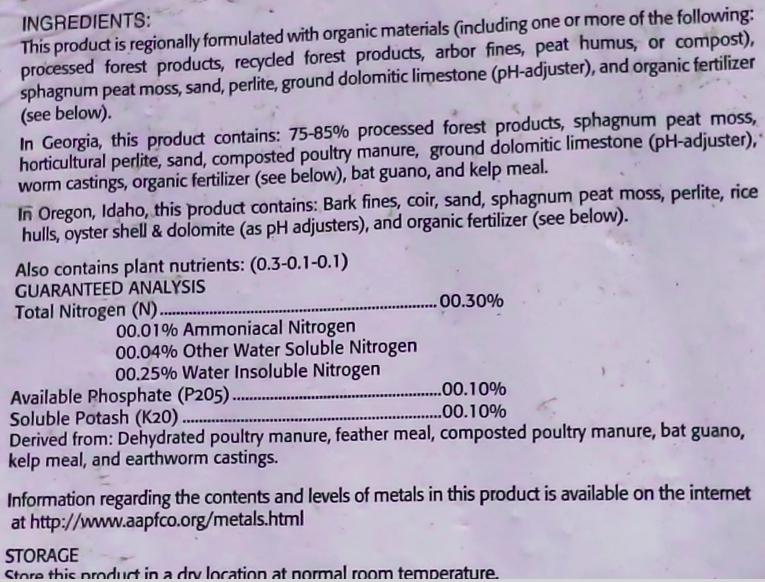
Home Depot Organic Potting Mix $9 – 40 quart bag X 10 bags = $95 for 6 tubs. It has to be Potting Mix to wick properly. Potting Soil has too much vermiculite and stays too wet. Must use Potting Mix. I’ll probably need another 10 bags of potting mix. However it’s a good start and I believe slow release and powder fertilizer will allow it to be used for several grows.
Cutting Edge LED 95 Watt Light Per Plant

For now I intend to use a hodgepodge of grow light bulbs and fluorescent lighting fixtures I’ve scrounged up used.
If I decide to continue this project long term I’ll go ahead and invest in the HLG 100 Horticulture Lighting Group Quantum Board LED Grow Light for each grow tub. It will then be a system you can even put in a closet or anywhere you have a 2 ft x 2 ft footprint and access to an electrical plug.
Look at that 5 Star rating by 402 reviews. People are really happy with this grow light. I’ve heard a lot of good things about it. It replaces older LED lights that sucked 3 times the electricity. You can light up a 10 X 10 grow tent with 12 of these LED lights and only be pulling about half of the capacity of a 20 amp breaker. Without a lot of heat.
Twelve hundred watts is about like running a blow dryer or a coffee pot with heating burner for 16 hours a day. You can compensate by turning off other unnecessary lights around the house. And maybe even the hot water heater all day or night when not needed. A lot of people I know, and have known, sit around with 20 or more lights on in several rooms day and night. Granted that low watt LED bulbs today have reduced by up to 75% the amount of electricity that old incandescent light bulbs used to pull. But still almost everyone can cut back on excessive lighting and electric use. If your electric provider has discounts for off-peak hours you also have the option to light up your plants all night and save.
Before you load too much wattage on whatever circuit breaker you’re drawing from (10, 15 or 20 amp), get an electrician’s opinion for safety.
Of course everyone should have a backup plan for when the power goes off. Either move the plants outdoors, if possible. Or in the winter have a small gas or propane generator capable of running 1,200 watts of lights. You could also cut back to 12 hours light, 12 hours dark. Or even 8 hours of lights on and 16 off in a power outage. Another option would be to turn every other light off. Or, go back to a dozen 34 watt grow bulbs during an outage. Regarding heat, the bark and forest products composting in that potting mix creates heat around the roots. Don’t complain about all the bark and sticks in the potting mix.
The good thing about these LED lights is they will daisy-chain with one plugging into another into another which reduces the number of plugs in a surge protector and timer.
Consider that each one of these lights probably has the ability to increase the temperature in the grow tent by 1 degree or more. 12 of them could easily increase the temperature by 10+ degrees. In a basement this is perfect but you will need an oscillating fan to move air around to reduce hot spots in the room. If you’re in an extra bedroom you’ll need to exhaust the hot air into an attic or outside in the summer. In a basement just open a grow tent vent and blow it out.
My Garden Mentor at the YouTube University – Gardening with Leon
Leon’s fertilizer formula for a grow tub:
This is Gardening with Leon’s fertilizer formula for grow tub:
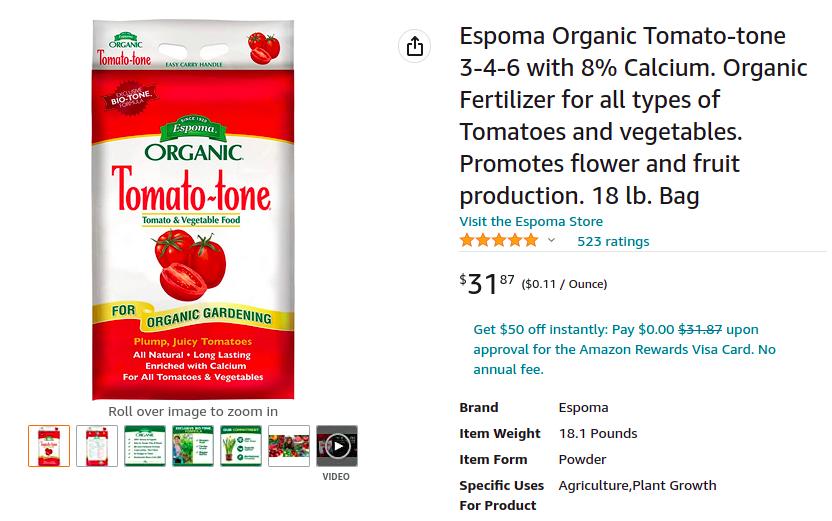
1/2 cup Sustane (chicken poop turkey feathers) or Walmart Tomato-Tone
1/4 cup Sea Minerals (not sea salt, will burn plant, avoid Redmond)
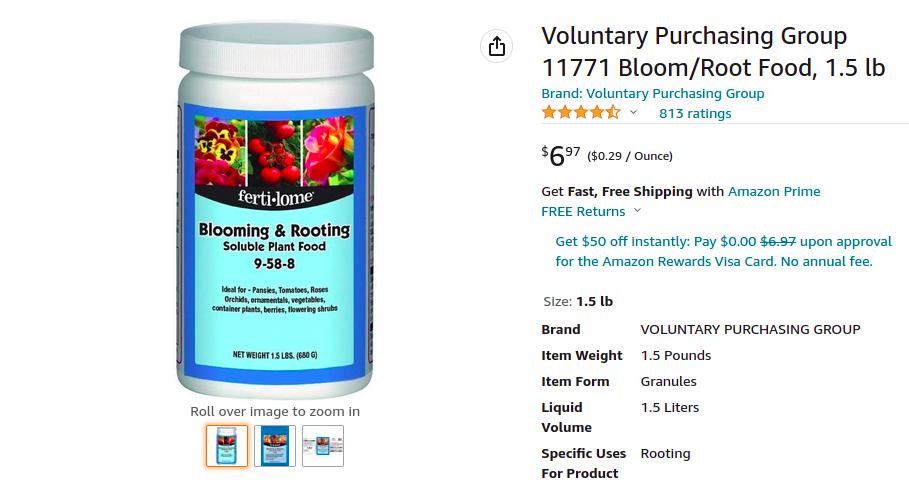
1/8 cup Gypsum
1/8 cup Lime (garden lime, not slack)
1/8 cup Epson Salt from any store
Keep in mind the Potting Mix you buy may already be HOT with these additives. Leon is adding this to Potting Mix so I guess it’s fine. That’s a question I need to ask. I can definitely see this fertilizer regimen after the first grow.
If you’ve considered stockpiling some of these nutrients for future uncertainty then here’s the list of what you need.
The product links in this post are not affiliate commission links. I don’t have any affiliate relationships with any products I’ve used or promote on this site. Links are for your convenience.
I like Leon. He reminds me of good Christian people I’ve known and relatives from a bygone era. A time when knowledge was passed on just like this. When you have a whole town full of people like Leon it’s like going back in time; Mayberry. I have all the respect in the world for good rural Christian people from that generation.
See more of Gardening with Leon at: https://www.youtube.com/@gardeningwithleon2816
To see more self-wicking water tubs see: https://duckduckgo.com/?t=lm&q=water+wicking+tubs&iax=videos&ia=videos
I modified my tubs for indoor growing without the drain holes 3 inches up from the bottom. If your tubs are on a back deck (consider weight) and exposed to the rain, then you need drain holes at 3 inches to drain off excess water. I don’t need to drain water indoors. I’ll always be adding water. I’ll use the dip stick float to tell me how much water is in each container.
Update January 31, 2023:
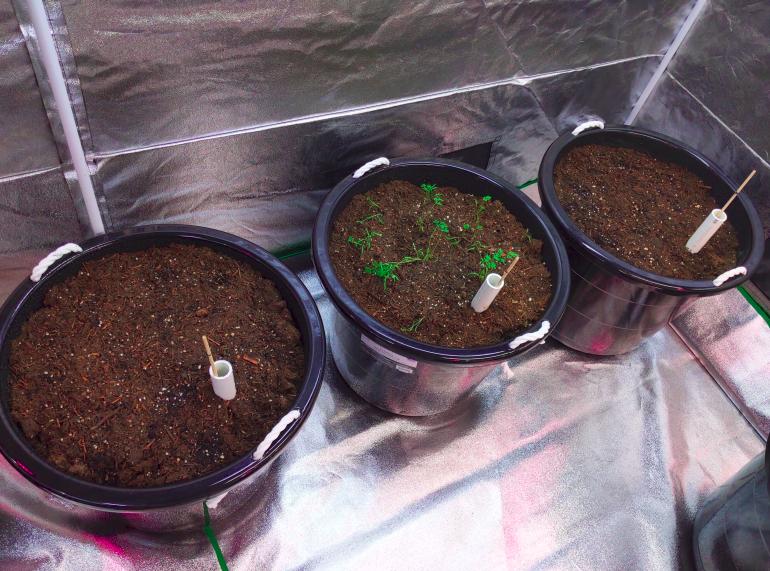
I finished manufacturing 12 self-watering grow tub systems and filled 6 tubs full and 3 partially full that used up the 10 bags of Potting Mix. 10 bags (40 quart size) filled 7 tubs. I should need an additional 6 or 7 bags. I’ll pick up 10 more today.
Like the fourth wall you never see in movies and on TV. Being able to unzip the whole front of the tent makes getting in and out with bags of dirt much easier.
Cost of Project So Far:
$356 Grow Tent 10 x 10
$102 12 – 17 gallon grow tubs
$55 40 foot of perforated pipe (buy 50 ft roll cheaper)
$11 2 – 1 inch X 10 ft PVC Pipe
$50 6 foot plastic folding table
$20 float sticks
$10 zip ties (get a big bag you’ll need them all over the grow tent)
$191 20 bags Potting Mix
$300 Used grow lights (Craig’s List)
$50 Fresh Non-GMO Seeds
$100 fertilizer
$50 Misc
$1,295 Total
The product links in this post are not affiliate commission links. I don’t have any affiliate relationships with any products I’ve used or promote on this site. Links are for your convenience to find featured products.
Update February 2, 2023
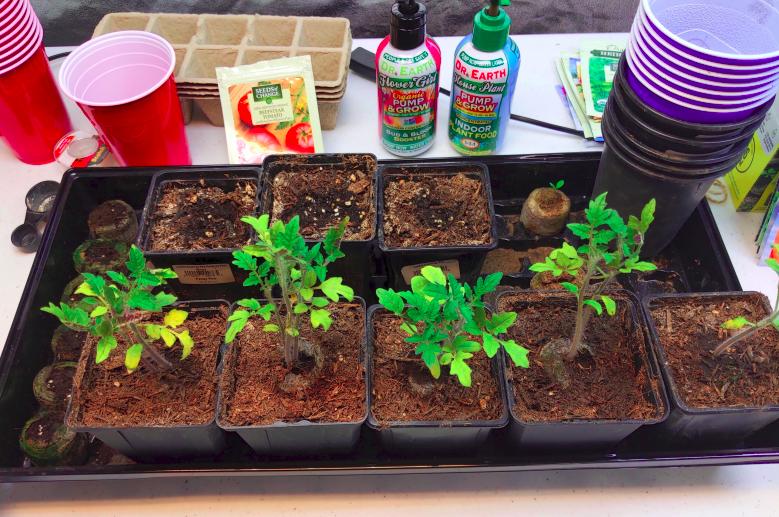
Got the remaining grow tubs filled with potting mix, fertilizer and microorganisms. It took 18 bags of Potting Mix for 12 tubs or 1.5 bags per 17 gallon tub. Those 34 watt LED grow bulbs are only temporary to get the plants started. I believe they’ll be fine until the plants get larger. Then I’ll need something stronger. They are supplemented with the fluorescent lights. The seedling table has left me with enough extra plants to give some away. I still have yellow squash, zucchini, large cherry tomato, and beets left over.

The Lettuce and Basil: This is the small leafy lettuce that can be planted this close on the right. Basil obviously needs more room in the left tub. For larger heads of lettuce they’ll be 6 around the perimeter of the tub with one in the middle. I’ve seen plastic lettuce/herb grow towers that I may look into to keep 20 heads or more growing all the time.
Zucchini and Yellow Squash:
Large Cherry Tomato:

Update February 3, 2023:
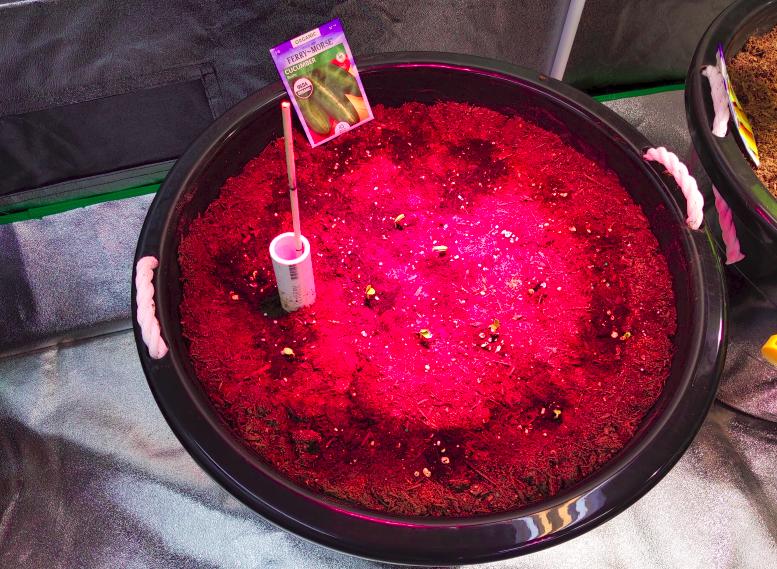
I planted cucumber, yellow onion and spinach seeds directly in freshly made grow tubs last night. I covered the seeds in a seed sprouting soil.
I also planted the sprouted carrots in a fresh grow tub.
I’ve decided to add 4 more grow tubs. I want at least 2 tubs of sweet potatoes. And a couple grow tubs for strawberries.
Do You Change Soil In The Wicking Tubs? Gardening with Leon
There is a 67% Cheaper Off-Brand Grow Light Using the Same Samsung LM301B Diodes
 The $153 HLG 100 Grow Light reviewed above in this post has an off-brand competitor knock-off that’s 67% cheaper. The reseller advertises it’s using the same Samsung LM301B light diodes. This light appears to have 13 rows of light diodes instead of 11 rows on the $153 HLG 100. The HLG 100 electric driver is attached to the aluminum light panel and there are no light diodes under it. Obviously because the heat from the driver would reduce the life of the diodes under it. The Seveka off-brand design lifts the electric driver off the back of the board with spacers so the board can accommodate 2 more rows of light diodes. The aluminum board is twice as thick as the HLG 100 also to dissipate heat better. In some ways maybe it’s better. If it’s the same diodes it should work as well as the HLG that’s 3 times the price.
 What this light does not show in their literature is the ability to daisy chain one light to the next to reduce plugs. However in one of the customer videos I see what looks like a twist-lock connector in the electric cord that may be a daisy chain link. It could just be the on/off switch. The Seveka light also doesn’t have a dimmer. But the manufacturer explained in broken English (must be Chinese) that the dimmer damages the light diodes, after the light is dimmed, the diode never goes back to full brightness, so they eliminated it.
I just bought 5 of these lights. I’ll review them once delivered. Because this light has a 3 ft X 3 ft footprint I may be able to light 2 grow tubs side by side. The grow tubs are 19 inches wide X 2 = 38 inches. Maybe I can run this grow room on only 500 watts of power. I can always supplement with fluorescent or even grow bulbs where needed.
There is also the possibility that one light could cover 4 tubs set up in a square 38 inch x 38 inch. This would only probably work in the Veg period. In bloom each plant could use the whole light.
I wanted a full spectrum white light with the red diodes for a really bright white as opposed to the Burple (purple) colored grow lights. The purple lights are hard on the eyes and require full-time eye protection. The new Samsung LM301B light diodes is very bright but only requires a pair of good reader sunglasses (if you wear glasses).
This light could bring the system cost down to just $80:
$8 – 17 gallon grow bucket
$15 – 1.5 bags Potting Mix
$50 – Off Brand Grow Light
$5 – 4 inch Drain Pipe
$1 – 1 inch PVC water pipe
$1 – weed mat
$80 Total Per Grow Tub
Only $55 if one light covers 2 Grow Tubs
Only $42.50 average per tub if one light covers 4 Grow Tubs
$100 worth of fertilizer for 3 Years of Future Grows:
See the Gardening with Leon recommended fertilizers for a grow tub below. I just bought one of each for about $100 with free shipping.
If you can get 4 turns a year on the grow room this should be enough fertilizer for 3 or 4 years. You just have to keep it dry. It shouldn’t expire. The Epson Salt isn’t shown but I can pick that up anywhere. 12 tubs X 4 turns yr X up to 1/2 cup = 24 cups Tomato-tone a year. There should be at least 3 years of full-time gardening in $100 worth of fertilizer.
So a couple hundred dollars worth of fertilizer could last 5 to 10 years.
This leaves the liquid grow and bloom fertilizer that’s added to each gallon of water at the rate of just a teaspoon. It too will last years,
With the 5 Seveka Grow Lights and the 4 fertilizer products below I have an additional $360 invested.
As an afterthought I wouldn’t waste time or money looking for used grow lights or equipment on Craig’s List. The new products coming out so fast are so affordable it’s a waste of money to buy outdated equipment.
Sustane alternative:
 Sea Mineral:

Gypsum:

Lime:

Add Teaspoon To Each Gallon of Water in Grow Tub:
Vegetation:
Bloom (just one of the 2)

February 6, 2023 Update:
I used a limb/branch clipper to cut all the 3/16″ dowel water float sticks to the correct length about 24 inches. Because each 1″ PVC watering pipe may be slightly different lengths or sit inside the drain pipe higher than the next tub the full and empty marks will be specific to each tub and dowel.
I used the Pilot Gel Black Pen to mark the dowel at EMPTY with the float sitting on the bottom of the drain pipe. Then I would measure 3 inches down (toward float) and create a FULL line. Markers spread on wood grain. The Gel pen colored in a dark line should suffice. You can always go over with paint later if it fades.
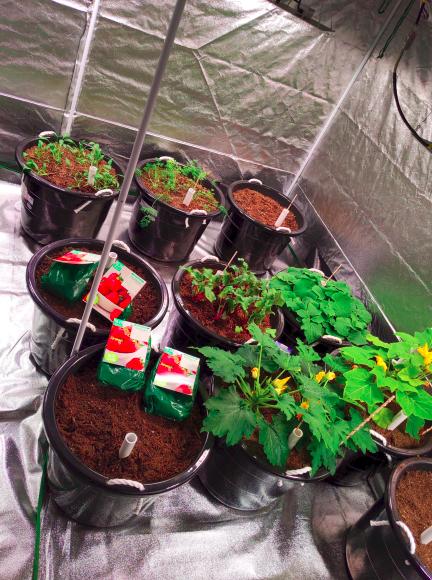
Large Beef Steak tomato, spinach, cucumbers, yellow onions and green onion seeds are planted for germination in new grow tubs.
With about a month (January) of preparation, germinating seeds, seedlings, manufacturing grow tubs, and moving potting mix took about a month. So this first week in February starts the Vegetation stage.
Water Filtration:
For now I’m monitoring for the need to water. I have to keep seeds in 4 tubs moist for sprouting. I’m hand watering all the small plants until the tubs are filled. I need to change the whole house filters and start the tubs fresh with the cleanest water possible.
You might consider using a small, portable, countertop inline water filtration system if you’re using municipality chlorine/fluoride/Rx/chemical laden tap water.
You could add male and female water hose fittings on the inlet and outlet side of the inline water filter pictured below. So you hook a male end water hose up going into the filter; and another water hose Female fitting for the clean water out side. I’m already considering where I can add a handy water hose-bib in my basement setup.

These are my 3 whole house filters pictured below I just replaced today for the third time since I installed the system. They’re 20″ long and 4.5″ round. The inline filter above is much smaller at 9.75″ x 2.9″.
The Fluoride and heavy metals cartridge is on the left, the center cartridge is a carbon filter to remove chlorine and hundreds of other chemicals, the right filter is for Lead and other heavy metals, Rx, chemicals. The center cartridge catches most contaminants and I should replace it twice as often as the Lead and Fluoride. They’re about $200 to $300 a year to replace all three. The fluoride filter is $110 by itself. The last time I shopped around and bought different brands at a discount.
See: https://www.ezekieldiet.com/488-whole-house-fluoride-chlorine-lead-contaminant-filter-from-lowes-or-home-depot/ for more information on a whole house water filter.

Update February 8, 2023
 To start these tubs I’m using a 5-1-1 fish crap emulsion called Alaskan Fish Plant Food sold at Walmart and Home Depot. I’ve used it for years and know it’s “good chit”. : ) It smells terrible but everything you put it one grows out-of-control. Wear gloves as the smell doesn’t wash off easily. You’ll smell it for hours.
I added a teaspoon per gallon. Seems odd to add fish crap to purified filtered water. I’m starting with this because of the high nitrogen number to start, 5. Later in bloom stage I’ll use a bloom fertilizer high in the 2nd and 3rd number.
I filled all the grow tubs with fertilized water last night. Each tub took 4 gallons of water. For the first 3 tubs I filled a 1 gallon pitcher and added fertilizer and poured into each tub watering pipe which was way too tedious. Balancing and pouring gallons of water from a pitcher into a 1 inch pipe was way too time consuming.
By the 4th grow tub I was pouring 1.5 tablespoons of fish crap down the watering pipe and using the water hose to fill each tub while sitting on a stool. This method only takes a few minutes per grow tub. The first 3 tubs did indicate to me that the reservoir holds more water than I thought, 4 gallons of fertilized water instead of two.
I checked them today probably 20 hours later and every grow tub had wicked 1 inch of water into the soil.
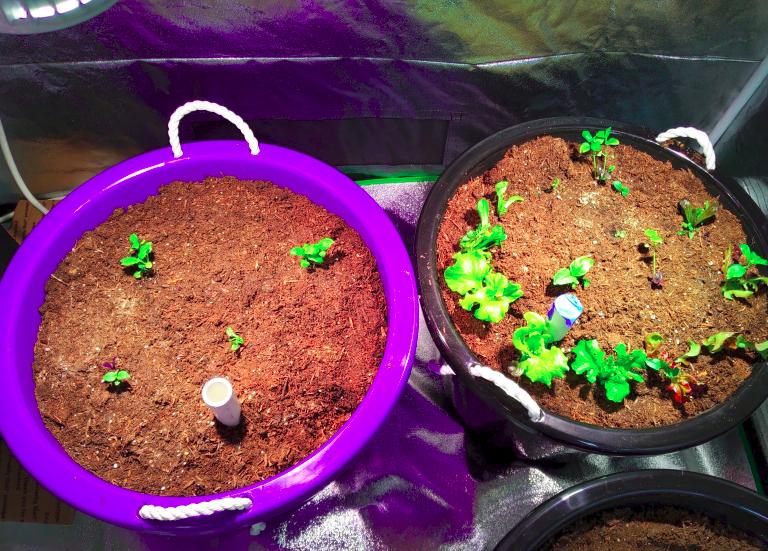
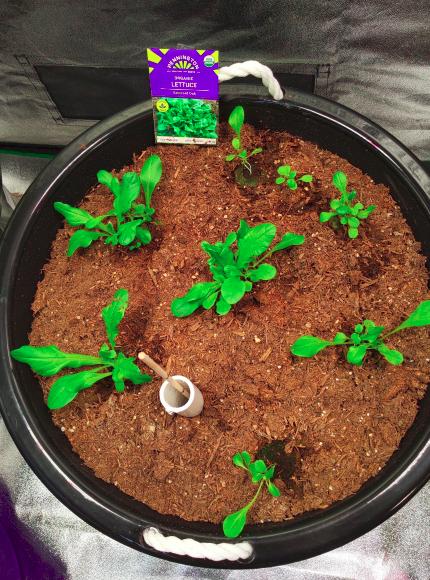
Here are some pictures. This first tub on the right is large heads of lettuce, 6 around the perimeter and 1 in the center (from Leon). The small organic lettuce in center tub doing well, and the basil plants in the left tub.
Below are spinach seeds planted in the left tub, only one plant is peeking through. The center tub is carrots that were germinated and grown then transplanted to the tub. The far right is yellow onions.
Below pictured are cucumbers just sprouting through the soil. I have no idea if this tub can handle this many plants. Row spacing was 4 inches so I tried to keep that spacing when planting the seeds. Notice the water level sticks indicating this tub has 3 inches of water in the bottom, or 4 gallons. Pull the float stick out to fill with a hose so you don’t beat that float up with water pressure. I used a spray nozzle using a jet stream.
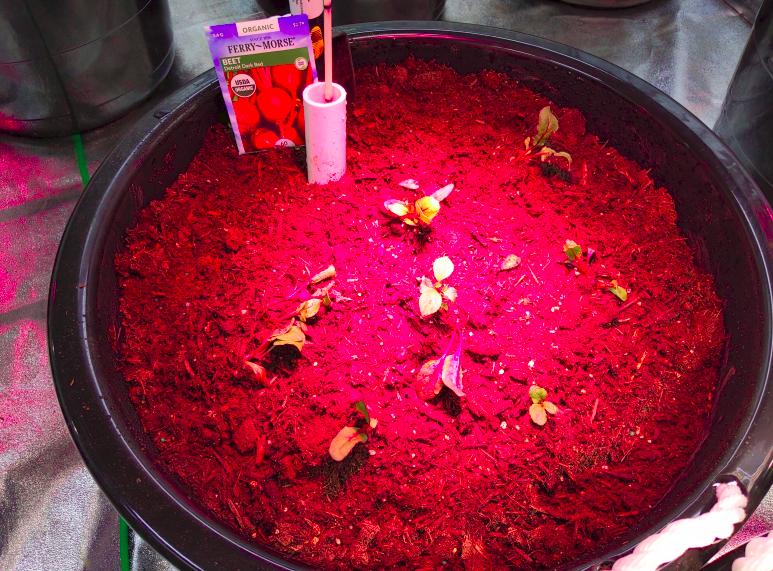
Below pictured are the beets. I germinated these from seed, planted in dixie cup sized containers and transplanted them last night.
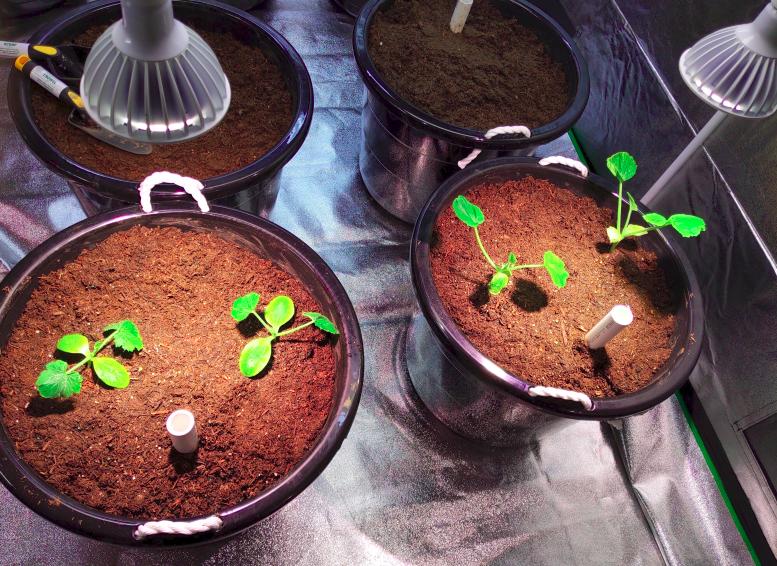
Below is the green zucchini. Again I have no idea how many plants I can put in a tub. I’m trying 2.

Below is the yellow squash which just shot up as a seedling and is larger than any other plant.
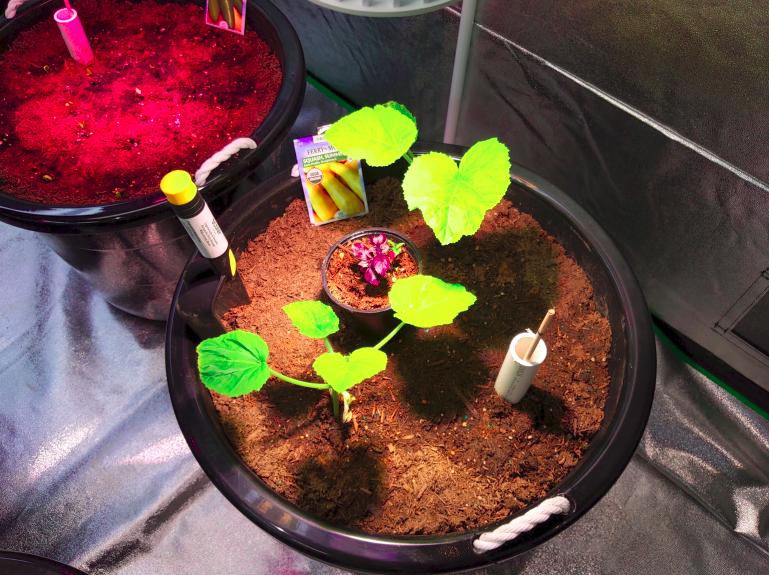
Below are 9 beefsteak tomatoes, 6 seed plugs and 3 containers. which were the last to plant as seeds. In hindsight I should have germinated two 35 spot seed trays with dome, instead of just 1. If you’re ever growing for emergency food I would use at least 2 and maybe 3 starter trays and get everything growing at the same time. Or plant all the tubs at the same time. Those are 5 extra cherry tomato plants looking for a home. We gave away extra yellow squash and zucchini already. That small sprouted plant next to the Dixie cup stack is a mystery plant, it may be lettuce. It took the longest to germinate than all the other seeds.
$35 100W LED Grow Light using Samsung LM301B diodes w Dimmer, Aluminum Driver
I spent a lot of time yesterday researching LED grow lights and eventually ended up at Alibaba.com where I discovered the LED aluminum plate with diodes only costs $12 wholesale. Some LED grow lights, like described on this blog post, can be purchased wholesale as low as 1 at a time for $18. Shipping from China doubles the price. Order a dozen and shipping becomes reasonable. Many US brands simply buy the Chinese components and manufacture them in the US. From what I can tell a $50 to $150 100 watt LED grow light using Samsung LM301B or H light diodes with the power cord and driver has a cost of less than $20. Packing and accessories may add $5. Another $5 bumps you to better electrical parts. Regardless of the name brand and huge price all LED Grow Lights are cheap to manufacture. Several times yesterday I seriously stopped and considered becoming a LED Grow Light retailer.
I just bought this Samsung LM301B HooYan brand new in the box for $35. There are deals out there if you can find them.

I believe one of these grow lights can cover 4 tubs in vegetation stage. Probably not optimal in bloom stage though.
This replaced the 4 bulb 4 ft fluorescent light and 4 – 34 watt grow bulbs. I’m not sure of the wattage for the 4 fluorescent bulbs. But I believe this light is half half the wattage used before.
I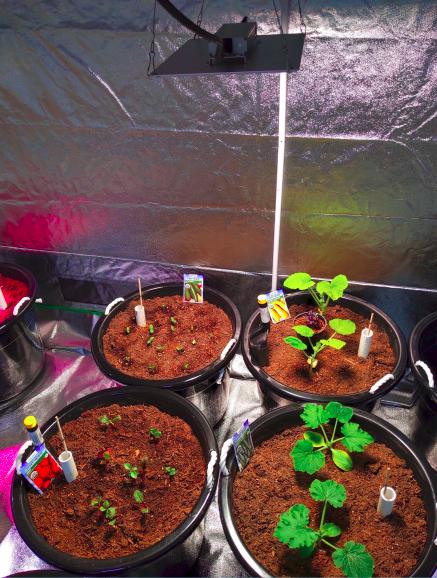 \
\
Sturdy aluminum housed driver.
Update February 10, 2023
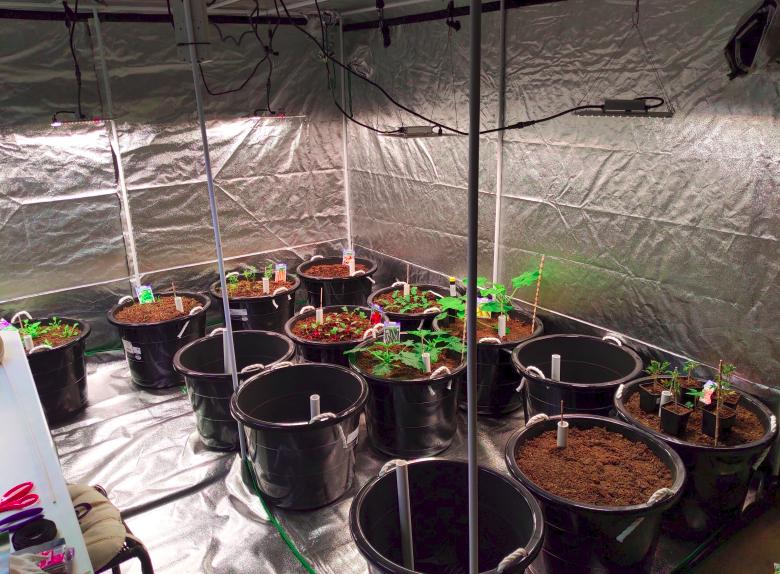
I purchased 4 more 17 gallon tubs to maximize the amount of tubs that will fit the 10 X 10 grow tent. I want to try my hand at growing sweet potatoes and strawberries in the self-wicking grow tubs. This gives me 16 total tubs.
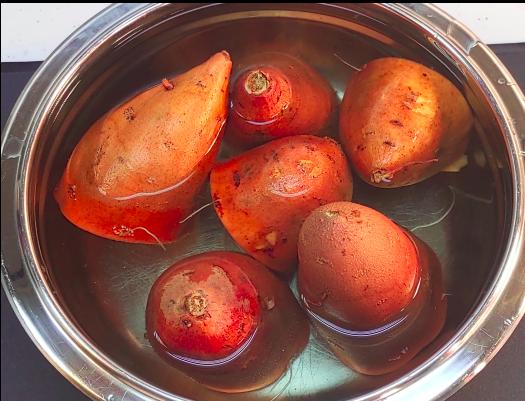
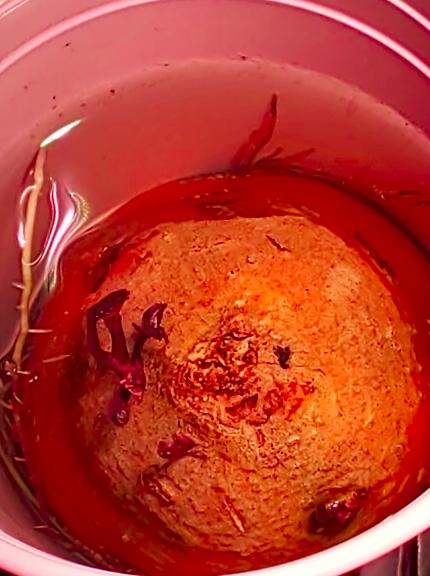
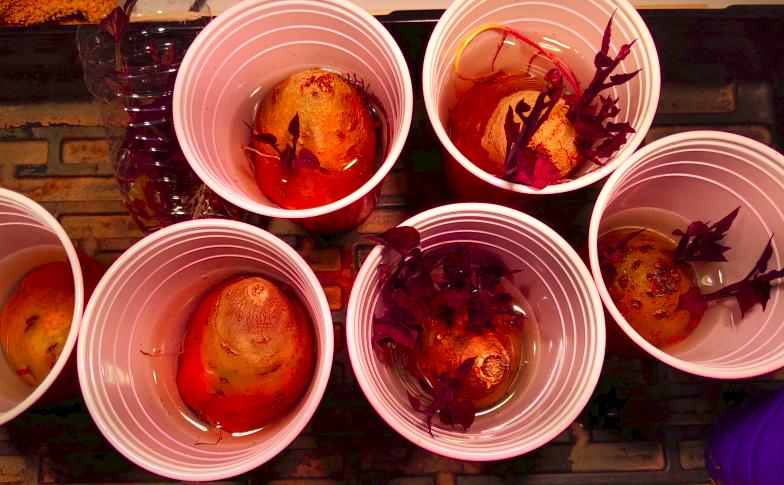
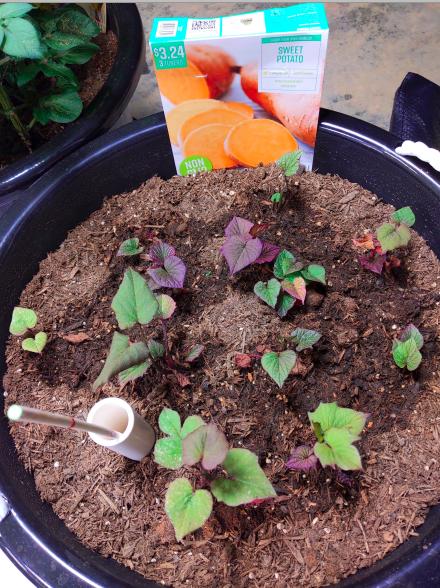
I went online to check into buying sweet potato shoots, however they don’t ship until the outdoor grow window begins in March and April. Rather than wait I decided to go ahead and try to grow my own shoots. They cost $24 for 6 shoots online. I hope to get at least 6 shoots off each sweet potato half pictured below.
Again, in hindsight this should have been set up 6 weeks ago. It will take a month to get shoots from these potatoes. I’ll probably plant the shoots right into two tubs designated for sweet potatoes. I understand the leaves are packed with nutrition, edible and delicious as salad; we’ll see.
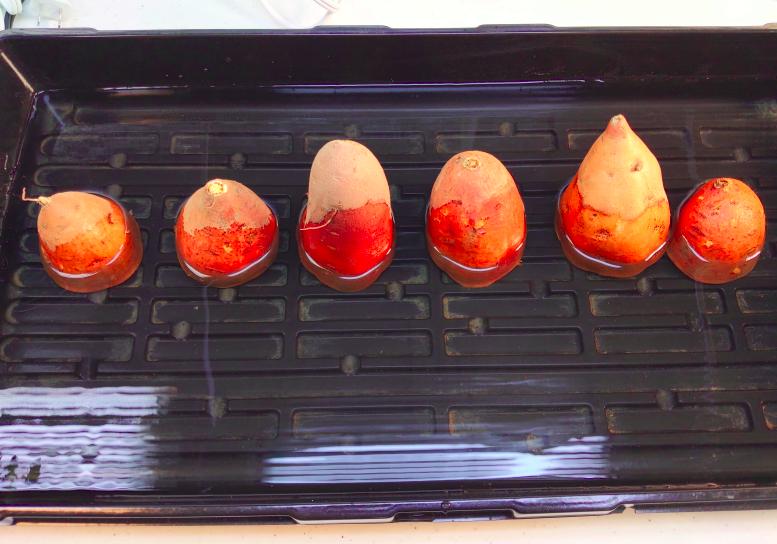
These are organic sweet potatoes from Whole Foods. I’m assuming they haven’t been sprayed with the chemical that keeps them from sprouting. Under close examination one of the above sweet potatoes had a shoot starting already so I thought I would try them.
Instructions said to cut them in half and place cut side down in water in a warm place. Sweet potatoes came from tropical areas and like heat. I have a seed mat heater under the water tray they’re sitting in which will keep that water a little warmer.
Everyone should know how to make a few dozen sweet potato shoots for stealth or bag gardening. The leaves are edible, plus you get a harvest of potatoes later.
The temperature in the tent with just 2 100w LED Grow Lights and 2 – 24″ T5 fluorescent light fixtures is 75 degrees F. That’s already 12 degrees difference inside the tent verses outside. Humidity is 68% inside the tent and 48% outside. I’m concerned that 5 more 100w LED Grow Lights could add another 8 to 10 degrees. If this is the case I’ll need to redo ventilation and pull the hot air out into the basement. The electric drivers on the LED lights reach 130 degrees. I’m considering an additional small oscillating fan running at the light level. This should help extend the life of the electric drivers and the LED light diodes.
I thought it was interesting that the heat from the 2 – 100w LED grow lights pulled down the humidity in the tent by 5 to 10%.
Electroculture gardening techniques – how to boost crop growth
I heard this clip on the SGT Report about Electroculture Gardening Techniques and was curious if it could apply to my grow tubs. I found the video on YouTube (below) and have decided to try it. Every water dip stick I made for the grow tubs had a 12 inch piece of 3/16th wood dowel left over. I just need some copper wire to give it a try.
Skip to 34 Minutes to the start of the Electroculture segment in video below.
The first 34 minutes is about his path to health and a lot of new age stuff I don’t agree with. I’m not endorsing anyone or their beliefs. I’m just interested in this Electroculture copper antenna phenomenon.
One comment he made in the video below, that went right over my head then later I found interesting was about the number of birds he said started hanging out around his house after he started using these copper coil antennas. I made several of the copper coils that were just laying on my desk. I witnessed something I’ve never seen before in years at my home. A song bird comes and lands on the railing outside my open front door and just sang and sang and sang. Did it have anything to do with the copper coils? I don’t know, maybe.
From YouTube: Join us for an enlightening journey as we explore the secrets of electroculture and the ancient knowledge of holistic farming techniques. In this episode we discover the hidden technology and DIY solutions that can help boost crop yields and increase your harvest to unimaginable growth, all while reducing your dependency on pesticides. Find out how this approach to urban farming can offer a solution to food shortages and provide fresh, healthy food using everyday technology found right in your home. Get ready to revolutionize the way you grow your food!
Electricity Cost for 7 – 100 watt Grow Lights
Someone asked: what will it cost to run 7 – 100 watt grow lights for 16 hours a day? Off the top of my head I said $20 maybe $30 a month. Then I decided to calculate the exact number.
I went to my electric company’s website and took last month’s total Kilowatt Hours (KWH) used divided into the total bill and came up with a rough rate of about .11 cents per Kilowatt Hour or KWH.
A KWH is 1,000 watts of used electricity. A 100 watt LED Grow Light that is on for 10 hours = 1,000 watts and used 1 KWH, or about .11 cents worth of electricity. Or 100 watts X 10 hours = 1,000 watts or 1 KWH and costs .11 cents.
Here’s the math for 7 lights (without using Smart Usage off peak hour electricity):
100 watt LED Grow Light X 7 = 700 watts per hour X 16 hours = 11,200 watts or 11.2 KWH per day X .11 per KWH = $1.23 per day or $38.13 per month (31 days). This is about what it costs to run a pool pump for 8+ hours a day.
For just one 100 watt Grow Light you’re looking at about .18 cents a day X 31 days = $5.58 a month.
This is the worst case. Earlier I wrote that everyone can cut back on electric usage to accommodate some of this extra consumption. How many old fashioned, power-hog incandescent light bulbs are still in your home? You can run 6 – 60 watt equivalent (using just 10 watt each) LED light bulbs for every old 60 watt incandescent light bulb you get rid of. If you’ve never thought about it, you may be surprised how many old electric hog incandescent light bulbs you can do away with.
Another problem today is all the chandeliers, bathroom lights, ceiling fans and canned lights in most homes. When you flip a light switch you start burning 4 to 12 bulbs for however long they stay on, verses one light.
All power companies have numerous plans to to save you money if you use extra KWH during off-peak hours. Peak hours are 2PM to 7PM from June to September heat months.
I just reviewed one plan that advertised the off-peak rate at just .01 per KWH, however you pay $8.41 per KWH for all electricity used between the peak hours of 2PM and 7PM. Someone devious could probably get over on the power company under that plan. Maybe that’s what they want. Some items can’t be controlled like refrigerators and phantom electricity used by electronics even while off. The AC/Heat can be controlled to some extent. Electric hot water heaters can be set on a timer to go off from 2PM to 7PM. No cooking, washing, drying, or growing from 2 to 7PM.
Another option is to figure out how many solar panels and batteries you need to operate up to 700 watts of LED lights for 16 hours a day using a combination of sun wattage and battery stored wattage until the sun is back over you.
Update February 14, 2023
The grow tent now has 5 – 100w grow lights operating and the inside temperature of the tent is at 76 degrees. Humidity in the 50s.
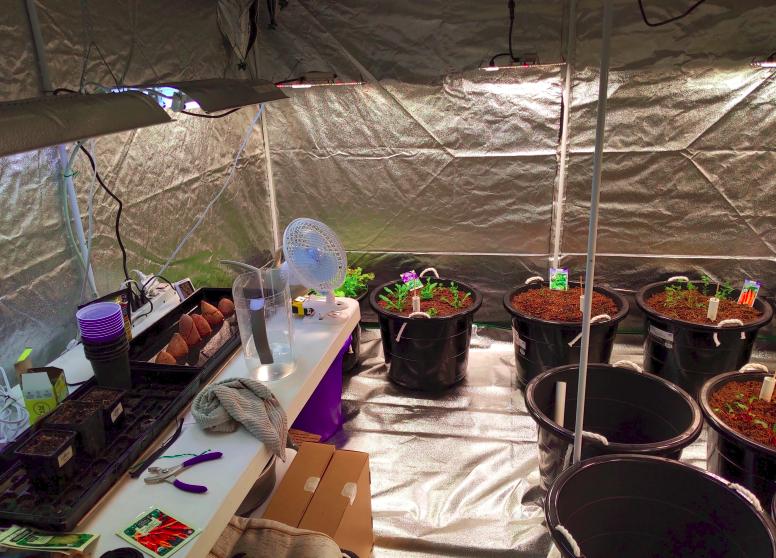
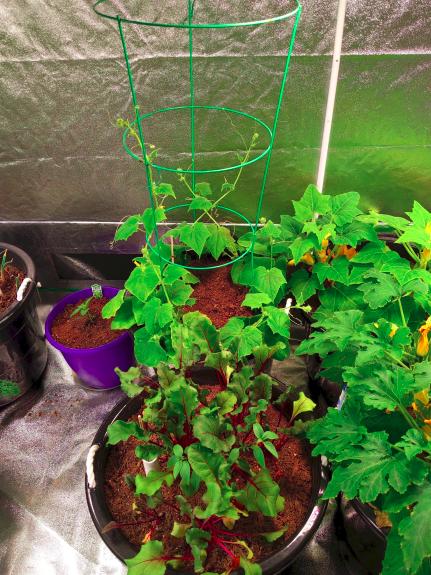
I’ve added 4 additional 17 gallon grow tubs I’m setting up slowly. Two will be strawberries and 2 tubs will be sweet potatoes.
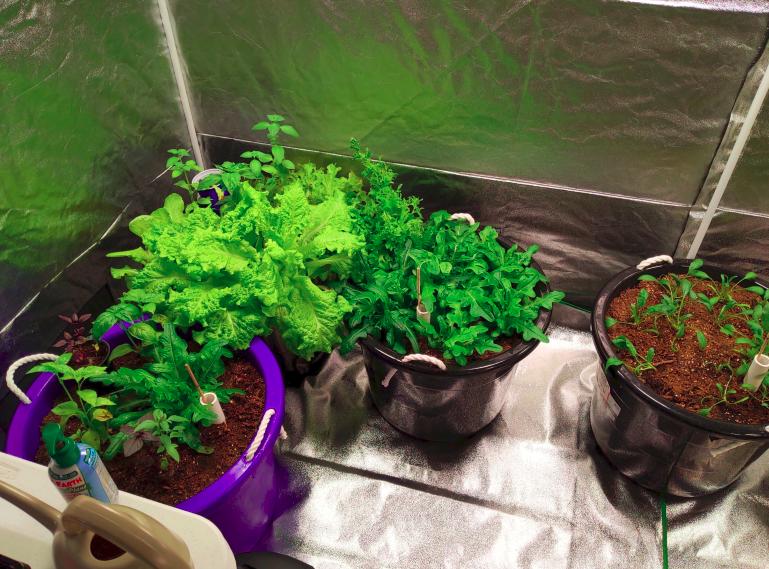
Organic lettuce going strong pictured below.
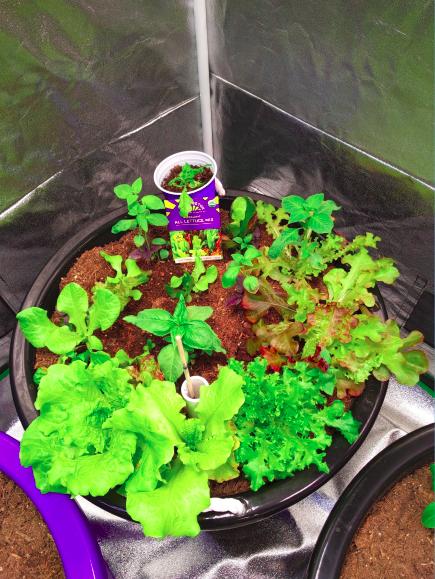
Heads of organic lettuce pictured below.
Zucchini looking healthy pictured below. Notice the copper coil Electroculture antenna. I used 24 inch 1/4 inch dowels and #12 copper wire. Just buy a 25 ft roll of 12/2 w ground electrical wire. That gives you 25 ft of ground already bared. And a black and white plastic coated wire you can strip and use. Each 24 inch antenna will take at least 3 ft of copper wire.

The trick to spinning 12 gauge copper wire around a dowel is to use a pair of pliers to grab the last coil around the dowel with one hand and spin the wire around the dowel with the other hand. Then repeat.. pair of pliers to grab the last coil around the dowel with one hand and spin the wire around the dowel with the other hand. You have to be careful not to crush the 1/4 in dowel with the pliers. To start the wire at the top of the dowel make a curl in the end of the wire and clamp it to one end of the dowel tight without crushing to dowel. Once started, grab last curl with pliers and start wrapping the wire.
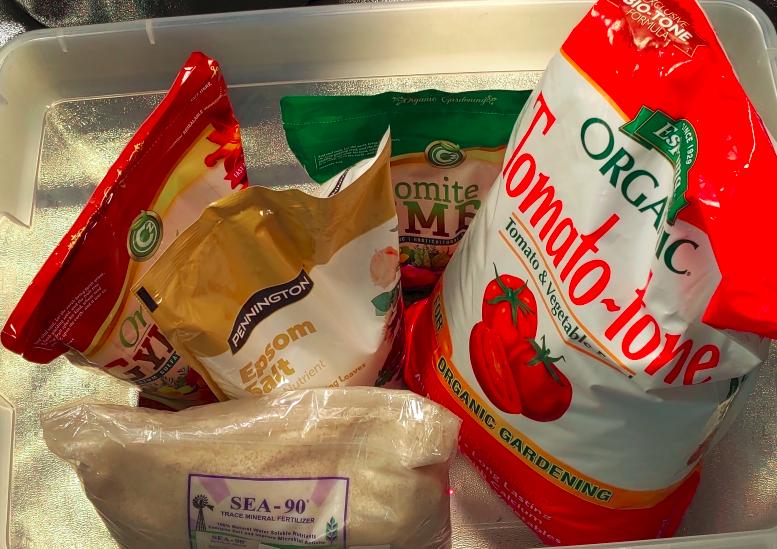
Pictured below is the Gardening with Leon 5 ingredient soil fertilizers for self-wicking grow tubs. With the Epson Salt ($13 Home Depot) I have $120 here in fertilizer. It should last 3 years. The 5 bags fit neatly in a 64 quart plastic tub to store under the table. I’ll pull out a baggy of each and keep the rest sealed in this tub. You want to seal this in a tub because the Tomato-Tone chicken poop smells through the bag.
This is: 18 lbs of Tomato-Tone (1/2 cup tub), 10 lbs Sea-90 Minerals (1/4 cup tub), 5 lbs Gypsum (1/8 cup tub), 5 lb Lime (1/8 cup tub), 5 lb Epsom Salt (1/8 cup tub). All organic.
The 5 Seveka $50 100w Grow Lights using the Samsung LM301B diodes came in and I ordered one off of eBay I found for $36. They get hot like a light bulb. I’m looking for a good oscillating fan to run at the light level to help keep them cooler.

All these LED grow lights come with these adjustable ratchet rope hangers that require either an S hook or I use plastic zip ties to hang from a ceiling tent pole. The adjustable rope hanger lets you adjust the height of your grow light above the plant(s). You’ll want a couple bags of zip ties in different lengths, they come in handy all over the tent.

Update February 15, 2023
I’ve changed the way I’m sprouting the sweet potato shoots. I noticed they were only sprouting roots on parts of the potato under water. This should increase the rooting area and accelerate sprouting. I’ll probably change this again and put each one in a clear plastic cup mostly submerged.
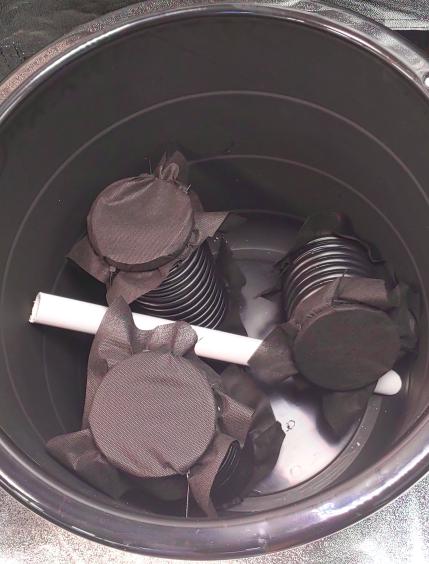
The extra 4 tubs are ready to fill. I covered the drain pipe ends last night with the landscape weed mat material. I used zip ties (2 8″ ties connected) that was easy to position over the ends in a rib and tighten. I also decided to use 3 straight pieces of drain pipe rather than circling the tub in a longer piece. The reason is because curving the pipe around the bottom put a lot of stress on the thin plastic tub sidewalls. The straight cut doesn’t add any stress to the side of the tub.
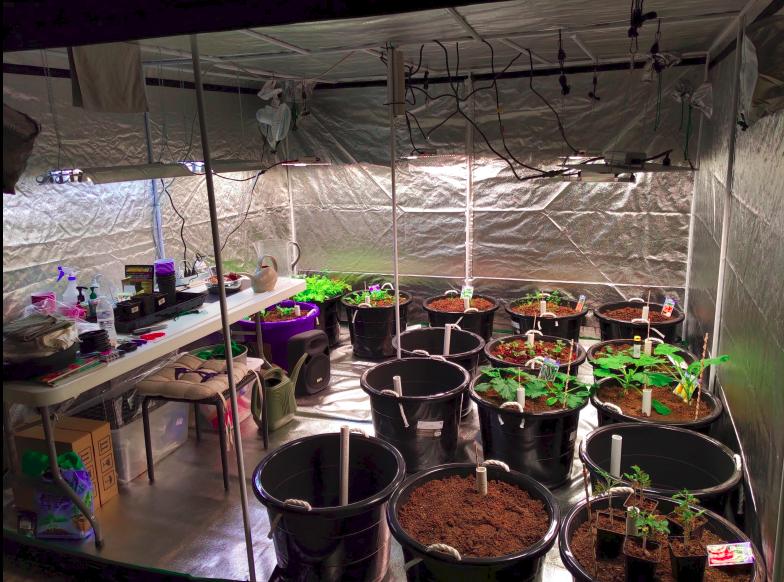
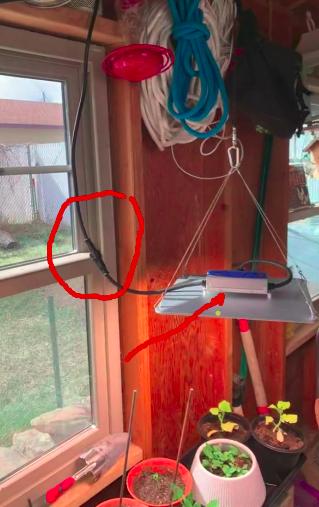
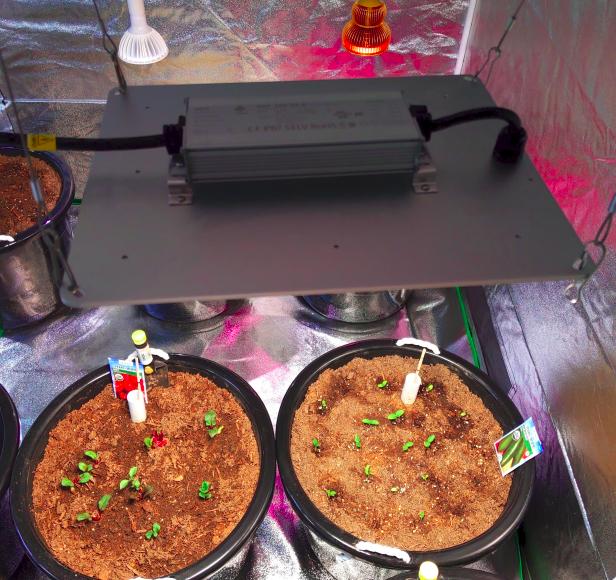
Pictured above is 5 – 100w LED Samsung LM301B Diode Grow lights that are approximately 12″ x 12″ equals 500 watts. There are 2 more Seveka 100w lights under the table in boxes. Over the table is 2 T5 24 inch fluorescent fixtures, 8 bulbs 24 watt each equals another 200 watts. I’ll replace those 8 T5s with two 34 watt LED grow bulbs now that I know they’re pulling 200 watts. Nothing competes with the new LED diode efficiency. See the MP3 garden music speaker to the right of the army green watering tub.
Zip ties come in handy. Moving air over Seveka 100w LED Grow Lights.


Nearly two-thirds of gardeners play music to their plants, research claims
Nearly two thirds of gardeners play music to their plants, according to new research.
Studies have shown that music helps plants to grow, with the vibrations stimulating their growth.
In a survey by music licensing company PPL PRS, which studied 1,000 gardeners, 63 per cent said they played music to their plants.
Like people, plants enjoy listening to music, while different plants prefer different genres.
Classical music is most effective on the growth of roses, while chrysanthemums thrive after just 30 minutes of play.
PPL PRS’s gardening expert Michael Perry (AKA “Mr Plant Geek”) said: “Using sound to stimulate growth is an entirely natural phenomenon.
“To that end – and as strange as it might seem – research suggests that plants enjoy music. With houseplants, a good beat can mimic the natural vibrations they would experience outside.”
According to Perry, jazz and classical music are the best genres for plant growth stimulation, so he advises plant owners to try pivoting to those genres.
Read more: https://lseband.org/nearly-two-thirds-of-gardeners-play-music-to-their-plants-research-claims/
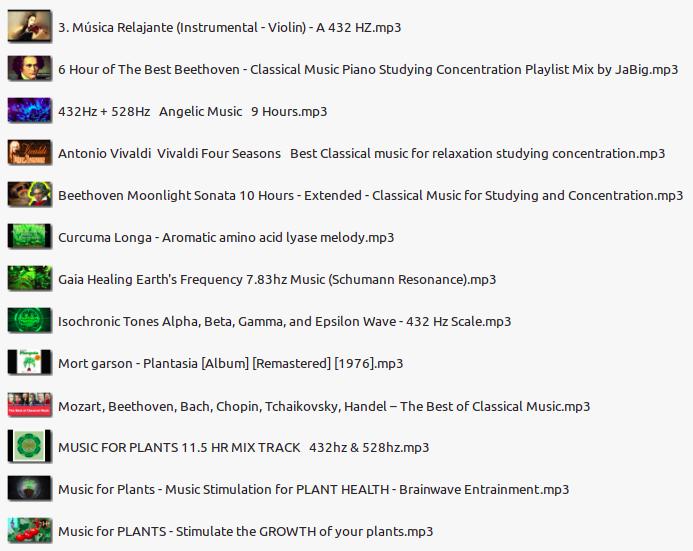
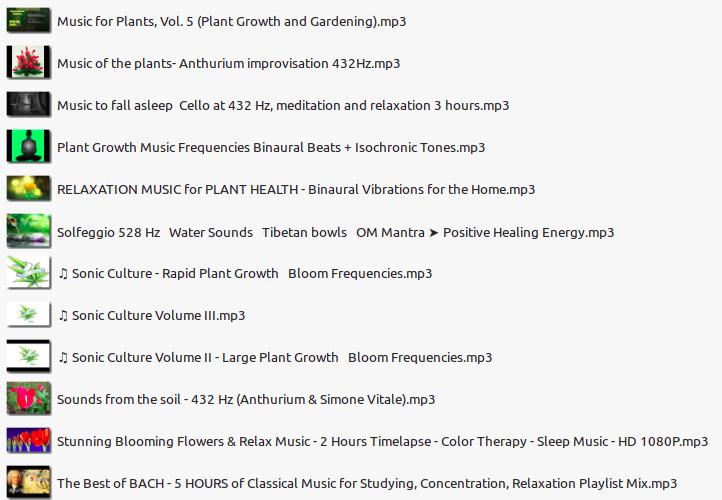
Here’s what my garden is listening to:
All of these MP3s came from YouTube videos by the same title. I simply recorded them to a USB drive and plug it into an MP3 player.
How Many Watts Can I Run on a 15 AMP Breaker?
Electricians will normally install a 15 AMP Breaker for a dozen lights and minimal receptacles in an unfinished basement. I’ve replaced the hodgepodge of old energy hog incandescent bulbs in the basement lighting to 8 – 10 watt LED bulbs, plus 2 garage LED lights at 60 watts each. When the basement lights are on I’m only pulling 200 watts to light the whole basement. I could cut that in half by getting rid of the 2 – 60 watt garage 3 wing LED lights and replace them with 10 watt daylight LED bulbs.
It appears as though I need to keep electric usage below approximately 1,500 watts of electricity on a 15 amp breaker. Right now I’m well within that range.
Many bedrooms will have a 20 AMP breaker. At some point I may need to consider a separate 20 AMP breaker just for the grow room.
Current wattage used:
650 watts Grow Tent 568 watts lights, fan and music
200 watts basement lights
850 total watts
My only issue is a 3HP treadmill that’s probably maxing the 15 amp breaker. I either need a separate breaker for the treadmill, or ideally the treadmill should only be used when the grow lights are off. I need to get my Kill-a-Watt gauge and find out exactly what that treadmill is pulling.
I discovered the treadmill is pulling 300 to 350 watts at 3 MPH walking. So at 850 + 350 watts = 1,200 watts total – I’m close to maxing out the 15 amp breaker. I need to find an electrician and eventually run a separate 20 amp breaker just for the grow tent.
Understanding Grow Light Terminology: PAR PPFD PPF PBAR Spectrum Wattage
LED Grow Light PAR and PPFD maps and ratings can be confusing without a couple key basics to remember.
Here’s the basic rule of thumb regarding plant lighting needs:
Seedlings need PAR under 300 (24+ inches above plants)
Vegetation needs PAR from 300 to 600 (18 inches above plants)
Flowering needs PAR from 600 to 900 (12 inches above plants)
Either the light will need to be dimmed or spaced up or down over the plant at the right height to achieve the correct PAR PPFD rating. You use the PAR PPFD maps shown below to estimate distance of light from plant and PAR ratings.
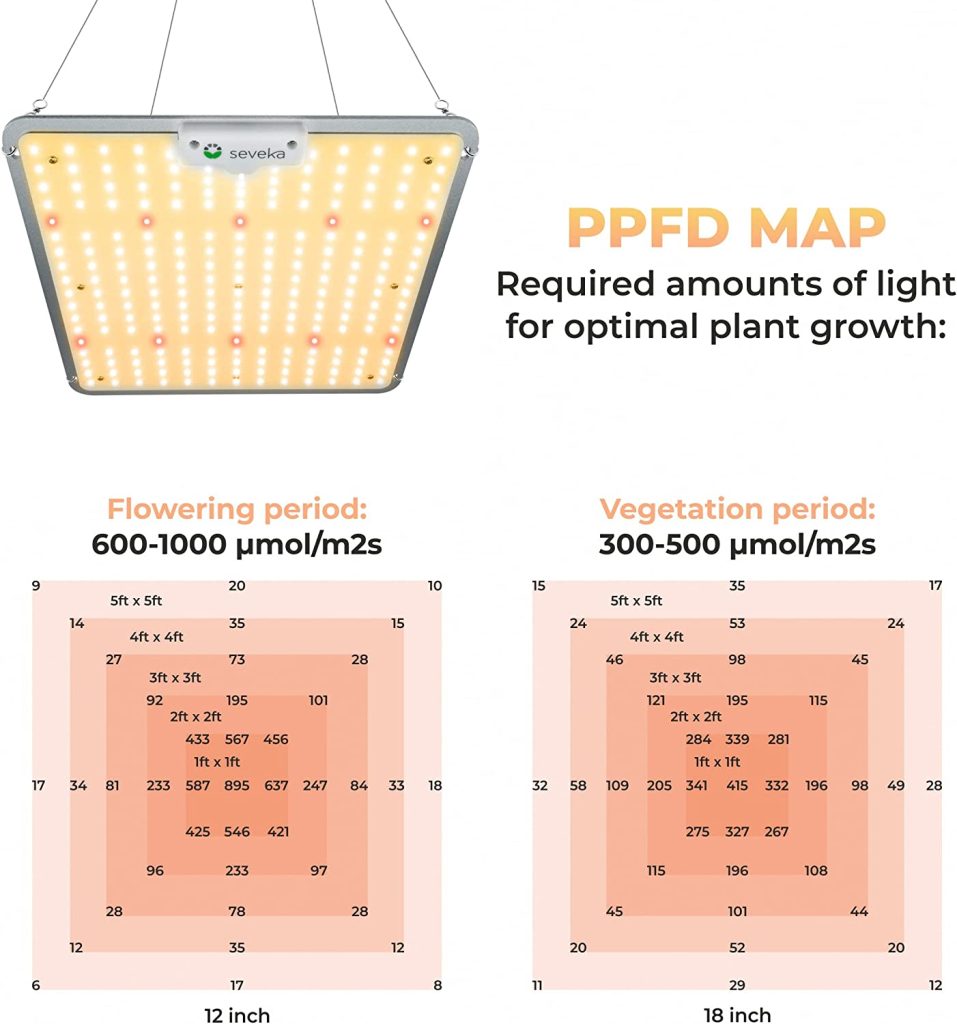
None of this made complete sense to me until I heard someone explain PPFD ratings for the actual sun. It was explained that in nature the sun reflects PPFD in the 400 range in the morning as the sun is approaching, increasing to 2,000 in the afternoon when the sun is overhead and then back down to 500 PPFD as the sun moves out of range.
Flu Update February 25, 2023
I haven’t lost interest in this project. I picked up a flu virus a week ago that’s slowing me down. I’m taking everything in my flu protocol so it’s just a matter of time to work it out of my system. I would appreciate your prayers for a speedy recovery.
Update February 28, 2023 Pictures
The self watering tubs have done well while I was sick with the flu. I monitored them once and watered small plants. But it was a low maintenance week.
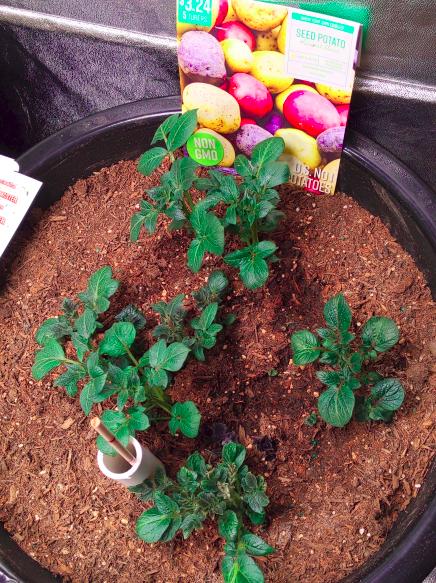
I filled the 4 new tubs today with potting mix. I just need to finish the water level stick floats and fill with water. I picked up strawberries, 2 different brands of potatoes plus sweet potato. This just leaves one tub for a tomato plant I guess I’ll buy from Home Depot.
2 tubs above will be strawberries.
Lettuce is doing very well and needs to be cut and used. That’s spinach in the right tub. I sprouted the spinach in the tub. I could have planted 4 times this much. In fact most of this lettuce doesn’t need air rights and could be grown on a shelf and stack several layers of lettuce, spinach, grasses, herbs and greens. I can imagine two 4 foot wide X 6 foot tall chrome wire shelves in this corner using T5 fluorescent bulbs.
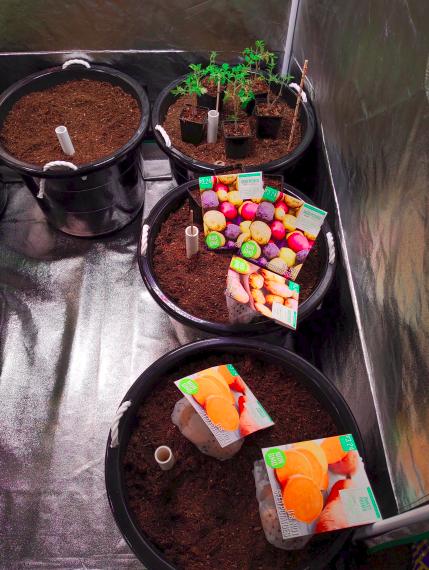
I’ll add a beefsteak large tomato on the back left tub I just filled. The 2 new tubs in the foreground will be 4 different types of potatoes.
We plan to use those leaves for a stir fry wrap meal.
Green zucchini.

Green zucchini and yellow squash.
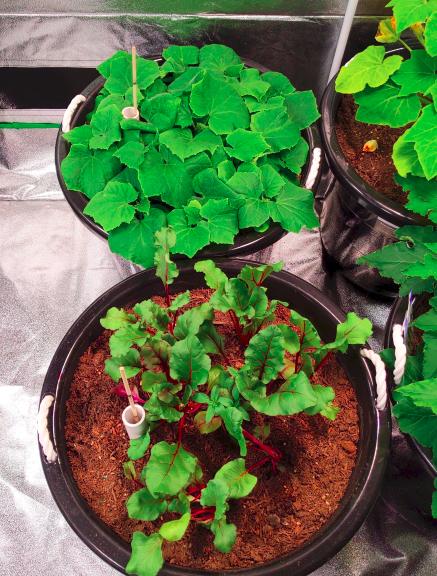
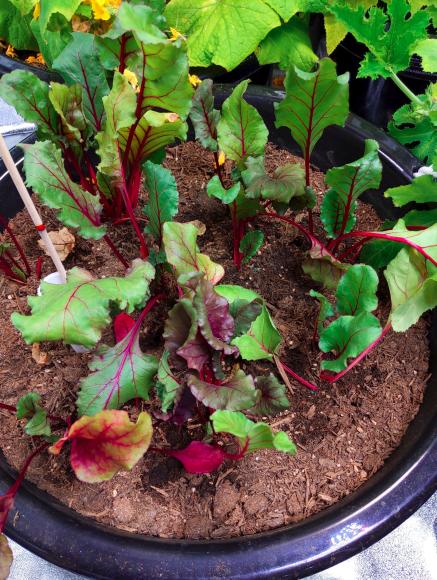
Beets and cucumbers. I should have planted twice this many beets. I need to thin the cucumbers. Live and learn.
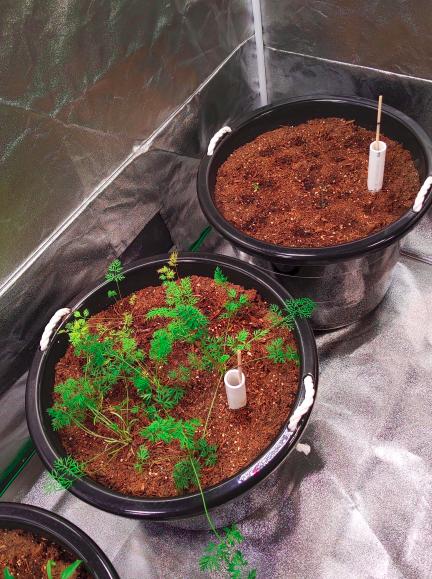
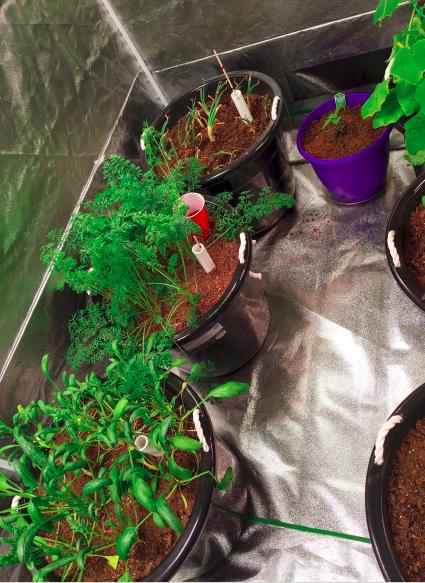
Carrots doing well. I should have planted 3 times this many. The sweet onions in the back tub still haven’t sprouted.
The sweet potatoes are sprouting.
Walmart 10 ft X 10 ft X 80″ Grow Tent for $343
Walmart has a good price on a 10 x 10 grow tent. I like this design because the whole front wall can unzip open, plus you have the smaller doorways that can be easily unzipped (for most ingress and egress) without bending all the way to the floor to unzip it across the bottom. This one is very similar to mine.
You need a closed environment to keep bugs out, humidity in, light in, dirt contained, water spills contained, and give you a framework to hang lights, fans, power strips, etc.

GrowAce.com also has their 10 x 10 Grow Tent on sale for $387 ($43 Off). https://growace.com/products/yield-lab-120-x-120-x-80-reflective-grow-tent
Self-Wicking Grow Tub With Water Level Float Stick
This is where I got the idea for my Water Level Float Stick concept. Mine is just a variation of this one.
Be The Bee – Hand-Pollinating Indoor Plants
First, put your John Belushi bee costume on (SNL circa 1975-76). Don’t forget the bee antenna, this is a very important step. You must wear the bee antenna to be successful. This is where all the pollen-mojo-magic happens.

Now you’re ready to be the bee:

Off Grid Garden Tower
Downspout Hydroponics
Update March 9, 2023 – First Harvest
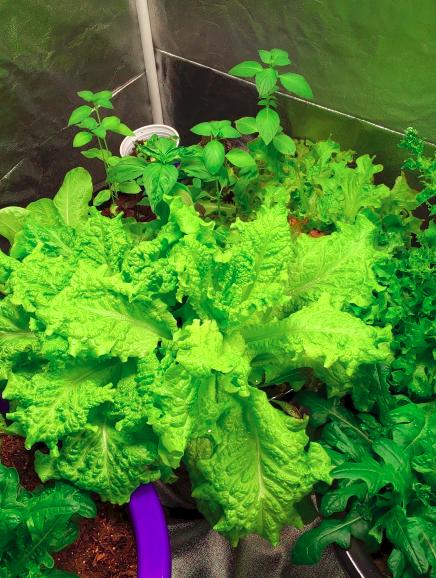
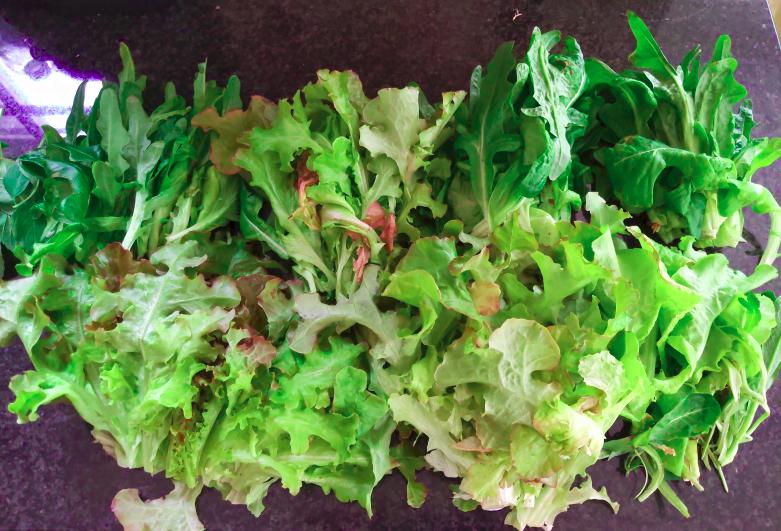
The organic lettuce was the fastest growing plant. This was started from tiny seeds maybe 8 weeks ago. We’ve harvested probably 5 stalks this size.

This is the first documented meal using the organic lettuce. The tomatoes and cucumbers will also eventually come from the garden as well. It was tastier than other lettuce. The occasional basil leaf was very strong with taste.

Update Photos March 16, 2023
Just a little done here and a little more done there adds up over several weeks.
Below: The sweet potatoes were put in water on February 10, so this is 5 weeks of growth. I think a 6 pk f 12 inch sweet potato shoots was $24 online. I’ve already twisted 4 shoots off that were about 4 inches. 2 of the 3 potatoes sprouted. Once I twist a shoot off I put it in a plastic water bottle cut in half with water. I cover the bottom third of the shoot in water so they can start rooting. Once they’re 12 inches tall with roots they’re ready to plant. I have more than enough shoots started to fill a 17 gallon tub.
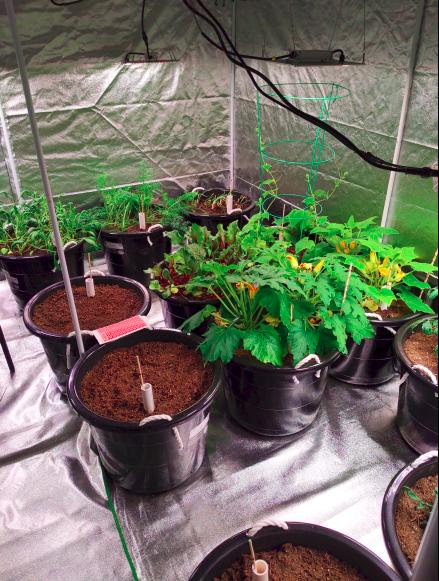
Below: Just about everything in this picture was started from seed in January. I went from 12 tubs to 16 tubs which slowed the project. The two tubs with no plants below are strawberry seedlings I bought at Walmart. In the back corner is a large round Sweet Onion sprout packet about 16 sprouts I got from Home Depot.
Below: I picked up these potato sprout kits at Walmart that already had shoots growing off the small potatoes. They were planted 3 inches down.
Below: This is the basil and lettuce gone wild. We’re clipping and eating from the 4 salad tubs daily.
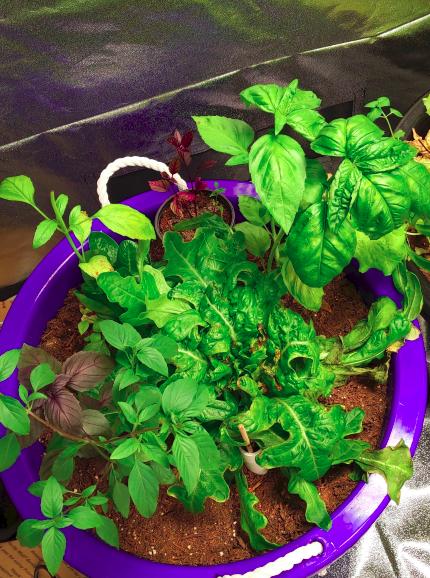
Below: Again all this was started from seed in January. You can see where we’ve cut several stalks of organic lettuce. The good thing is just clipping what you need today. A little lettuce, basil, spinach.
Below: More organic lettuce we need to get busy and eat. All the lettuce tubs are wicking water quicker than most other tubs.

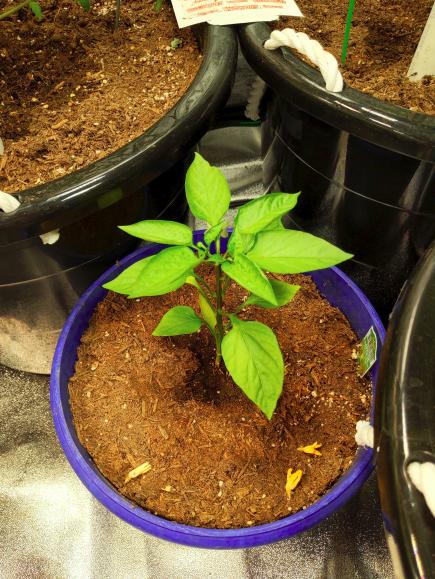
Below: Bottom left is spinach doing well. Needs to be eaten. The carrots are also sucking water fast. Notice the water stick sitting on empty. The back corner is a the round Georgia Sweet Onion sprout pack from Home Depot for $5.48. That blue 3 gallon planter is a green pepper I got for $5.48 at Home Depot.
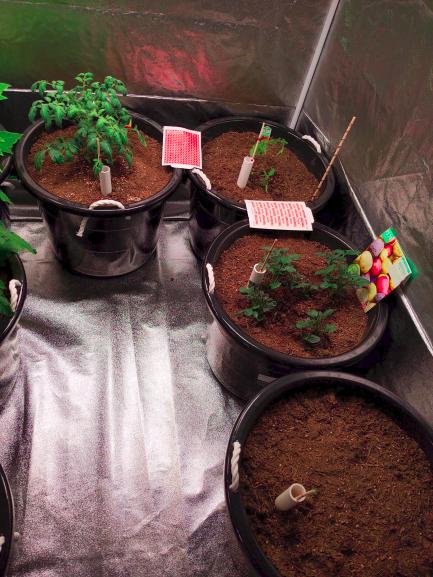
Below: Top left is a Hybrid Red Tomato that thrives in containers and only grows 2 ft tall I got from Home Depot for $9.48. To the right is a Sweet Cherry Tomato I got from Home Depot $5.48. I had to replace the cherry tomato plant I started from seed. It never thrived so I replaced it. We still have 6 or 7 cherry tomato plants to give away. The right center is the small potatoes. The empty tub bottom right is for the sweet potato shoots once they get 12 inches long with roots. I snap a sweet potato shoot off at 4 inches and put the stem in a water bottle to start rooting. Notice the red and white bug sticky traps. They’re there to catch gnats that come in with the dirt. I put 4 sticky sheets in the tent and they were all gone in 3 days.
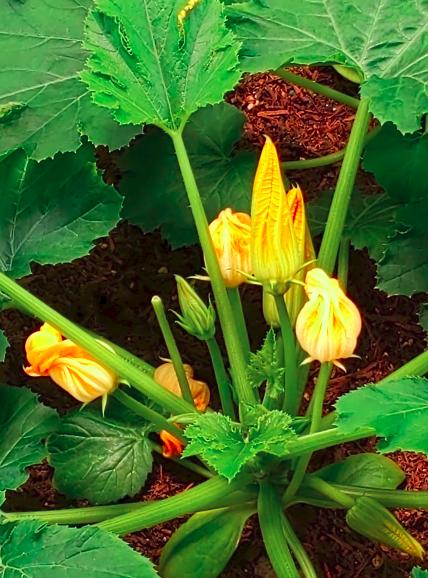
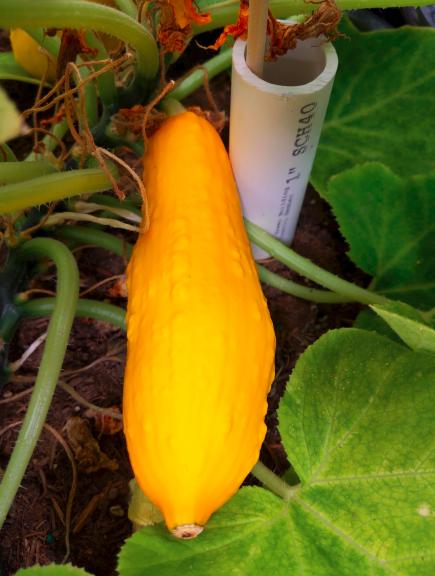
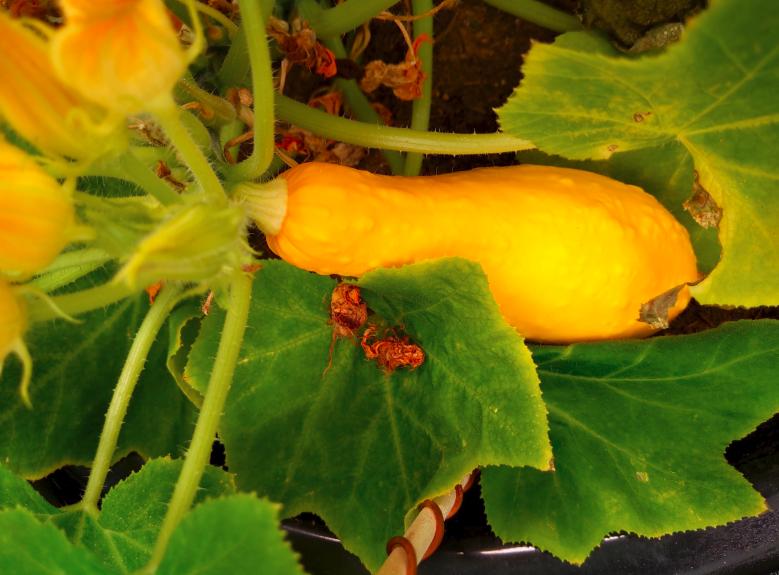
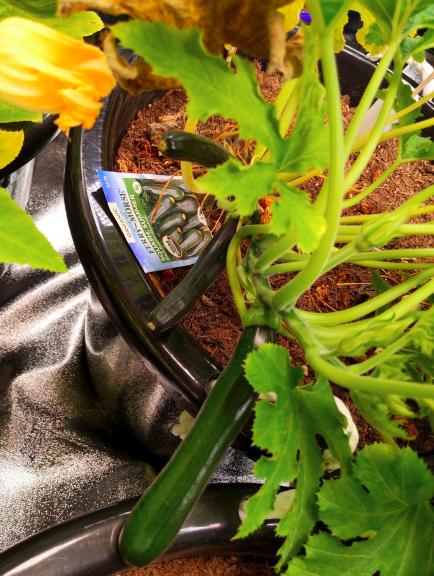
Below: This is the green zucchini in the back. And the Yellow Squash in front. We’ve lost a dozen cigar sized squash and zucchini that didn’t get pollinated in time. I now know the female flower with fruit opens in the morning. I only have a short window of time to be the bee. We’re on top of it now.
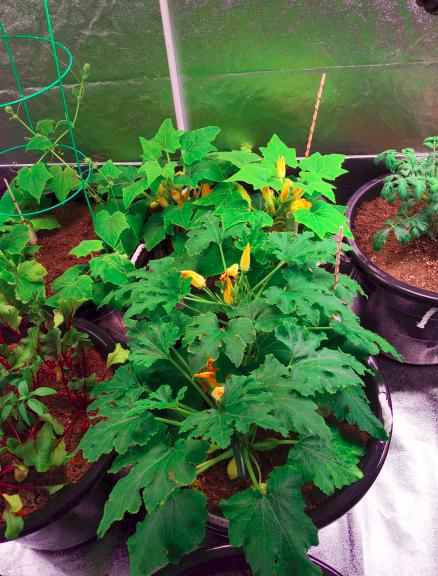
Below: In the back is the cucumber plants. We weeded a dozen extra cucumber plants out and re-potted to give away. In fact this project has spun off three dozen excess plants that went to other gardens. The beets are growing strong and wicking water now. All this too was from seeds.
Panda Film verses Grow Tent to Save Money
This kung fu Hermit guy in the video below was not my first choice. However he’s the only one who has done a how-to video for the panda film concept that I want to share. Listen at 1.5 to 2 X speed as he could have done this 15 minute video in half the time. Keep skipping ahead to get the idea without watching every minute. There are better videos but they’re all about growing cannabis. So you get kung fu Hermit.
Also never staple within 2 inches of the corner. There’s a metal corner bead on every corner with floated gypsum mud that the staples will break loose.
The idea is to create the best reflectivity and protect the walls.

This Panda Film can also double as blackout curtains over windows if there ever comes a time when you would want to conceal a lit home. This would be a handy item in any pantry storage.
Solitary Backyard Bee Help Wanted
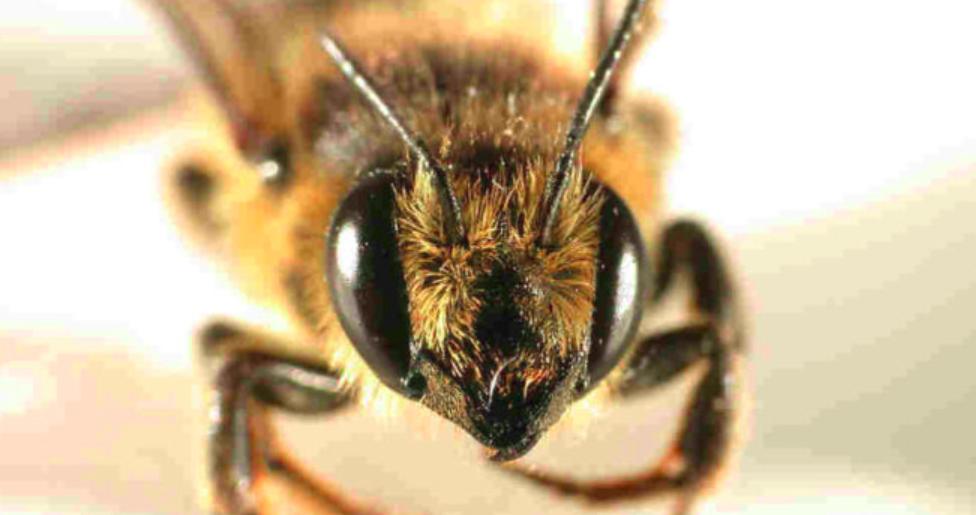
Tell me about your pollinating skills. Where did you go to school? How much pollinating experience do you have?
After some additional research I’ve discovered the cucumbers also need to be hand pollinated. It occurred to me I need to just trap a backyard bee and release it in my grow room.
In my best Klaus Swab (James Bond evil character German accent) I’ll inform the bee you will spend the rest of your life (2 weeks average) in this 15 second garden and you will own nothing and be happy.

Update Photos March 23, 2023
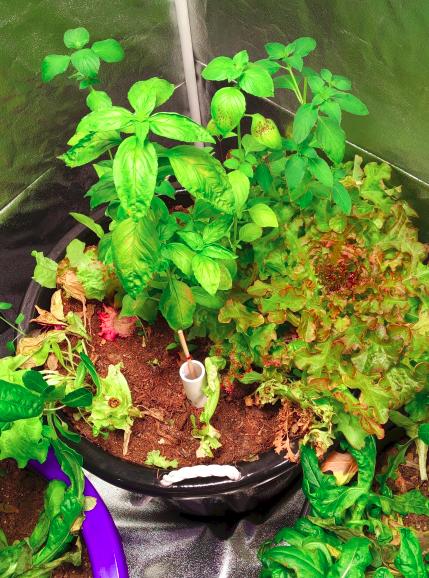
Below: I cleared the 4 salad and spinach tubs and I’m getting them ready to replant. This picture below is about 1 of 6 cuttings this size. Half of it was wasted because we couldn’t eat it fast enough. It’s composting. The lettuce and basil below has been washed and drying to be used in a green smoothie.
Below: I finally started planting the sweet potato shoots that have rooted. I put them in water on February 10, 2023. About 6 weeks to get short rooted shoots. None of the 4 inch shoots I snapped off the potato grew taller once picked. However they all had healthy looking roots so I went ahead and planted them. Once a shoot sprouts from the potato they’ll grow an inch or more a day so it’ll be another week once you have a small shoot. I’ll need to keep an eye on these small plants until they get taller. I have room for a couple more shoots that are rooting now.
Below: The small potatoes are going gangbusters. They like the soil and the light obviously.
Below: This is the Home Depot Hybrid red tomato plant that is good for containers and only grows 2 ft tall. The leaves were curling down meaning the light was too close. I’ve raised the lights another 6 inches and it seems to be doing better.
Below: This is the Home Depot Sweet Cherry Tomato, doing well. I raised the light on it as well.
Wisdom Gained So Far
Hand Pollinating – be prepared for hand pollinating cucumbers, yellow squash and zucchini. Female blooms open in the morning and you have to visit every morning to pollinate with a brush. I easily lost a dozen squash and zucchini that didn’t get pollinated in time. The 4 squash/zucchini plants should have yielded 3 to 4 dozen vegetables. Or a dozen per plant if all were pollinated.
Don’t Play Twister with Hand Pollinating – Tubs with vegetables that need hand pollinating need to be easy to access all the way around the tub so you’re not playing Twister in the garden trying to pollinate flowers.
Easy Grow Tub Plants – I would have to say that carrots, beets, small potatoes, organic salad (multiple tubs) and spinach flourished in this potting mix and LED lighting. The carrots immediately figured out the wicking process and drank the tub dry faster than all other plants. Salad tubs were the second most water users.
More difficult to Grow – Tomatoes, Cucumbers, Yellow Squash and Zucchini create more work due to pollinating. Tomatoes are not so much a pollinating issue, although each bloom needs to be vibrated, but they aren’t thriving in this soil and lighting yet. Onions didn’t start from seed. I had to buy a pack of shoots.
Plan Ahead – I should have already determined what I would plant in the 4 empty salad tubs and had these seeds germinating in grow plugs. I should have started the sweet potato shoots back in January and planted them last month in mid February.
Sweet Potato Shoots – take 6 to 8 weeks to grow shoots 10 to 12 inches on potato and root in water. Once picked form the potato they stop growing in height and grow roots. Let the shoots get 8 to 12 inches on the potato then pick and put in water to root.
Daily Maintenance – You can automate a lot of tub watering using the grow tub with reservoir concept, however my original idea of filling tubs and checking back once a week is not possible. I’m spending 30 minutes a day in the garden with an occasional day skipped. But you have to keep an eye on heat, humidity, starter seeds, shallow rooted plants in tubs, etc.
Update Photos April 7, 2023
I thought I should update the grow tent garden project. I spend about 30 minutes a day maintaining the garden that includes: watering, checking seedlings and shallow rooted plants, checking water for shoots rooting, cleaning, pollinating, planting, adjusting lights, opening vents or door flaps to bring down humidity, etc. and often just taking a few minutes to enjoy the music and just take in this amazing seed, soil, water and light to food process God designed. So far I don’t feel like it’s a chore. I’ve learned a lot in 90 days and I’m confident I can fine tune this process to maximize food production.
Below: The sweet potato shoots are finally planted and growing. It took 2 months to get to this stage. I understand sweet potato leaves are delicious and nutritious. I might need a little more research before I eat sweet potato leaves though. But in a food emergency it might be good to know.
Below: The small potatoes love the potting soil and light and seem healthy.

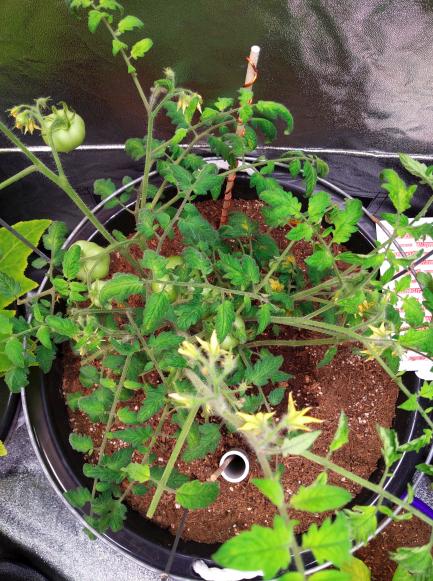
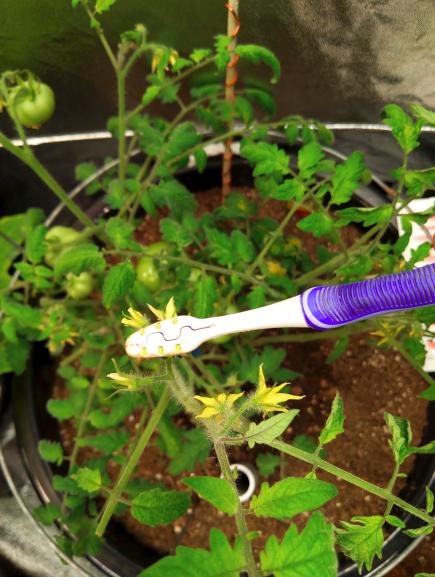
Below: The tomato plant has 6 tomatoes in different stages of growth. The tomato plants haven’t done well under the Seveka 100 watt LED lights. I’ve pulled the light up all the way and they seem to be doing better. I may go back to T5 fluorescent bulbs for tomato plants. Or swap out a light that can be dimmed. (This is a good reason to have a couple LED lights that can be dimmed) I hand pollinate these with a vibrating tooth brush. Just lightly touch a new bloom and see the pollen release and drop from the bloom. That flower is pollinated. This is easy for tomatoes.
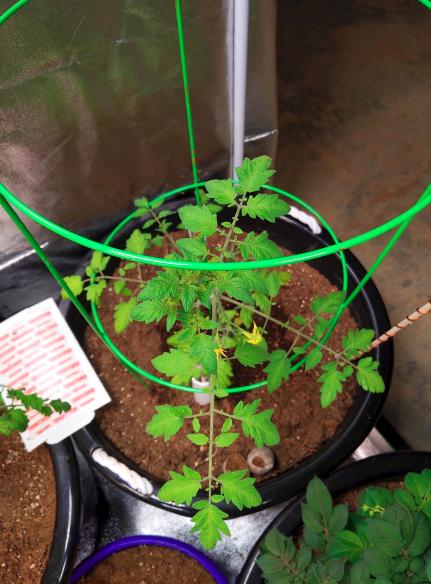
Below: Cherry Tomato plant with 3 or 4 blooms and tomatoes.
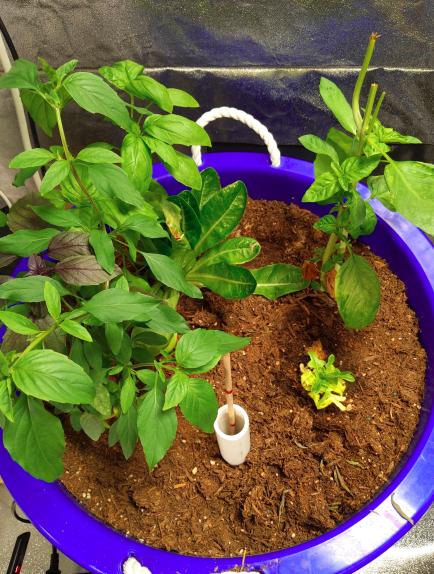
Below: This is the green bell pepper that’s doubled in size in 2 weeks. It’s soaking up excess light. I’m thinking about adding many more small pot plants to use overflow light.
Below: Once I started hand pollinating I have 6 yellow and green squash at different stages of growth. In these 4 plants I would estimate conservatively each tub will generate 12 squash, or 24 from 2 tubs. It could be twice that based on lost squash that didn’t get pollinated.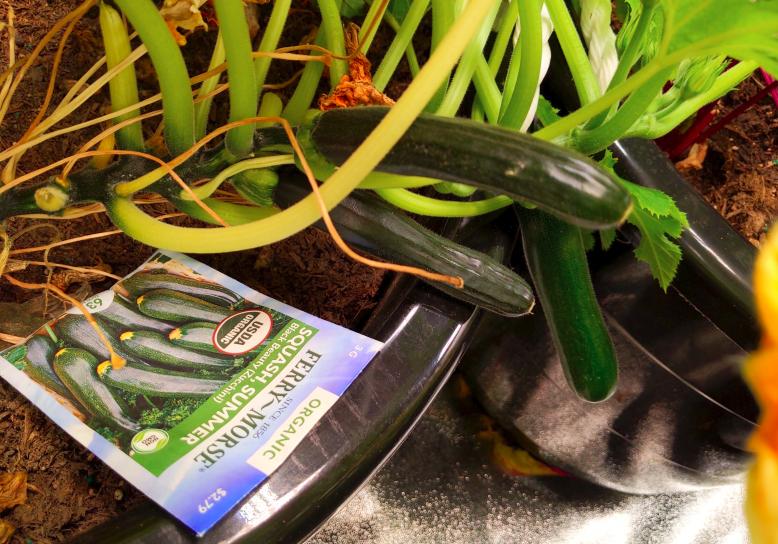

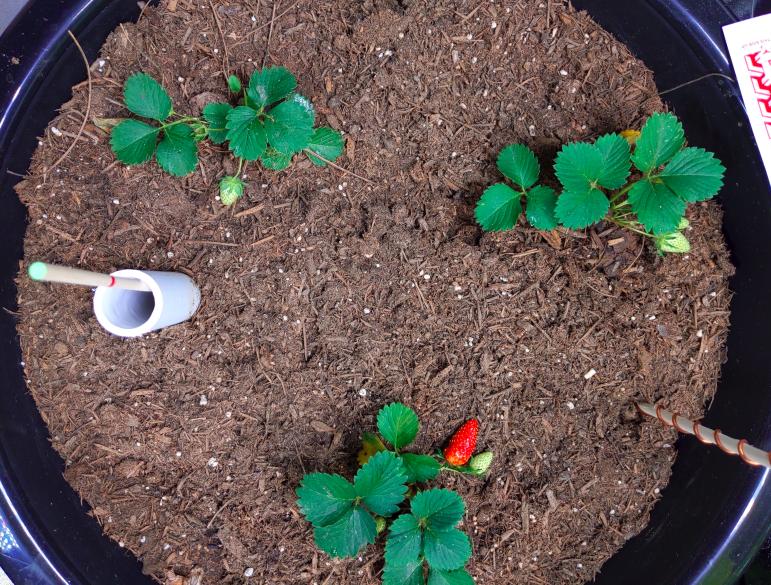
Below: Strawberry plants in 2 tubs, 6 plants. They’re already making strawberries. I have no idea how these 3 plants in each tub will overwhelm the tub. I believe they’ll be flowing over the edge to the floor. That’s the 2nd strawberry in 2 days even at this small size. Notice the copper wire wrapped around the wooden dowel. We’re conducting an experiment with these two tubs of 3 strawberry plants and the copper wire stick. Both tubs have 3 similar strawberry plants, the same potting mix and fertilizer and light. One has the copper wire stick and one doesn’t. So far the copper wire stick tub has produced 2 ripe strawberries and 4 or 5 new strawberries.
Below: I made a mistake when transplanting the beets. I left the cloth wrapper on the starter peat pellets that restricted the beet growth. Each beet was the size of a marble or smaller due to the restriction. Once I discovered the mistake I removed the peat pellets and replanted all the beets. After a week of shock they all came back to what you see below. Always remove cloth wrappers from seed starter pellets before planting.
Peat Pellets wrapped in cloth. Always remove the cloth when transplanting. Some plants can bust out of the restricted cloth. But others will not and be restricted in size and growth.
Below: I’m baffled by the cucumber plant not producing cucumbers. I studiously hand pollinate 4 dozen flowers every day and still no cucumbers. Something is wrong and I haven’t figured it out yet.

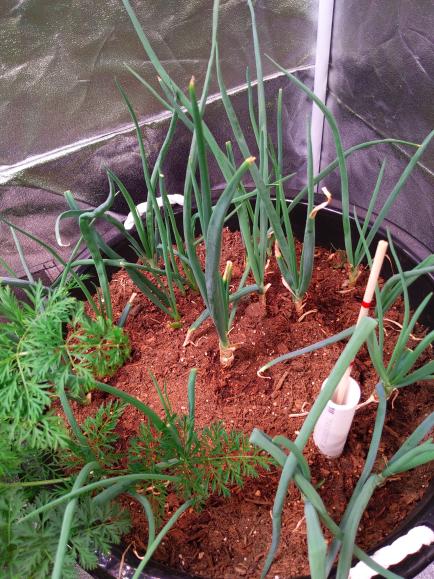
Below: The sweet onions seem to be doing well. This is the $5 packet I got from Home Depot that have tripled in height. I have no idea what’s going on below the soil.
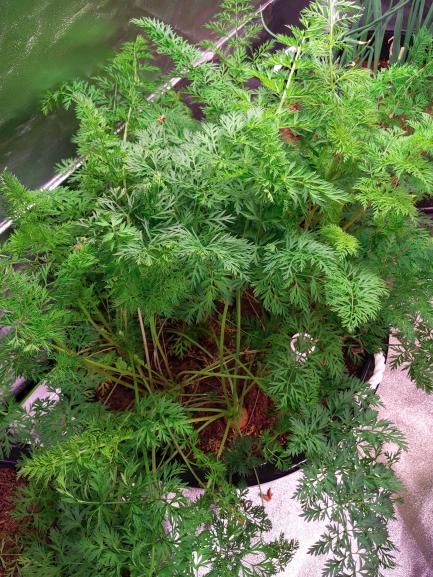
Below: The carrots seem to be the biggest success. But they drink a lot of water.

Below: I use an old vibrating toothbrush to hand pollinate the tomato plants daily. New blooms will release the pollen and you’ll see it fall from the bloom. Just lightly touch each bloom. I just tap the bloom, it doesn’t take much.
Below: The open 4th wall view. Just a few minutes every day becomes an elaborate project in no time.

Below: Different angle on the 3 Green Zucchini that got pollinated correctly.
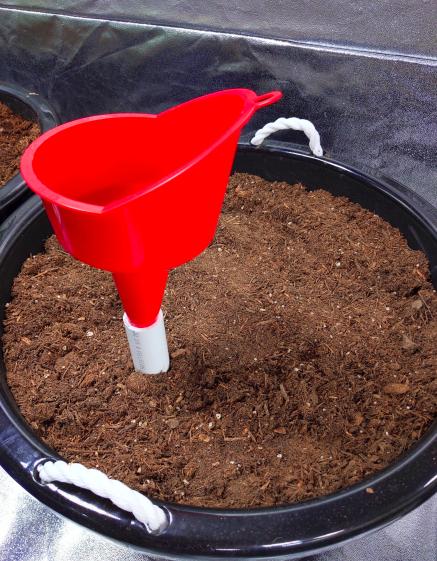
Below: Take a tip from race car pit stop refueling. Pick up a funnel like this one below to make filling the grow tub reservoir much easier and faster. It cuts watering time to just seconds. I think I got this at Walmart. Remember the 1 inch PVC pipe is 1 inch inside diameter so make sure the funnel is close to 1 inch or less. But not too much smaller that say 3/4 inches if you want to guzzle the water down. This one is just a tad smaller than 1 inch and when shoved in it stands by itself. The funnel makes watering much easier. Especially when the plant grows over the water pipe. The funnel helps push limbs and leaves out of the way. It’s very tedious to pour a couple gallons in a 1 inch pipe without a funnel.
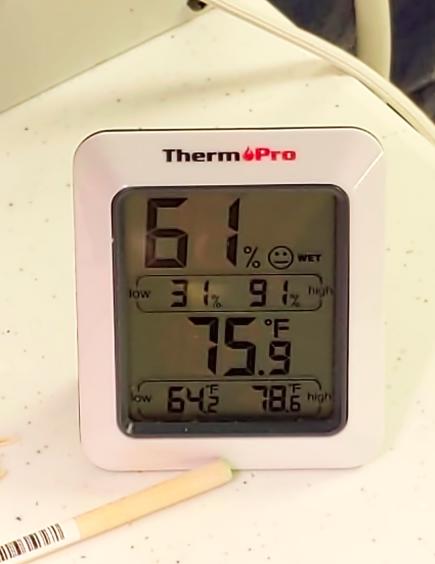
Below: You’ll also need a $10 temperature and humidity gauge. See the High and Low Ranges. This will require monitoring and opening the tent to release humidity and sometimes heat. Eventually I will regulate temperature and humidity with automatic switches that turn exhaust fans on and off.
Below: This is another way to harvest sweet potato shoots. Just designate a few small seed potatoes and put on a window sill or under light until they sprout. Once sprouted and a few inches tall slice the potato leaving a chunk of potato on each sprout. Plant the sprout with sweet potato plug and water until rooted. It’s taken a month to see the sprouts below.

Below: You need a cosmetic or paint brush similar to this for hand pollinating.

Below: The cucumber plant tendrils are amazing to watch over time. They will reach out to other cucumber vines and support each other as they grow taller. They shoot straight out until they find an anchor point. Then wrap 4 times and then it creates these shock absorbing curls to give when needed. Absolutely amazing. It causes me to wonder about the moment in time when God designed this feature into the cucumber plant.

Below: The right half of the grow tent 4th wall unzipped showing the basement it’s in. The basement is actually bright but the intensity of the light in the tent makes it look dark. It’s constantly 65 degrees in the basement and 75+ in the grow tent. I leave the wall open regularly with basement windows open to allow fresh C02 in the room. And to help control heat and humidity. When considering where to put your grow tent position it near a window if you have a daylight wall with windows in your basement. If you choose a windowless room you’ll need to pipe outside air in. Plants need fresh C02 and in pollen season I would assume you can pipe in pollinated air that might help in the pollinating process.

Zucchini plant root bound in a seed starter peat pellet
This is one of the two green zucchini plants I pulled today and found this. It’s been root bound by the peat pellet wrap. Just like the beets. This means the yellow squash was also root bound. Reading the directions is a good idea even if you think you already know everything. Those cloth wraps are enough to drastically reduce root growth.
Picking Seeds for Indoor Grow Tent LED Container Gardening
More wisdom: I don’t believe it’s a good idea to go to Walmart or Home Depot and start buying organic heirloom seeds off the rack. These seed packs are marketed mainly to people using them in outdoor gardens.
I also believe that most “prepper” seed packs and deals are mainly intended for outdoor gardening. Indoor container gardening under LED lights will require specific genetics and characteristics.
I now understand grow room container gardening under LED lights will take a different approach.
As I’m reaching the end of this first grow cycle and considering what to plant next I think it’s very important to spend more time looking into seeds that are known for their ability to grow indoors in container and under LED lights.
Plan: Research heirloom open pollinated seeds that produce plants that are compact, do well in containers and artificial LED lights. Test plant and grow to determine grow-room LED light viability.
Best Vegetables To Grow Indoors Under Lights
——————————
Ezekiel Diet Note: Notice that potatoes, squash, zucchini and cucumbers are not on the list below. Melons and strawberries are fruit. I’m still planning to try growing container LED potatoes, strawberries and cucumbers, maybe using dwarf plants that do well in containers.
——————————–
By: Imran Saleem
I assume you wanted to grow veggies indoors because it is too cold to grow outdoors or you are doing some kind of experiments or you don’t have any kind of space outside to grow your organic veggies.
So many gardeners start indoor gardening to get a head start for next spring or summer crops. Sowing seeds and growing seedlings indoors under lights is the most common activity in gardeners. But growing full crop under light is not a simple and easy task.
So many crops are not suitable to grow indoor like different varieties of tomatoes (grow up to 6 feet) will need a bigger indoor system to better growth.
In this post I will share some simple growing vegetables, you can grow under lights. But first, you need to do your research on how to grow vegetables indoors under lights.
23 easy to grow vegetables indoors under lights.
1: Spinach.
Spinach is very easy to grow indoors under lights. Spinach is one of the fastest-growing leafy green vegetables. Because you are growing indoors, you will need a pot, a light source (led grow light). Sow the seeds in a pot or you can use plastic bottles. Do not use the topsoil from your home or garden. For pots potting mix is necessary.
2: Lettuce.
Lettuce is another easy growing leafy green. Like spinach, lettuce can also grow in pots or plastic bottles. Sow the seeds of Lettuce in potting mix. Or you can start growing lettuce from the bottom part of store-bought lettuce.
Put the bottom part in water, when you see small roots, plant that in your pot.
Read More: How to regrow store-bought lettuce.
3: Tomatoes.
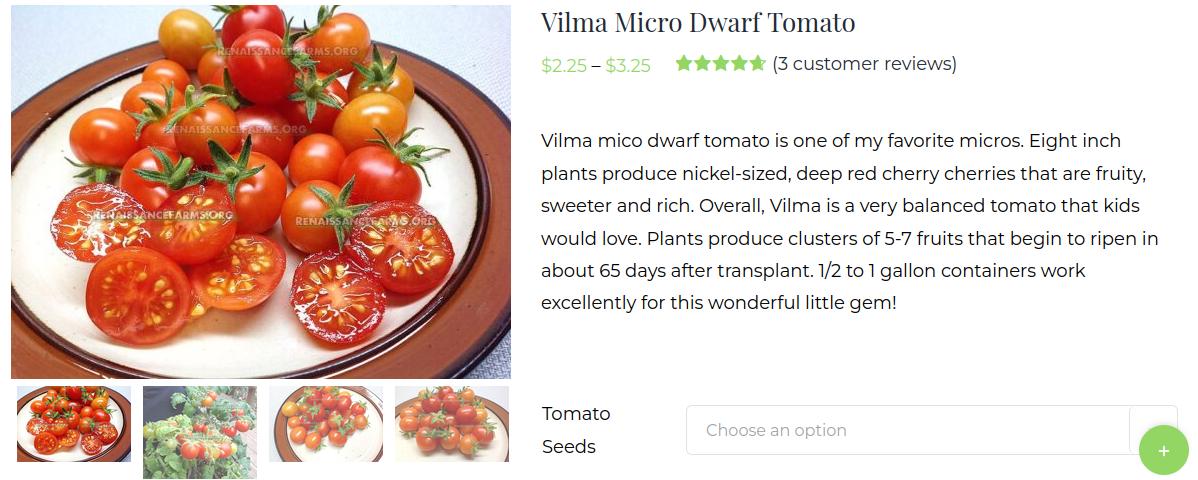
As I mentioned above growing tomatoes indoors under lights is not an easy task. But there are so many varieties of tomatoes you can grow indoors, they are called dwarf tomatoes. Here are some varieties you can grow:
Mohamed
Yellow Dwarf
Andrin
Orange Hat
Vilma
Yellow Canary
These all varieties are dwarf. They only grow 7-10 inches in height. You can grow them in grow bags or pots using potting mix.
Read More:
How To Grow Beefsteak Tomatoes In Pots
Everything You Need To Know About Growing Tomatoes In Grow Bags
4: Carrots.
Growing carrots in a pot are very easy. You will need a pot about one foot deep and one foot wide. You can also use grow bags instead of pots. Use potting mix soil in a pot or grow bag. Remember no matter how much your soil is good, you will need a good source of light (led grow lights) to grow all these veggies.
5: Mushrooms.
Growing mushrooms indoors is extremely easy and fast. Small mushrooms only take 2-3 days to grow. Even a plate size mushroom only take 10-15 days to grow. You can grow mushrooms in pots, grow bags or your laundry Container.
6: Scallions.
They are healthy as garlic. Growing them is very easy. You can also regrow store-bought scallions. Cut the end part of scallions about 2-3 inches. Put that in a glass of water. Change the water on a daily basis. In a few days (8-10) roots become double in length and new roots will appear. It’s time to plant them in a pot or grow bag.
7: Green Beans.
Green beans grow very tall, so you need a good source of light. They also grow very fast. Sow the seeds in a pot, use some wood skewers to support the plants, as they grow very tall.
8: Kale.
Kale and spinach are like cousins. They almost serve the same purposes in dishes. Both are very easy to grow. They don’t require your attention on a daily basis.
Grow kale directly from seeds, in pots or grow bags (or bigger plastic bottles). Don’t let the soil dry and you are good to go.
9: Bell Pepper.
These bombs of vitamin C are extremely easy to grow indoors. Use pots, grow bags or plastic bottles to grow them. When fruits of bell pepper are ready, harvest immediately. Because the more you harvest, the plant will produce more fruit.
10: Arugula.
Arugula is very fast and easy to grow inside. They prefer a cool temperature which makes them best to grow indoors. Sprinkle the seeds of arugula in a pot filled with potting mix. Water them and place the pot or your container under your source of light.
Each plant of arugula gives you multiple harvests at maturity. Harvest the bigger leaves and leave smaller ones for later harvest.
Read More: An Ultimate Guide to the Best LED Grow Lights for Indoor Plants
11: Ginger.
Ginger is very easy to grow. If you have some store-bought ginger at your home you can grow your own ginger. Put the ginger bulbs in water for a few hours, so any kind of growth inhibitor dissolve in water and leave the bulb. Now plant that bulb in a grow bag, water them and watch them grow.
12: Onion.
Onion is a must vegetable in our dishes. And it is very easy to grow onion indoors. You can grow onions from seeds, but it is best to grow them from seedlings or from a scrap of store-bought.
Use a bigger bot to grow onion, because they have a bulb to expand under the soil. When the green stalk of onion is about 6 inches in height, harvest your onion.
13: Beets.
Beet is very beneficial for the patients of blood pressure. Choose a bigger container or grow bag for beets. Grow them directly from seeds. But first, soak the seeds overnight in water. Now sow the seeds in potting mix, water them and place the grow bag under a led light source and watch them grow.
14: Radish.
It is one of the fastest-growing crops. Radish can be harvested in just 3-4 weeks. That makes it a perfect crop for an indoor project. It is a moisture-loving crop. So do not let the soil dry. Also, do not overwater them, because nobody likes waterlogged soil. Radish is a big source of vitamin C, folate and potassium.
15: Swiss Chard.
Swiss chard is not that different from kale. Growing kale is also very easy. Swiss chard is one of the toughest crops. The plants of chard required 6 hours of full sunlight. It means a good and slightly bigger source of light will be needed for this crop.
16: Mustard Green.
Mustard green is not common as other leafy greens. But they are very beneficial and easy to grow as others. You can grow them in pots or any container available.
Here are some herbs you can grow indoor under the light.
17: Basil.
Basil is one of the most common and easy growing herbs out there. Basil can be grown in every pot, literally in every pot available. If you don’t have any pot for basil, you can them in plastic bottles of Coca-Cola. Use a good kind of potting soil in your container.
You can grow this herb directly from seeds, or use cuttings from store-bought basil to grow them in pots.
18: Rosemary.
Rosemary is also very easy to grow indoors. For making your indoor garden more classy and beautiful, use mason jars for your all herbs. Make a mason jar indoor herb garden. You can use seeds or store-bought cuttings to grow rosemary.
18: Oregano.
Moderate to a strong light is good for better growth of oregano. Oregano is one of the most popular species of the mint family. Oregano can also be grown from cuttings of store-bought. When you feel the surface of the soil is dry, water the plant.
19: Bay Laurel.
This is one of the strongly flavored herbs. The oldest leaf has a strong flavor. This herb can be attacked from different diseases easily, so pick a place with good air circulation.
20: Mint.
From a herb garden to mint garden. There are so many different varieties of herbs you can grow in your mint herb garden, peppermint, spearmint, apple, orange and banana etc.
Growing mint is very easy. Growing from store-bought mint is the easiest method. Pick some good green cuttings, plant them in potting soil, water them and they will start to grow in a few days.
21: Parsley.
This is one of the most using herbs. You cannot go wrong with growing parsley indoors. Pick a container or plastic bottle to grow parsley. Using potting soil as a growing medium. Grow them directly from seeds. Sow the seeds in Potting mix, water them and use a strong source of light.
22: Thyme.
It is a very popular member of your herb garden.
Growing thyme under light is very easy. You can grow thyme from store-bought cuttings. Water the plant when the soil feels dry. Thyme is sun-loving, so a good light source is necessary.
23: Microgreens.
A microgreen is a very beautiful addition to your indoor garden. If you are a beginner, start with microgreens.
Microgreens are way more beneficial than fully grown vegetables. They have a lot more vitamins and are full of nutrients. In 10-15 days, you can have an indoor garden, full of microgreens.
There are a lot of varieties of microgreens you can grow under lights. Here are a few of them:
Radish microgreens
Cabbage microgreens
Watercress microgreens
Mustard microgreens
Arugula microgreens
Sunflower microgreens
Broccoli microgreens
Flax microgreens
Pea shoots microgreens
You can have your own separate microgreens garden in no time.
Read More:
How To Grow Microgreens In Your Kitchen Garden
How To Grow Purple Potatoes In Containers
Which Plants Can Be Grown In Plastic Bottles?
Source: https://slickgarden.com/grow-under-lights/
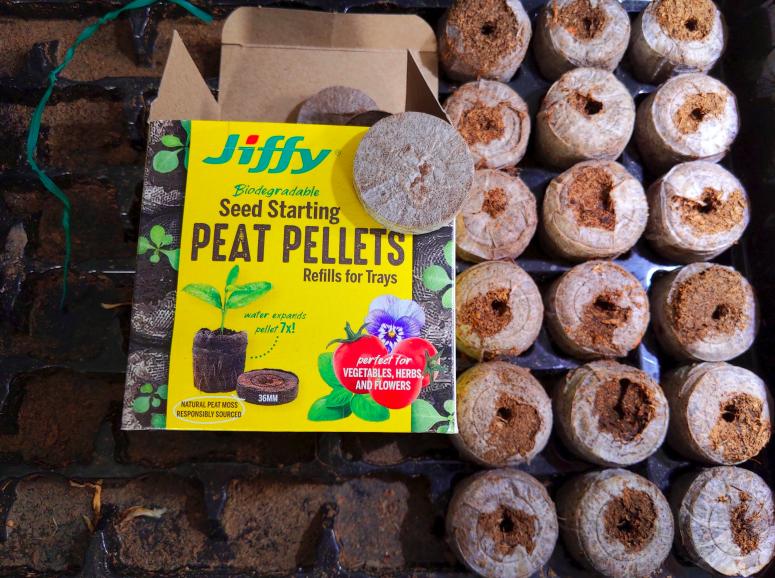
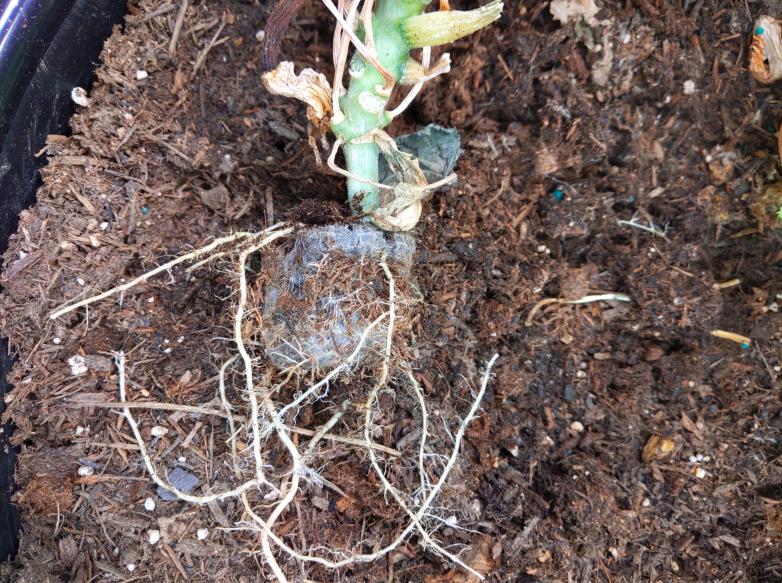
Harvested Root Bound Carrots from Peat Pellets
Below: The carrots have done well (I thought) and it was time to harvest. However, I discovered over half the carrots were root bound from the peat pellet wrappers left on when planted. They were drinking a gallon of water a day but very easy to grow indoors under LED lights. The greens are edible as a garnish on salads or other food. Good to know in a food emergency.

Below: See the peat pellet wrapper still clinging to this cluster of carrots. I also learned that regardless of how small and fragile I need to separate clusters of carrots to singles so they’re not cramped while growing.

Below: See one peat pellet wrapper below left that completely restrained the carrot from growing. I won’t be using starter pellets again. We still have a harvest of carrots, just not uniform in size and shape.

This was the last of plants I originally started in the peat pellets with growth restraint fabric.
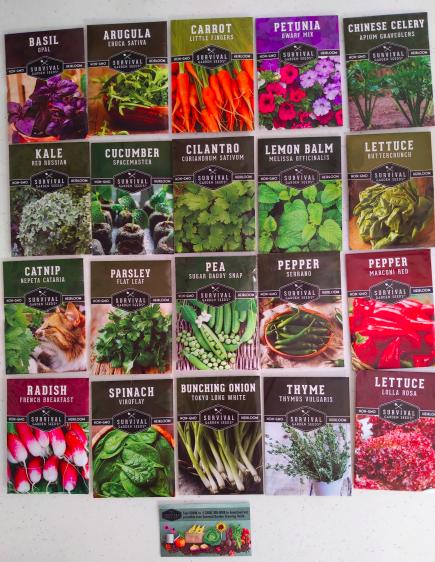
Indoor Garden Vegetables Hydroponic Survival Garden Seeds – Non-GMO Heirloom Vegetable Varieties for an Apartment Victory Garden – Container-Friendly – Plant Indoors or Outdoors – Survival Garden
I looked all week for an heirloom seed packet designed specifically for indoor container gardening. I just ordered this package below.


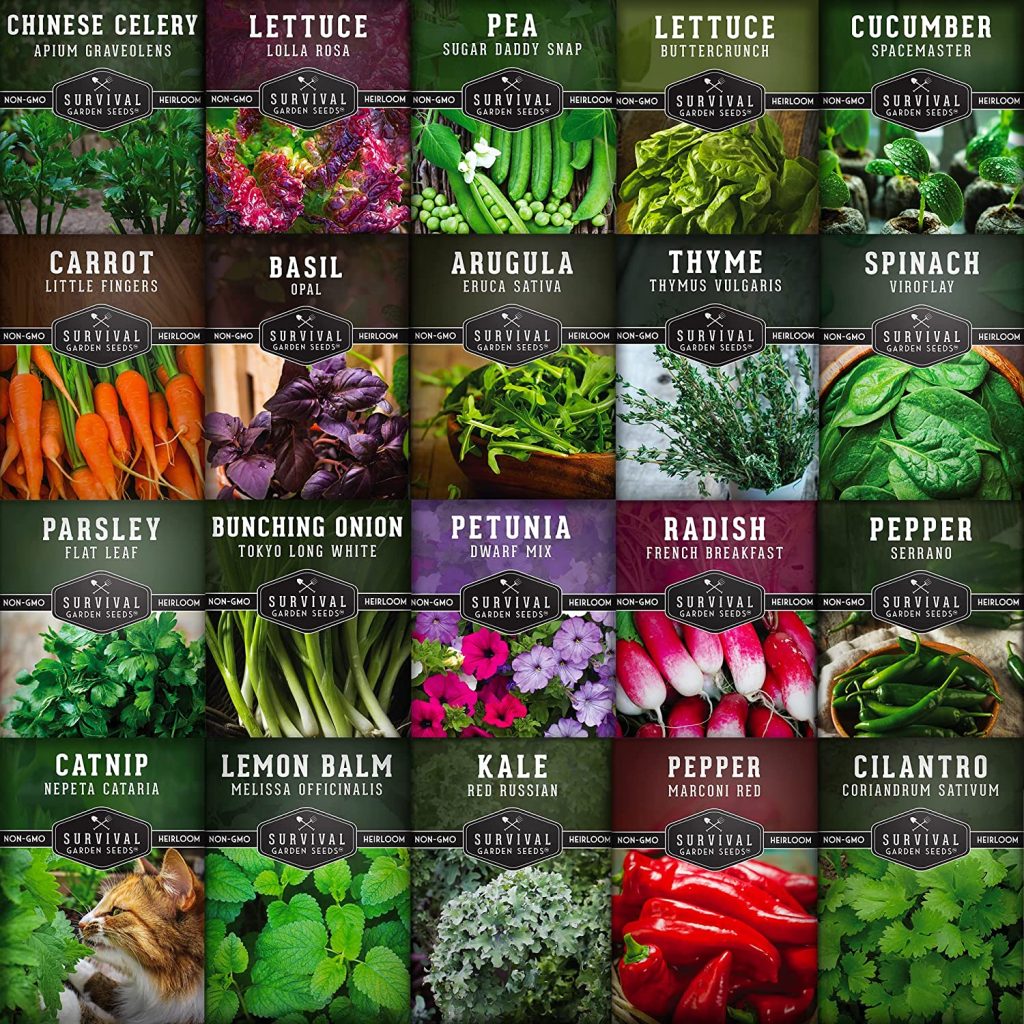


Update April 25, 2023 Photos
The “Apartment Collection” of seeds that were chosen for their ability to grow indoors in containers finally arrived. The first Amazon delivery was short 10 packs of seeds. I had to return the first set and request a new delivery that came yesterday. No tomatoes in this package. I had to get them elsewhere.
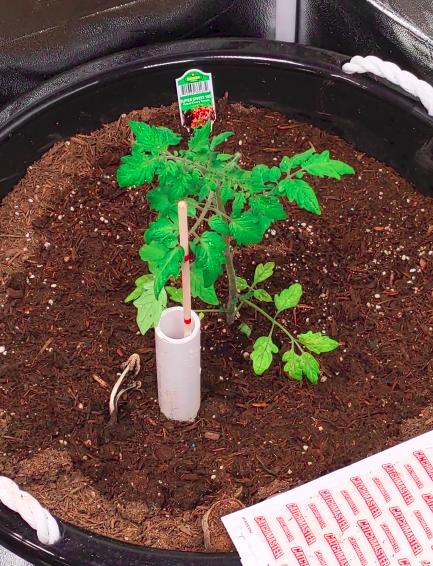
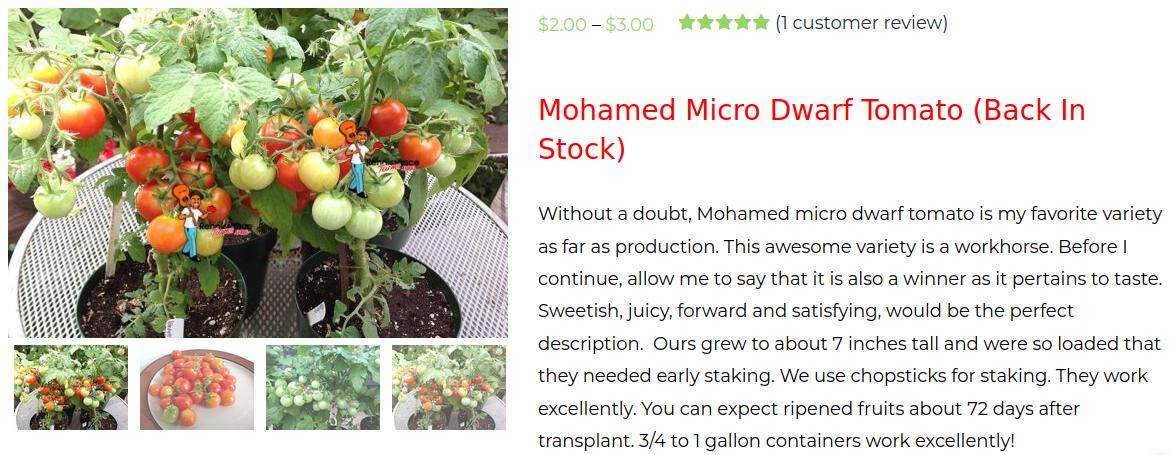
Growing Micro Dwarf Tomatoes Indoors And Under Lights
Click the link above to read the article. These tomato seeds below are dwarf plants that only grow 8 to 12 inches tall. The description says they will grow loaded with dwarf tomatoes. I plan to grow them in 1 gallon fabric grow bags on the table top using the T5 fluorescent lights.
In the comment section the author recommends:
If you like yellow tomatoes, try Jocholos, Pinocchio, Monetka.
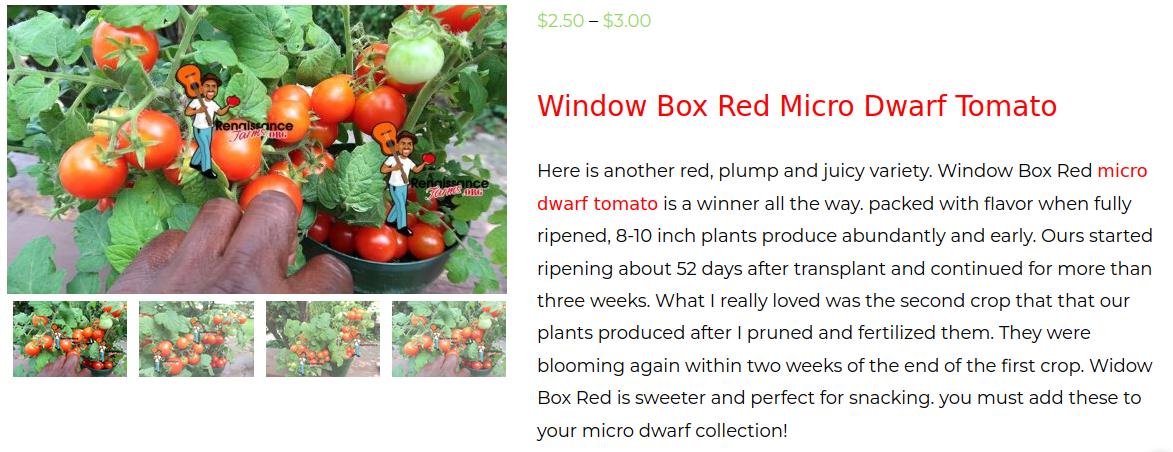
If you like Reds? Mohamed, Bonsai, Red Robin, Window Box Red.
There are many other great tasting varieties in both reds and yellows, but these would be the first that I would recommend. Thanks.
Below: I’ve had an infestation of gnats that I mistook for fruit flies. In the past I’ve successfully used little plastic sauce containers with apple cider vinegar and dish soap. Poke a few small gnat size holes in the top of the plastic lid and it would normally trap dozens. But these gnats aren’t attracted to vinegar or rotting fruit smells. They come from the potting soil and are attracted to the dirt.
I’ve been using these sticky traps but it didn’t completely get rid of them. I bought a couple of these ZEVO brand flying insect traps that seem to be working well. I can actually watch them become attracted to the ultraviolet light, fly into it and get stuck. I paid $20 for 2 at Walmart.


Below: This trap below is covered in gnats from just one day and has almost cleared the room. The picture doesn’t do justice to the amount of gnats stuck to it. The ultraviolet light must attract the gnat.

Below: These sticky sheets catch a lot of gnats but hasn’t cleared the room like the one above. This collection of gnats is from at least a couple weeks. The ultraviolet trap caught this many overnight. However I believe I can just add a small ultraviolet bulb over this sticky sheet and have a much cheaper and larger trap. 
Below: I have 4 empty tubs waiting on the new indoor seed genetics that were just delivered.
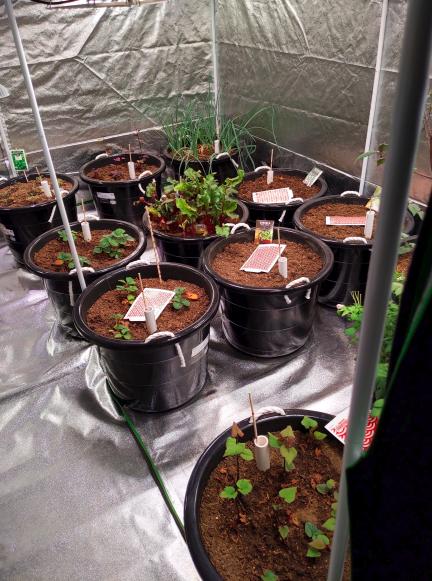
Below: I’ve cleared the table top to start planting the dwarf tomatoes and micro-greens under T5 fluorescent grow lights.

Below: I have 8 dill plants coming up. I use darker colored seed starting soil right in the potting soil. This way I know where each seedling is for easy target watering.
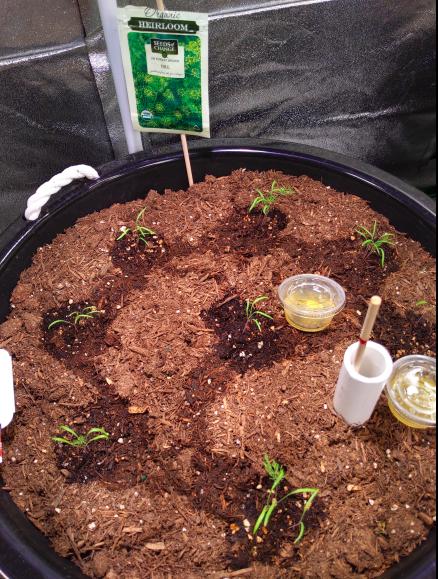
Below: A couple Cilantro plants just started on the right. Oregano taking longer to sprout in the 2 dark areas on the left. Notice the darker plugs of seed starting soil.
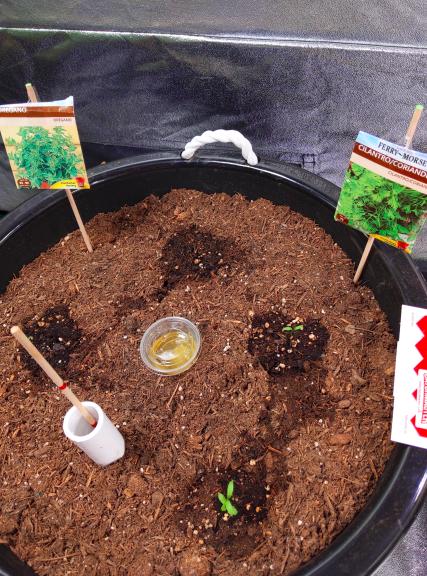
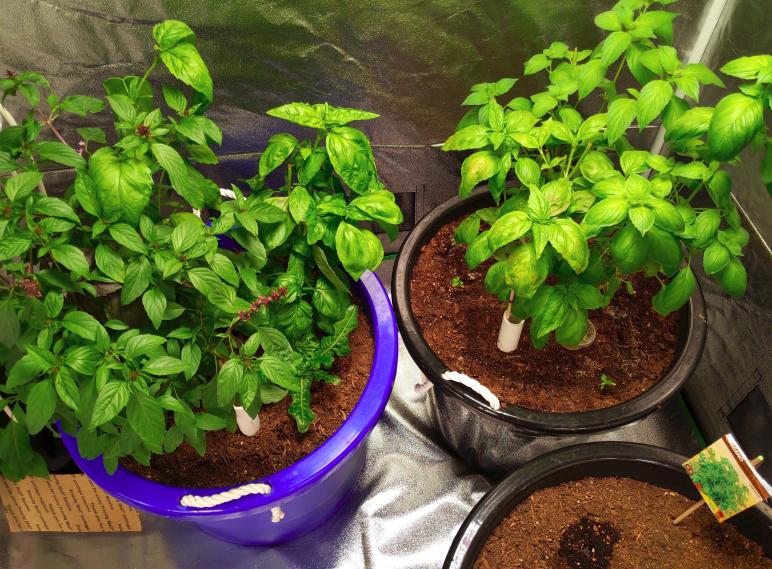
Below: The Basil plants do well in tubs and LED lights. We’re taking cuttings from them almost daily. There are 3 Parsley plants just popping up around the edges of the right tub. They’ve been so useful for cooking I added the Parsley, Oregano, Cilantro and Dill believing they’ll be used regularly as well.
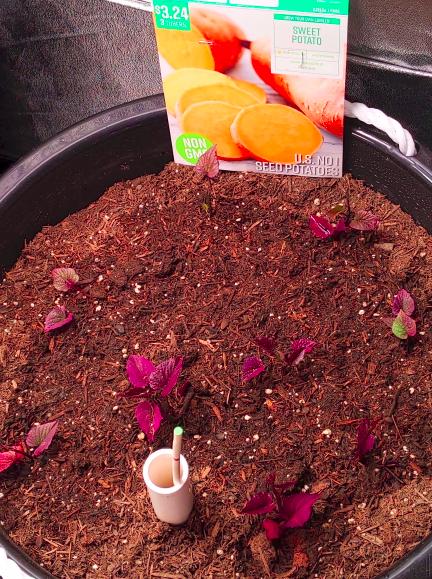
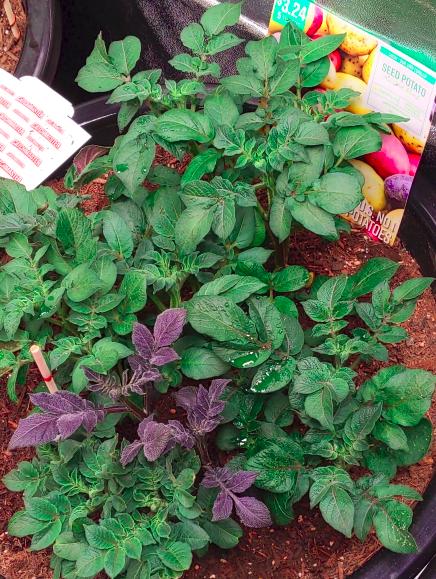
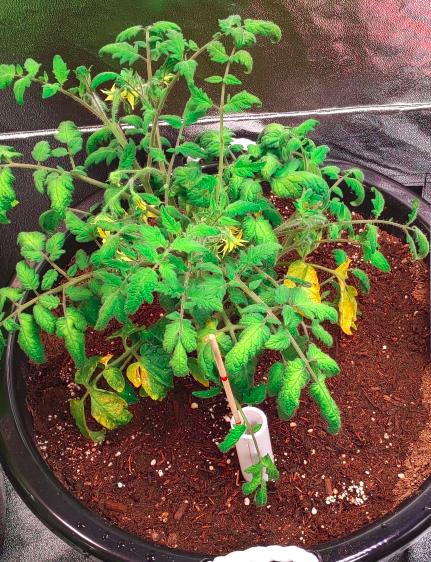
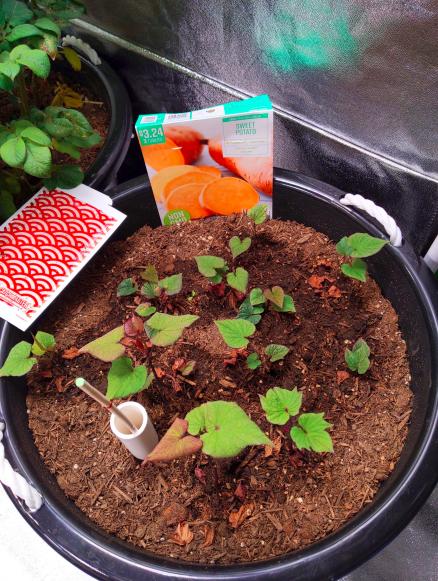
Below: I now have 2 tubs of sweet potatoes growing. These were the shoots that seem to have taken root and doing well. The leaves turned from purple to green. The second tub not pictured has the actual sweet potato halves I used for taking shoots. They were covered in roots and I thought they would be good to plant.
Below: The cherry tomato plant (corner) shot up to about 3 ft and has 8 tomatoes. I pulled the other dwarf tomato plant that wasn’t thriving in the grow room. We transplanted it outside and I’m waiting on better indoor genetic tomatoes listed above.
To the right of the cherry tomato plant is the small potatoes that have just shot up in foliage.

Below: I will plant the new carrot seeds directly into this grow tub. I added the Leon fertilizer mix of 1/2 cup Tomato Tone, 1/4 cup Sea Minerals, 1/8 cup Lime, 1/8 cup Epsom Salt, 1/8 cup Gypsum to each of the 4 tubs. Then I used a battery powered drill with 2 ft. a garden auger bit to mix the soil in each tub. Being careful not to drill into the 4 inch pipe in the bottom.
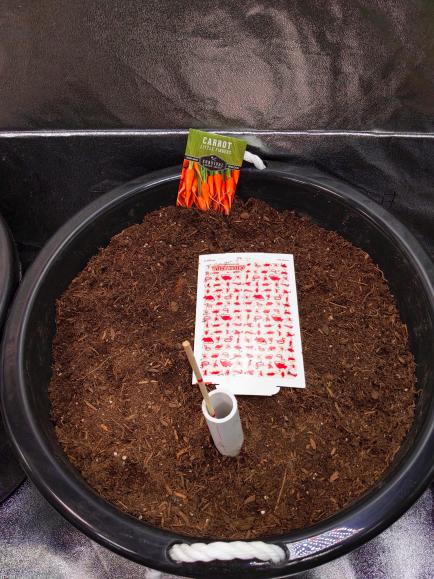
Below: This is the new genetics indoor seeds. I’ll try lettuce in this tub.
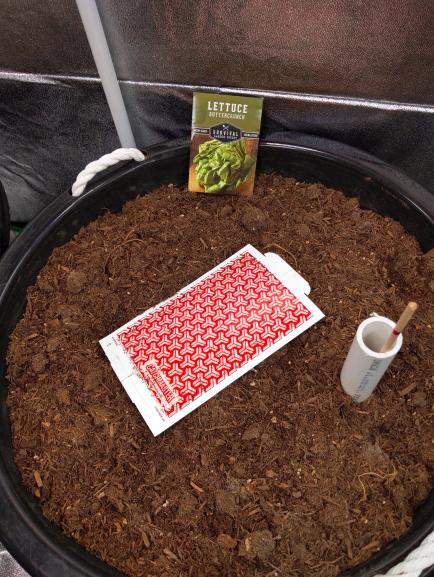
Below: This is the new genetics indoor seeds. I’ll try a new dwarf cucumber in this tub.
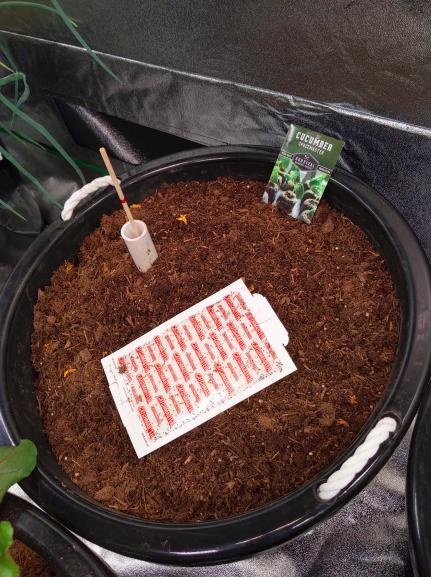
Below: This is the new genetics indoor seeds. I’ll try arugula in this tub.
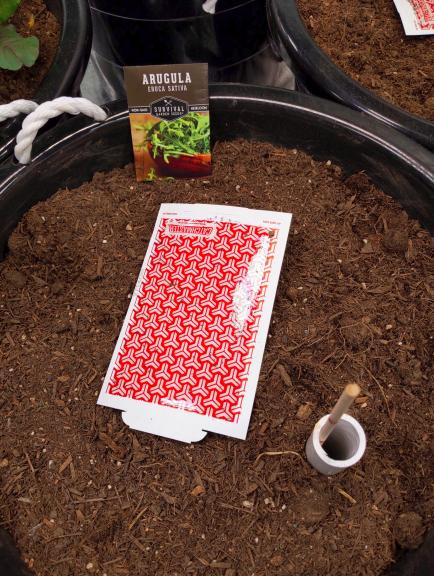
Update Photos April 26, 2023
Below: I planted 6 tubs last night from the “Apartment Collection”. I planted 2 tubs of Lettuce, 1 tub Cucumbers, 1 tub Carrots, 1 tub Arugula, 1 tub of Thyme.
I removed the 2 tubs of Strawberries as they were not doing well under LED lights. I have no mercy for a plant that’s not producing. It reminds me of the vineyard parable in Luke 13:7 where Jesus taught – Then said he unto the dresser of his vineyard, Behold, these three years I come seeking fruit on this fig tree, and find none: cut it down; why cumbereth it the ground?, and Matthew 3:10 – The axe lies ready at the root of the trees, and every tree that does not produce good fruit will be cut down and thrown into the fire. This is a reference to unproductive Christians. You could make an good argument that that’s exactly what’s happening today; God using the heathen demons as His axe. Why “cumbereth” the earth with these unproductive Christians?

Below: 3 of the tubs needed fertilizer. I added it to the top of the tub and used the drill and garden auger to turn the soil under and pull soil from down below to the top. Basically plowing the soil. It’s much easier than doing this by hand. I got this auger when I purchased Zoysia grass plugs to drill holes in the ground for the grass plugs. You can get one at Home Depot or Lowe’s.
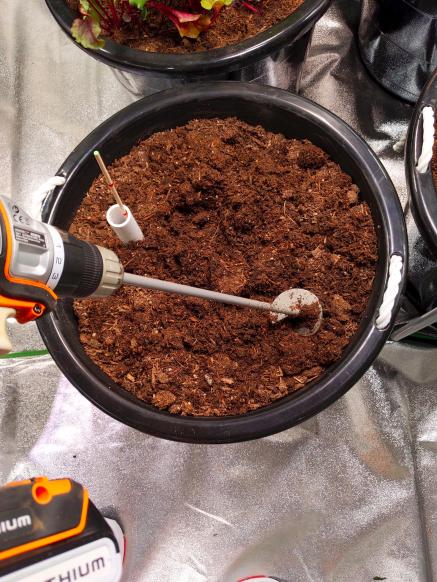
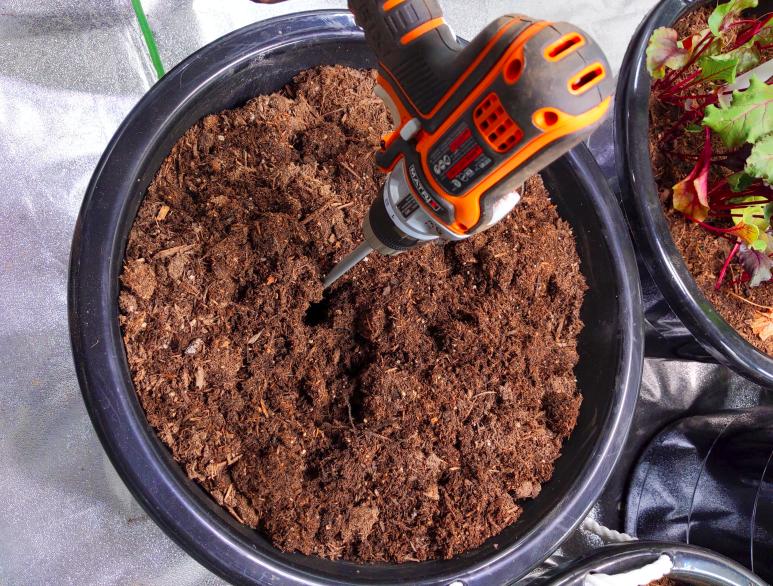
Below: This is one of the 2 Lettuce tubs. The instructions said to plant 6 to 8 inches apart. This would be the footprint of 6 to 8 inches.
In case you missed it earlier, the darker soil areas are a seed starter soil mix that’s designed to stay wet and includes nutrients needed for germination. Rather than germinate in small containers and transplant and shock, I’m just planting the seed directly in the grow tub. The seed starter soil makes it easy to identify where the seeds are and only water these spots. I use a spray bottle to wet these areas as pouring water will disrupt the soil and displace the tiny seeds. I could cut back drastically on the amount I’m using because it will eventually change the potting mix dynamics and keep it too wet. However, a lot of this seed starter soil may come out with the plant and roots when pulled later.
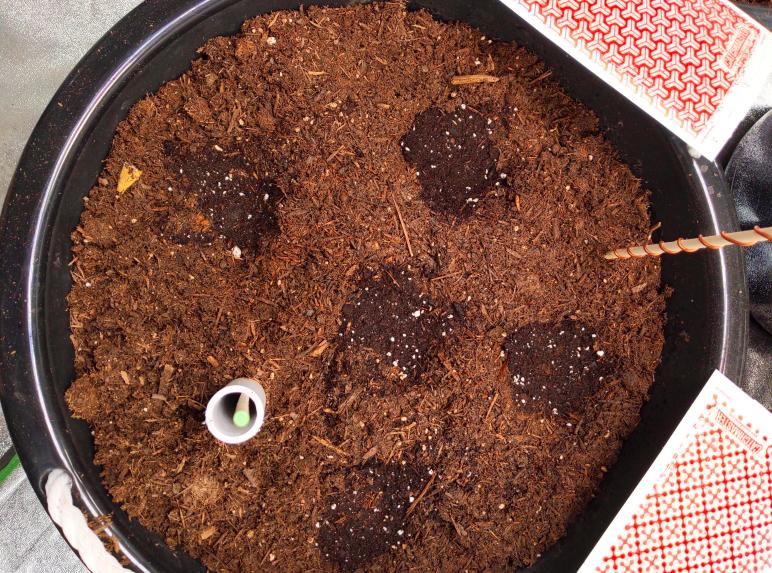
Below: This is the Arugula tub. The instructions said to plant 2 to 3 inches apart. This would be the footprint of 2 to 3 inch spacing.
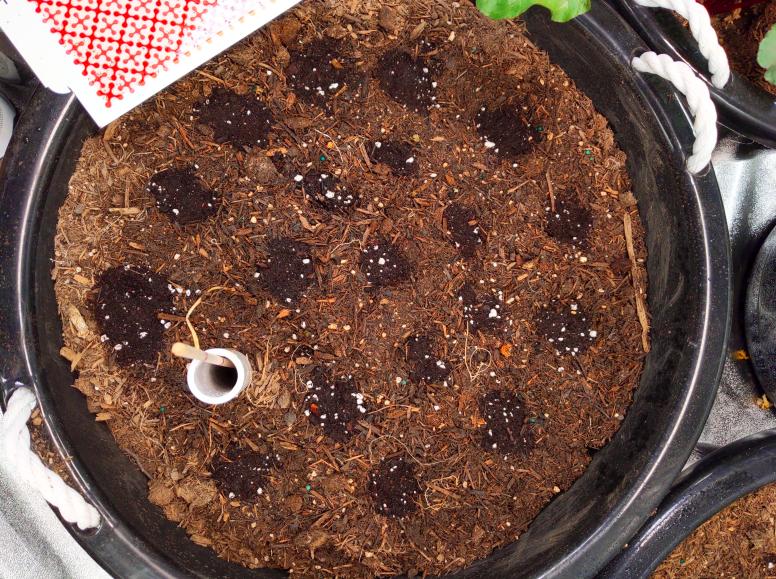
Below: This is the Carrot tub. The instructions said to plant 2 to 3 inches apart. This would be the footprint of 2 to 3 inch spacing.

Below: This is the Cucumber tub. The instructions said to plant 10 to 12 inches apart. This would be the footprint of 10 to 12 inch spacing.
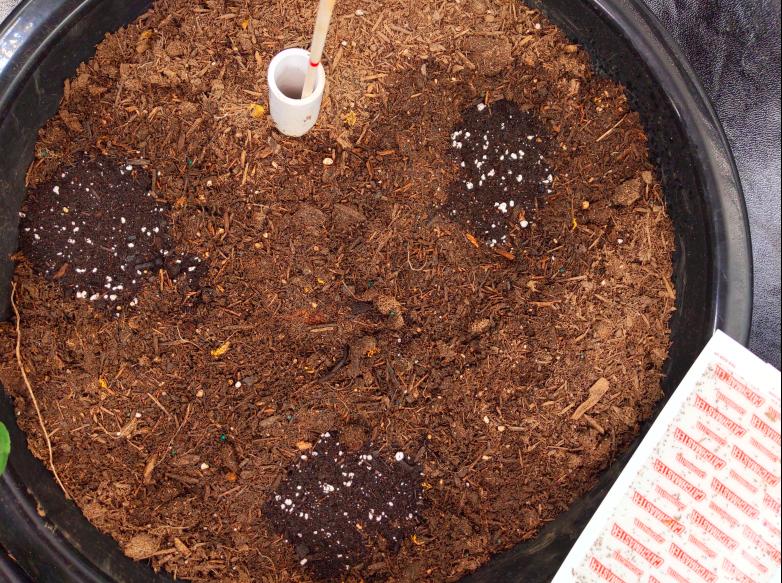
Killing Fungus Gnats Permanently with Organic Neem Cake Tea
Wisdom: I would suggest this solution the first day you see a gnat as each one can lay 200 eggs. It’s probably a good idea to go ahead and treat a new grow tub full of potting soil on day 1 when you build it. Then periodically if a gnat is ever seen. I’ll probably make the Neem tea in 5 gallon buckets to treat 16 tubs. It will probably take 4 – 5 gallon buckets if I put approximately a gallon on each tub to cover the top completely and drench a couple inches of potting mix. I ordered it from Amazon today and expect delivery tomorrow.
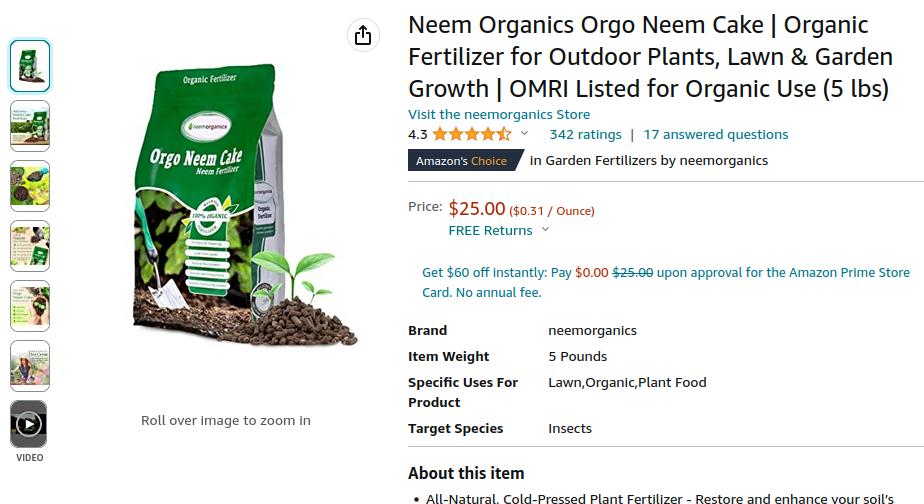
Update Photos May 1, 2023
Below: This is the Apartment Collection Arugula sprouting already in just 6 days. I may need to thin some pods of multiple plants. These seeds are so small it’s very difficult to put just one seed in a hole.
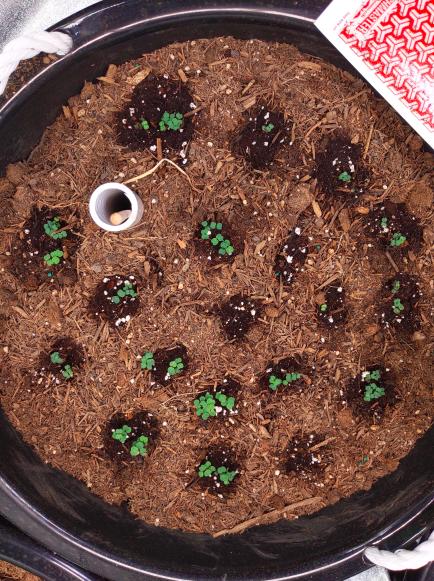
Below: This is 1 of 2 tubs of the Apartment Collection Organic Salad sprouted to this size in 6 days.

Below: This is the Apartment Collection Cucumber’s growth in 6 days.
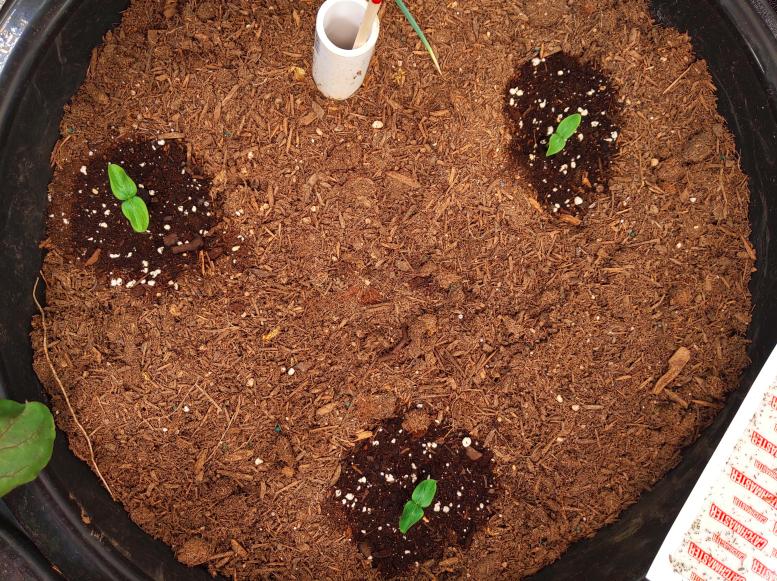
Below: This is the Apartment Collection Thyme you can just barely see sprouting out of the soil in all 5 pods.
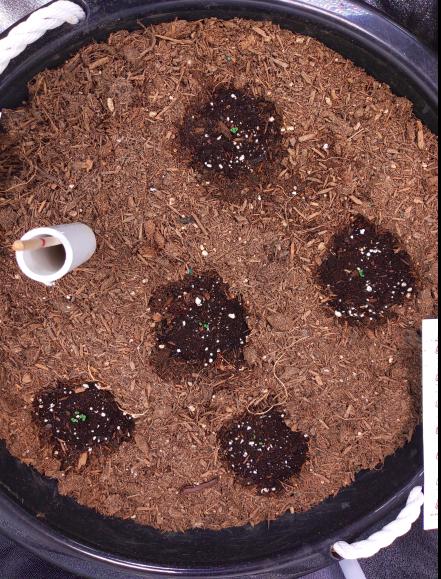
Below: This is the Apartment Collection Carrots that must take longer to germinate. Keeping them moist and waiting.
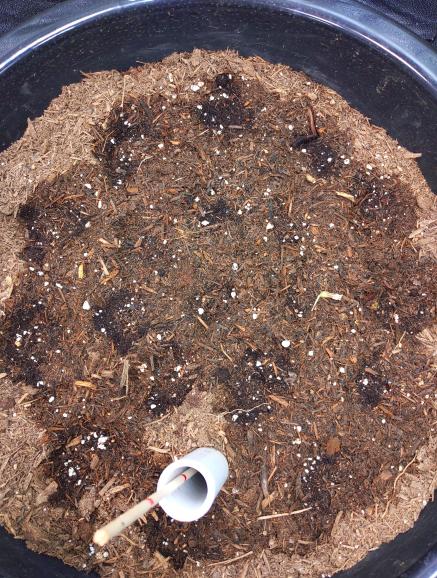
Below: This is the Home Depot $4.98 Cherry Tomato plant that shot up to 3 foot with 12 to 16 tomatoes in different stages of ripeness now. It has the first 2 red ripe tomatoes to try.
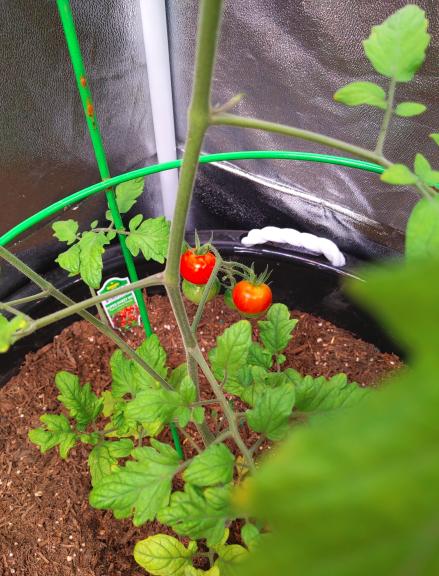
Below: This is the second tub I started for sweet potatoes. This is the actual sweet potato halves I used to make shoots. Rather than throw them to the compost pile I planted them because they were covered in roots. They’re growing twice as fast as the shoots I pulled and rooted. They need support for those vines.
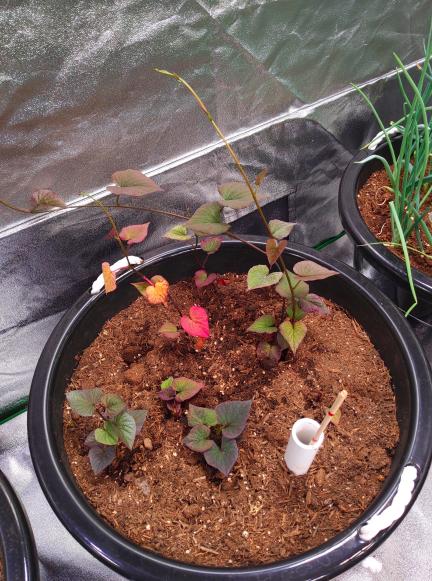
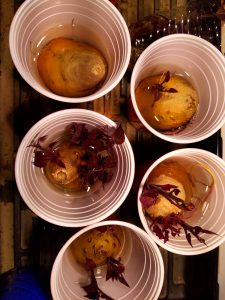
Below: These are the Beets from the original January planting. The beets were stunted from the peat pellet cloth wrapping I should have removed before transplanting. After realizing what happened a month ago I pulled them, removed the cloth wrapper and replanted. It’s time to spoon some dirt out and see what’s happening under the potting mix.
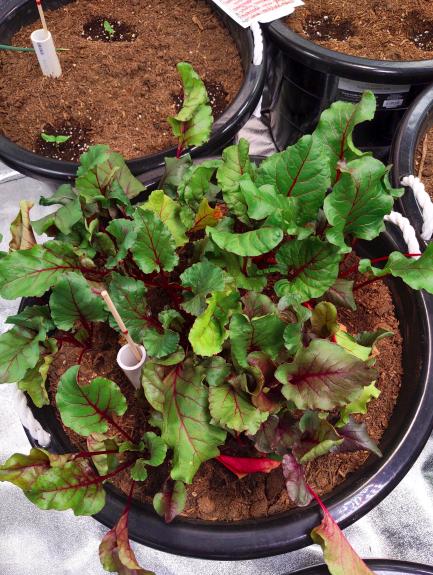
Below: This is the Home Depot $4.98 pack of Onion shoots that seem to be thriving. I keep seeing the onion stalks in salads and soups and stir fries. They’re useful too.

Below: 4 Sprouting Jar Lids $11.99. This will be my first test of sprouting seeds. I picked up these sprouting lids at Amazon that fit my wide mouth quart Mason Jars. Each package comes with 4 lime green screened lids. I got 2 packs or 8 lids. I also bought a couple sprouting seed mixes to get started. Salad Mix Sprouts and Holly’s Mix with Mung, Adzuki, Green Pea, Red Lentil, French Lentil, Green Lentil seeds. I’ll try 4 jars and then graduate to 8 if we can eat that many sprouts.
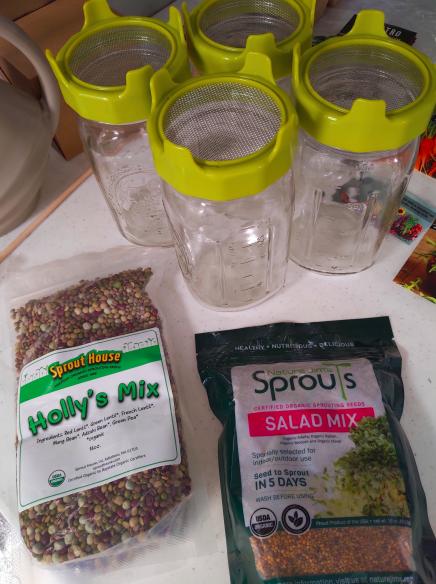
Below: This is 1 of 2 Zevo flying insect traps that uses ultraviolet light to attract and a sticky insert to trap a gnat. This catch below is a week of attracting and trapping fungus gnats. This device almost clears the room by itself. But it doesn’t get to the source of the problem which is the dry tops of the potting mix. There are always a few smart gnats, I figure they must be the Patriot Gnats trying to warn the other gnats the Ultraviolet Light Sticky Trap and the Man must be working together in a Eugenics effort to exterminate them all. : )
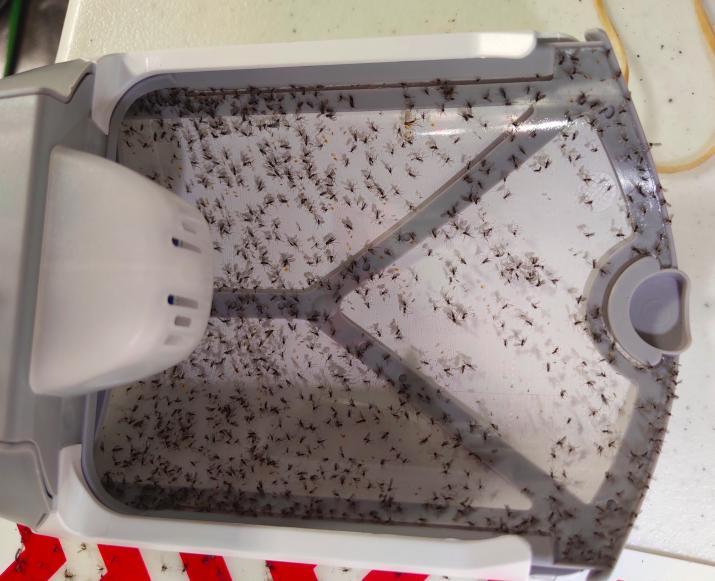
Below: This is just a standard insect sticky trap you can get at Walmart. Below is about 2 months of trapping gnats so it’s not near as efficient at the Zevo. I believe if you set up an ultraviolet nightlight over this it would work just like the more expensive Zevo.
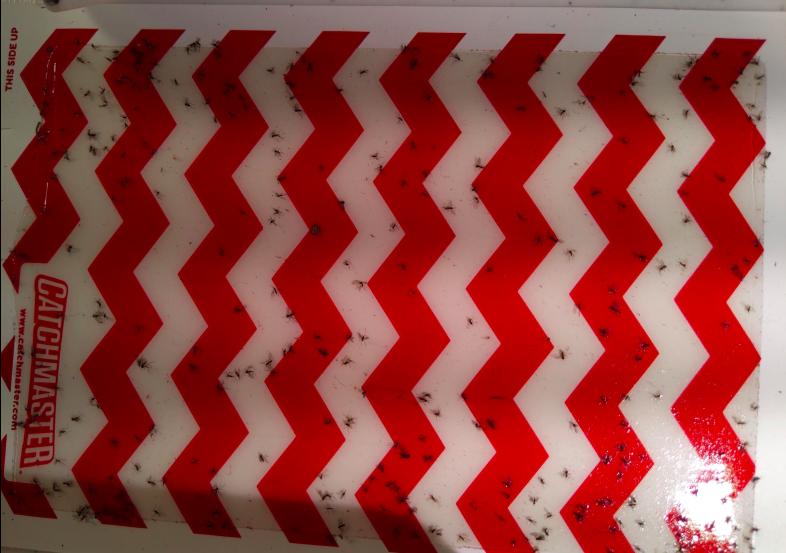
Below: I ordered the Organic Neem Cake pellets from Amazon in a 5 lb bag to make a tea to soak the potting mix to get rid of my fungus gnat infestation. The video a week ago said to use 2 to 3 Tablespoons per gallon of water. That would be up to 15 Tablespoons for a 5 gallon bucket. There are 16 Tablespoons in a Cup. So I added about a cup of Neem Cake to each of the 4 buckets. I want a strong first mix. It’s messy. I used the jet setting on the water nozzle to help mix it up good while adding the water. I let the first 3 buckets sit for 3 hours and went ahead and wet every grow tub. I could tell it really displaced the gnats. By the way, buckets are getting expensive. The Home Depot orange 5 gallon bucket is $4.48 and the lids are $2.48. But a regular white 5 gallon bucket is $7.98 plus the lid. Hang onto buckets, they can come in handy.
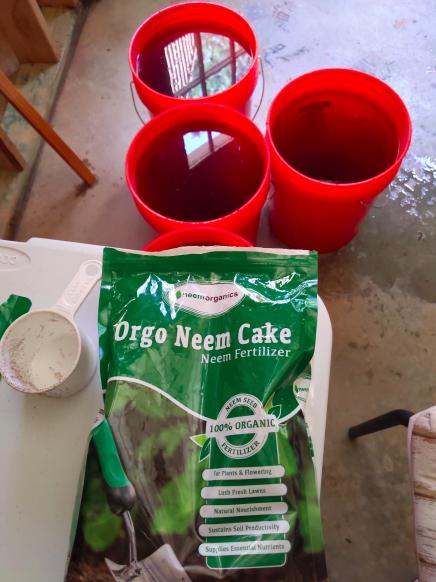
Below: I poured the Neem Cake tea on mature plants where I could drench the top completely and let it settle in. On tubs with new seeds germinating and new growth I used the HDX Hand Pump Sprayer ($8.97 Home Depot) pump sprayer below. I recommend one of these verses endless pump spray bottles that break and leak. Pump this thing 20 times and you can make it rain on 2 tubs before the next pump.
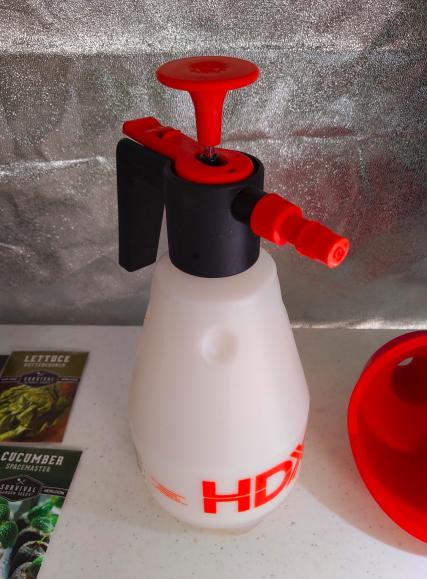
Below: It took 3 – 5 gallon buckets of Neem Cake tea to wet all the Potting Mix grow tub tops. I have another 5 gallons I’ll use tomorrow (that should be stronger) in the HDX hand sprayer on the new growth tubs that couldn’t be drenched.
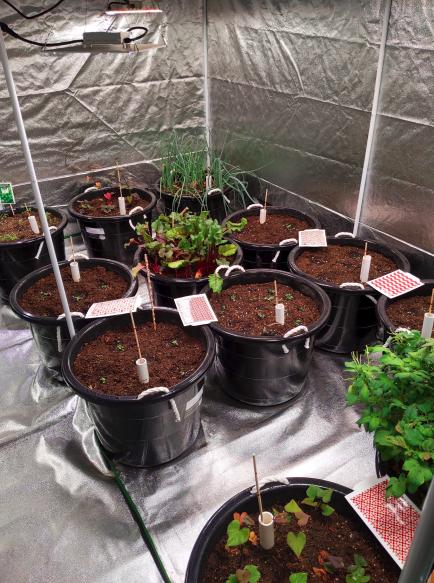
Below: This is one of the seed packages I bought at Walmart for sweet potatoes. This was 2 kits I believe. This is a couple months of growth. Sweet potatoes are a plan way ahead vegetable. I could probably carve that longest shoot out with a chunk of the potato and plant it. But I’m not in a hurry as I have 2 tubs in the ground already.

Gardener’s Log May 16, 2023
My fungus gnat problem has gotten worse. It seems to progress in waves of very under control to very out of control. I’ve treated the grow tubs twice drenching the soil with Neem Cake tea (which creates other problems I’ll describe later), as well as a natural oil spray (hard on new vegetation) and the infestation is still going strong like nothing happened. I understand the Neem Cake tea disrupts the gnat eggs and larvae process but can take 6 weeks. I have set out more sticky traps and have cleaned up, swept up, vacuumed up what seems like millions of gnats. This is a big issue if you’re slightly excessive compulsive about a clean grow room. My best advice regarding fungus gnats is treat the soil monthly as a preventative for anything that lay eggs. In fact, if you see one gnat you’re 14 days away from 200 more gnats, and another 14 days from 40,000 gnats, and another 14 days from 8 million gnats.
I just took delivery of Mosquito Bits described in this video below to disrupt the gnat larvae stage. I’ve drenched the soil in every tub with Mosquito Bits.
This perky gardener in the video below takes a long time to get to the point. Skip forward to 5 minutes to save some time.
My Fungus Gnat Plan:
Here’s my immediate plan as soon as Amazon delivers the drill pump attachment. I’m draining the water out of every tub down to bone dry and stop watering all plants until the soil is bone dry. I’ll plug all the grow tub water pipes to keep the gnats out of the reservoir. I’ll turn all the fans off and increase the temperature to dry soil faster.
All future watering will be with Mosquito Bits BT tea sparingly to keep the soil as dry as possible.
Drill Pump To Remove Excess Water From Grow Tubs
An issue I’ve experienced while treating some of my grow tubs is over filling because I’m watering from above new, small plants and it’s accumulating and over-filling the grow tub. Once there’s too much water and no air the siphoning process stops and the soil is just wet 6 to 8 inches down. Also, treating the soil with Neem Cake tea and now Mosquito Bit tea has several tubs with too much water as well. The original grow tub design had a drain hole drilled at 4 inches from the bottom to drain off excess water. I believed I could control the water levels and didn’t need or want overflow drains in the house.
So I’m buying a drill water pump attachment (below) so I can slide a water hose into the water reservoir and drain the excess water into a bucket. I also plan to use this process occasionally to flush the soil of excess nutrients, Neem tea or Mosquito Bits residue.
Now that I can drain every tub I can flush all tubs with the Mosquito Bits tea. Mosquito Bits is basically BT, safe for humans, but not for gnats.

Update Harvest Photos May 16, 2023
Below: Beet harvest planted in February/March. This batch was made into beet juice with leaves and stems. The excess went to the compost pile.

Below: These are the tomatoes from the Home Depot dwarf tomato plant that supposedly did well in a container. The plant didn’t thrive in the grow tent so we moved it outside where it didn’t thrive either. But it did ripen up the tomatoes that started in the grow tent back in March.
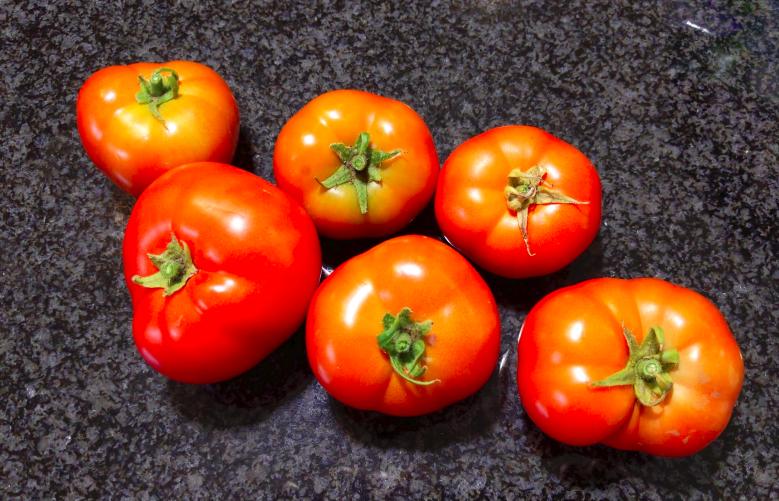
Below: The seed potatoes I bought from Walmart that I planted back in March were just dug up. I think there were 6 small seed potatoes that generated 21 potatoes of differing size. I would certainly want to figure out how to double or triple this capacity.
Below: The new carrots just popped up.

Wisdom Gained
Fungus on wet soil. The minute I see a white fungus on soil I should cover it with cinnamon and sprinkle cinnamon wherever I believe a fungus problem may occur from wet soil.
Fungus Gnats. The minute I see a Fungus Gnat start treatment to kill larvae immediately.
Draining Grow Tubs. Have the capacity to pump excess water (cheap drill pump) from tubs as needed. And regular flushing of soil.
 Learn how to plant a high-yield secret survival garden Wednesday, June 03, 2015 by: Daniel Barker
Tags: survival garden, DIY, perennials
(NaturalNews) When the SHTF, those with the means of growing their own food will have the best shot at […]
Learn how to plant a high-yield secret survival garden Wednesday, June 03, 2015 by: Daniel Barker
Tags: survival garden, DIY, perennials
(NaturalNews) When the SHTF, those with the means of growing their own food will have the best shot at […]- Grow 25 pounds of sweet potatoes in a bucket by: Amy Goodrich
(Natural News) Although sweet potatoes are an important staple food for Thanksgiving and Christmas dinners, this versatile, orange root tuber can be added to many other […]
- 2022 to 2030 Trends Forecast – Ezekiel Diet Files Ezekiel Diet Note: I found it necessary recently to document my future trend forecast beliefs for a friend. After hearing several times: "Oh please, you said that would happen last year […]


Newest Videos

Featured Videos


MORE ARTICLES
-
 DON’T Pull This Fuse From Your Car: They Can’t Track You if You Do
Jul 10,2026 5:13 pm
-
Put a Missionary on the Payroll Spotlight: TCM-USA Office Staff – Things To Come Mission
Jul 10,2026 9:22 am
-
Satan’s Little Season – The Greatest Test of Faith (And Nobody Cares). A Field Guide for Navigating.
Jul 10,2026 8:38 am
-
EVOLUTION OF FLOCK CAMERA’S FROM JAN. 2024 – JULY 2026
Jul 09,2026 9:09 am
-
BANK OF JAPAN INSIDER APOLOGIZES TO WEST: “FOR SHATTERING THE LIVES OF BILLIONS”
Jul 07,2026 12:57 pm
-
Dr. Eric Berg DC: The #1 Mistake that You Are Making with Supplements
Jul 07,2026 10:19 am
-
Update: The Charlie Kirk Death Hoax Perpetuated By Most Alternative Media Hosts
Jul 07,2026 7:48 am
-
The TOP Naughty TV BRANDS don’t want you to see this
Jul 06,2026 5:28 pm
-
Repairing an Out-of-Warranty Big Screen TV Yourself for $100 or less
Jul 06,2026 9:15 am
-
The Connection Between Eating 3 Hours Before Bed and Growth Hormone
Jul 05,2026 10:16 am
-
Outside Your Birdcage: 65 Years of NASA – All a Lie?!
Jul 05,2026 8:41 am
-
Chase Hughes: It’s Worse for YOU – Your Truman Show
Jul 04,2026 11:48 am
-
Dr. Eric Berg – The 11 Benefits of Lecithin
Jul 03,2026 2:54 pm
-
Was DOGE the Largest Data Heist in History?
Jul 02,2026 9:04 am
-
How to Disappear Online and Become Untraceable
Jul 01,2026 2:59 pm
-
Hot off the Press! BraxSIM Unlisted Cell Service for the Privacy Minded
Jun 30,2026 8:10 pm
-
Billionaire’s WARNING: I’m SELLING. The Crash Is Already Here!
Jun 30,2026 9:58 am
-
Naomi Brockwell TV: THIS doctrine destroyed your privacy
Jun 30,2026 8:34 am
-
13 observations from 9 days on the road in Florida
Jun 30,2026 8:00 am
-
Naomi Brockwell TV – Block Phone Tracking
Jun 29,2026 4:28 pm
-
Rob Braxman: Unboxing the NEW BraX3 Phone!
Jun 29,2026 9:37 am
-
They Already Told Us What’s Coming… It Was Written in 1997
Jun 28,2026 10:56 am
-
SIP and VOIP. The Privacy Solution No One Knows About
Jun 28,2026 10:28 am
-
They Aren’t Building AI Data Centers. (It’s Way Worse)
Jun 28,2026 9:21 am
-
I Read The Palantir Manifesto (and yes, it’s totally unhinged!)
Jun 28,2026 9:15 am
-
Tucker Carlson: Covid vaccine “was probably the greatest crime ever committed”.
Jun 27,2026 5:55 pm
-
GOG MAGOG: The End of The Little Season
Jun 26,2026 4:31 pm
-
Was the Millennium Kingdom the Middle Ages?
Jun 26,2026 10:51 am
-
License Plate Cameras: Now Tracking Cell Phones, Hot Spot, RFID, and MAC Addresses
Jun 25,2026 12:00 pm
-
Is This Satan’s Little Season? The Truth About the Rest of the Dead
Jun 24,2026 1:44 pm
-
“What’s Coming Is BIGGER Than A Recession…” – Catherine Austin
Jun 24,2026 11:15 am
-
They Destroyed Tartaria — And This Family Got Everything in the Little Season
Jun 23,2026 9:45 am
-
New I-95 Highway Rules Begin Tomorrow — Millions of Drivers Could Be Hit With Instant Fines!
Jun 21,2026 7:39 pm
-
How to Stop Cops From Using Wi-Fi to “See Through the Walls” of Your Home
Jun 21,2026 7:35 pm
-
Life is a Test Part 2 – Works. What is expected of us in the Little Season?
Jun 21,2026 4:43 pm
-
Avoid These 5 EGG Brands At ALL Costs (And 3 That Are Actually Safe to Eat)
Jun 21,2026 9:25 am
-
DNI Tulsi Gabbard Exposing Dr. Fauci with a Trove of New Documents
Jun 21,2026 9:17 am
-
CLA: The experts speak on Conjugated Linoleic Acid and weight loss
Jun 21,2026 7:12 am
-
From the Fringe: The Most Important News – Michael Snyder Daily Feed
Jun 21,2026 5:28 am
-
Mercy: The New AI Judge Film That Pits Man Against Machine
Jun 20,2026 2:34 pm
-
Is Satan’s Little Season Almost Over? | The Little Season Podcast
Jun 20,2026 1:35 am
-
Flock cameras track everyone for 30 days. Who’s watching the watchers?
Jun 19,2026 6:45 pm
-
Little Season Time Indicators Part 3: The Great Tribulation of the First Century
Jun 19,2026 8:00 am
-
No SIM? No Problem! Best Options Without Using a SIM. Powerful Security Tricks
Jun 18,2026 8:00 am
-
Very Interesting: The Little Season is a Test – Part 1 – Deception
Jun 17,2026 8:00 am
-
Supplements I Take Daily
Jun 17,2026 8:00 am
-
Tucker’s Dire Warning on Iran
Jun 16,2026 2:27 pm
-
Will Ezekiel’s temple be built in a future millennium?
Jun 16,2026 12:56 pm
-
Update to Perricone MD’s Top 10 Supplements for Healthy, Beautiful Aging & Living
Jun 16,2026 8:44 am
-
Documentary: Old World Order, Everything We’ve Been Told Is A Lie – Stew Peters
Jun 16,2026 8:15 am
-
A Warning To America – 25 Ways the US is Being Destroyed in Under 2 Minutes
Jun 16,2026 8:13 am
-
From the Fringe: How You Will Lose Everything Pledged As Collateral
Jun 16,2026 8:00 am
-
Magnesium – The Weight Loss Cure – Dr. Carolyn Dean
Jun 16,2026 7:20 am
-
Why Glycine is Important – Detox – Glutathione – Weight Loss – Liver Cleanse – Collagen – Visceral Fat – Hair Loss
Jun 15,2026 4:08 pm
-
Living Inside Castles Was Impossible — So What Were They Really Built For?
Jun 15,2026 12:06 pm
-
Plandemic 3 – The Great Awakening
Jun 15,2026 10:30 am
-
Melinnocense: Did the Great Tribulation Already Happen? Volcanoes, Pangaea, Little Season
Jun 14,2026 8:31 pm
-
Eugenics, Fluoride & Vaccines – Neurosurgeon, Dr. Russell Blaylock
Jun 14,2026 8:47 am
-
The Agenda: Their Vision – Your Future (2025) | Full Documentary | Oracle Films
Jun 13,2026 8:39 am
-
Eric Dubay: Why The Lie About Earth’s Shape?
Jun 13,2026 8:23 am
-
Deadly Proof NASA Lies About Space Vacuum and Humans
Jun 13,2026 8:05 am
-
Inviting Generational Curses Into Your Life
Jun 13,2026 8:00 am
-
From the Fringe: The Millennial Reign of Jesus “Tartaria” and Satan’s Short Season
Jun 12,2026 8:58 am
-
If we’re living in a Post-Millennium World or Satan’s Little Season – Where did the Saints go?
Jun 12,2026 8:19 am
-
Why World Leaders Work Together to Destroy The World We Know
Jun 12,2026 8:00 am
-
Jason Jack: How did “America” transition the world into the Little Season?
Jun 12,2026 8:00 am
-
On Guard Goyim: Must See Documentary – Parasites The Cancer Within
Jun 11,2026 8:32 am
-
SlaughterBots “They Can Not Be Stopped” – Might Explain Vaxxed MAC Addresses
Jun 11,2026 8:31 am
-
On Guard: Must Hear – Dr. Lee Merritt on Cancer and the Parasite Conundrum
Jun 11,2026 8:11 am
-
Catherine Austin Fitts: “We Are Manipulated by Demonic Inter-Dimensional Beings”
Jun 11,2026 8:03 am
-
U.S. Military Documents Indicate Hiroshima and Nagasaki Atomic Bombs Were Faked?
Jun 10,2026 8:56 am
-
From the Sheople Pen: Vaccinated Bluetooth MAC Addresses at an Airport Full of the Vaccinated
Jun 10,2026 8:52 am
-
From the Bible: Listen 20 Minutes, Then Contemplate All The Lying Imposters You Listen To
Jun 10,2026 8:46 am
-
What is considered a healthy cholesterol level today is HALF of what it was 40 years ago.
Jun 10,2026 8:40 am
-
Is it true we will not keep our memory after death? | All Things New Mind Wipe! Rev 21:5
Jun 09,2026 9:00 am
-
Ayn Rand: Who is John Galt? Atlas Shrugged and Disappearing Millennial Saints
Jun 09,2026 8:33 am
-
Exposing Jesuit and Zionist Propaganda: An Important Message to All White People
Jun 09,2026 8:31 am
-
On Guard Goyim: Parasites Are Like Demons Eating Away At You From Inside
Jun 09,2026 8:15 am
-
Under the Dome: Retired Soviet Astronaut Pays a Heavy Price for Admitting Earth is Flat
Jun 08,2026 9:11 am
-
Is NASA Satanic? Why Do Demonic Images Infest the CGI Blue Marble Lie?
Jun 08,2026 8:53 am
-
Under the Dome: NASA Deception and God’s Flat Plane Truth
Jun 08,2026 8:39 am
-
Is There Any Doubt Satan Has Been Loosed for the Little Season We’re Living In?
Jun 07,2026 9:25 am
-
China Builds 870 Mile Water Canal – 300 ft Drop Flowing North – Impossible on a Globe
Jun 07,2026 8:59 am
-
Outside Your Birdcage: Lucifer’s Temple – Inside the Vatican
Jun 06,2026 9:32 am
-
Outside The Birdcage: Clouds Behind The Sun Prove It’s Not 93 Million Miles Away
Jun 06,2026 9:06 am
-
The Frankfurt School, Tavistock and the Science of Conformity to Undermine Christianity
Jun 06,2026 8:41 am
-
7 Rockets Filmed Hitting the Dome, Skipping Across the Dome, and the Space Travel Lie
Jun 06,2026 8:27 am
-
GOG MAGOG: The End of The Little Season
Jun 05,2026 8:53 am
-
The Little Season, The Last Battle + The Camp of the Saints
Jun 05,2026 8:51 am
-
Say ‘Flocking the Flockers with Flock-Blocker’ 3 Times Fast – SunFlexZone
Jun 03,2026 6:18 pm
-
Your NAME Is Written in a Book in Heaven — What Scripture Says God Has Recorded About You
Jun 02,2026 9:41 am
-
GOD REVEALED AMERICA’s Last Days to 3 Prophets — And All 3 Said the Same Thing
Jun 01,2026 9:43 am
-
Satan’s Little Season: The Christian Conspiracy Theory Taking Over YouTube
May 31,2026 3:14 pm
-
Where was the headquarters of the millennial kingdom?
May 31,2026 9:35 am
-
Most Christians Don’t Know What They ACTUALLY Are — The Identity Scripture Gives Believers Is…
May 30,2026 8:57 pm
-
They Pull 10 Million Teeth a Year — Dark Secret of Dental Industry
May 30,2026 4:26 pm
-
Turn any USB drive into a media player in 30 seconds Ford SYNC 3 & 4 Audio
May 29,2026 12:59 pm
-
Was Satan’s Little Season a Global Deception? The Watchers & Euphrates Mystery
May 27,2026 11:03 am
-
Put a Missionary on the Payroll Spotlight: Dan & Elaine Lancaster – Every Home a Lighthouse
May 27,2026 8:43 am
-
PCR Panic Returns? Hantavirus, UFO Files & Antarctica Secrets
May 26,2026 6:02 pm
-
My Experience With ChatGPT and Canva Making Images
May 26,2026 4:57 pm
-
My Revealing Experience Collaborating with ChatGPT on a Book Idea
May 26,2026 1:16 pm
-
Little Season Time Indicators Part 2: FAQs & Answering Futurist Objections
May 25,2026 4:31 pm
-
Little Season Time Indicators: Fulfilled Prophecy, Biblical Timing & The Millennial Reign of Christ
May 25,2026 4:29 pm
-
AI Fatigue: Nobody Actually Wants AI Anymore
May 24,2026 1:07 pm
-
The Last Country Doctor Who Delivered a Giant Newborn—What the Mother Said Before Dying
May 24,2026 11:28 am
-
Why All “AI Layoffs” Are Actually a Big Lie
May 24,2026 11:14 am
-
Why Tech Companies Are Quietly Cancelling AI Data Centers
May 24,2026 9:53 am
-
The Timeline Deception: Calculating Satan’s Release & Our Position In The Little Season
May 23,2026 8:19 am
-
The Matrix Was Wrong About AI — And It Changes Everything
May 19,2026 2:54 pm
-
AI Is Quietly Trying To Escape
May 19,2026 11:21 am
-
The AI data centers are part of Satan’s plan to be omniscient like God
May 19,2026 10:39 am
-
2030: The Endgame Nobody’s Talking About
May 17,2026 9:47 am
-
DNA Doesn’t Lie: Why the Khazar Conversion Stole the Name ‘Israel’
May 16,2026 8:13 am
-
5 Things Enoch Warned Before God Took Him — NO ONE Is Talking About NUMBER 3
May 16,2026 8:07 am
-
Fascinating video of Dr. Rashid Buttar’s interview with Drew Griffin on CNN in 2021
May 15,2026 8:10 am
-
How To Build An AI Agent With No Code In 2026 | TechaiFin
May 13,2026 11:08 am
-
Prayer Request: Like Jesus Commanded “Peace Be Still”; Hantavirus Lies Be Thwarted!
May 13,2026 8:08 am
-
Time is Short. What They’re Showing Us, What it Means, and What I’m Doing to Prepare.
May 12,2026 6:12 pm
-
The 10 Best AI Websites Nobody Is Talking About in 2026 | TechaiFin
May 12,2026 5:23 pm
-
The Vaxxed Are Quietly Slipping Away
May 12,2026 8:12 am
-
The Amish Have Never Been to a Dentist — The $2 Paste They’ve Used for 200 Years
May 11,2026 7:53 am
-
Prepare NOW for UFO Disclosure, U.S. Govt Reportedly Tells Pastors
May 09,2026 5:56 pm
-
Spraying The Sky, Targeting Food Supply & The Next Plandemic?
May 09,2026 5:08 pm
-
Crotch Cams: The New AI Cameras Photographing Drivers
May 09,2026 11:11 am
-
Download These 15 Files Tonight — The Internet Won’t Be There When You Need Them
May 09,2026 10:10 am
-
The AI Takeover Nobody Can Stop, Explained Like You’re 5
May 09,2026 9:59 am
-
The $400 Billion Tech Disaster Explained Like You’re 5
May 09,2026 8:13 am
-
The Windows 11 Crisis Explained Like You’re 5
May 09,2026 8:02 am
-
Admiral Byrd Gave One Lecture at the Naval Academy in 1956 —The Recording Played Once and Was Erased
May 04,2026 7:28 pm
-
Is He Mad? … or is Trump Destroying the Old Order on Purpose? The Collapse May Be the Plan!
May 04,2026 7:22 pm
-
They Collected Every Bible Printed Before 1800 — The New Ones Had Different Pages
May 03,2026 9:16 am
-
How Rockefeller Bought Up All Homeopathic Medical Schools and Shut Them Down
May 02,2026 7:13 am
-
Energy Crisis EXPLODES, “Shots Fired” & The Digital Prison
Apr 30,2026 9:49 am
-
2030: The Endgame Nobody Talks About – Your Planned Future
Apr 30,2026 8:56 am
-
SHOCKING AI That Broke the Internet This Month: DeepSeek New AI, GPT 5, Google’s MAD & Mangle..
Apr 29,2026 6:36 am
-
This Is What Life Was Like in Tartaria Before the Reset!
Apr 29,2026 6:26 am
-
Six Families Divided America Between Them After 1860 — Oil, Steel, Rail, Banks, Land, and Media
Apr 28,2026 11:26 am
-
Jason Jack: Where is the Bottomless Pit?
Apr 25,2026 11:51 am
-
Tucker Responds to Israeli Soldier Caught Smashing the Face of Jesus Statue
Apr 24,2026 12:34 pm
-
What I Believe After 20 Years and 36,000 Hours of Matrix Research at 5 Hours a Day
Apr 24,2026 9:06 am
-
The True Origin of Tartaria’s Blue Blood Elite
Apr 23,2026 9:45 pm
-
China Population Cut in Half After 3 Mandatory Vaccines?
Apr 23,2026 1:36 pm
-
Rick Wiles Calls on God to Destroy Israel
Apr 20,2026 8:38 am
-
Exposing The Dark Side of America’s AI Data Center Explosion
Apr 18,2026 8:06 am
-
2026 SECRET Bilderberg Group maps out the future of warfare, global AI, and Russia.
Apr 18,2026 7:33 am
-
Millions Dead Because Ivermectin Research Was Suppressed in the 1950s?
Apr 18,2026 7:11 am
-
Strait of Hormuz BLOCKED? Fake Ceasefire, Oil Crisis & What’s Coming Next
Apr 14,2026 9:10 am
-
God Responds to Prayer Immediately – Don’t Mess Around With God
Apr 13,2026 9:04 am
-
They Renamed 1,213 Cities On A Single Day to Hide Tartaria
Apr 12,2026 3:47 pm
-
Prayer Request: Christians in Lebanon are being SLAUGHTERED by Israel in a savage massacre
Apr 12,2026 9:12 am
-
Shocking New Lab Findings on Glyphosate in Grocery Store Bread
Apr 10,2026 2:47 pm
-
Watch NASA Artemis II Masonic Actor-nauts Exit the Rocket Stage Left Before Launch
Apr 10,2026 9:41 am
-
NASA’s Artemis moon mission hoax powered by A.I. takes us where no green screen has gone before!
Apr 09,2026 10:40 am
-
Tucker on Trump’s Desecration of Easter and a Warning to Christians Everywhere
Apr 07,2026 8:47 am
-
The $98 Billion NASA Artemis Moon Mission and Masonic Actor-naut Distraction
Apr 06,2026 12:41 pm
-
100 Different Cancers Cured in 5 Days with a Natural Cure? 2 Minute Video
Apr 06,2026 8:19 am
-
The Amish Have Never Bought Fertilizer — This $2 Wire is Now Illegal
Apr 04,2026 8:31 am
-
Better Than Potatoes. Plant Once, Harvest Forever, Even In Winter.. That’s Why They Buried It.
Apr 04,2026 8:08 am
-
Implications Of The Little Season – Part 1
Apr 04,2026 7:56 am
-
Why You Should Try Kerrygold Irish Butter with Avocado Oil
Apr 03,2026 9:23 pm
-
Baby Trump Addresses the Nation!
Apr 03,2026 8:22 pm
-
Tartaria’s Impossible Glowing Cities — Before Tesla & Edison
Apr 03,2026 7:53 pm
-
Ronald Reagan’s 1984 Alliance With The Catholic Church
Apr 02,2026 10:16 am
-
Documentary: ‘Pharmakeia’ the Sorcerer’s Wand – The Hidden Spells in Big Pharma’s Magic Pills
Apr 02,2026 9:05 am
-
Outside Your Birdcage: Why Christians Are God’s Chosen People
Mar 31,2026 8:59 am
-
The Old World Airports They Erased — 200 Years Before Planes Were “Invented”
Mar 29,2026 11:24 am
-
Baby Trumps Peace Demands Get Rejected By The Supreme Leader of Iran!
Mar 28,2026 12:15 pm
-
Full Spectrum Collapse: Fuel Shortages, Panic Buying & Poisoned Skies – EyesIsWatchin
Mar 27,2026 8:52 pm
-
Tucker’s Weekend with Bibi: South Lebanon Christians – Bless/Curse Thee – Sowing/Reaping
Mar 27,2026 11:11 am
-
Empaths With Few or No Friends Usually Have These Traits
Mar 27,2026 9:25 am
-
Do hagiographies within the Vatican’s restricted archives align with Little Season Eschatology?
Mar 27,2026 8:37 am
-
Everyone Says ‘They’ Destroyed Tartaria… But WHO Are ‘They’?
Mar 26,2026 5:44 pm
-
Fenbendazole and Cancer Facts You’re Not Supposed to Know
Mar 24,2026 9:12 am
-
Put a Missionary on the Payroll Spotlight: Love for Myanmar
Mar 24,2026 8:00 am
-
6 PILLARS OF PROOF JESUS ALREADY RETURNED Millennial Kingdom, Mud Flood, Tartaria, Little Season
Mar 23,2026 7:22 pm
-
The Rise of Amazon / eBay / Social Media and the Decline of the American Mall
Mar 21,2026 9:17 am
-
Why They Demolished Every Hospital Built Before 1900
Mar 21,2026 7:08 am
-
Trump’s Gas Prices Cold Open – SNL
Mar 20,2026 6:51 pm
-
The Interview That Made Her a Target (CERN insider speaks out) – Dr. Astrid Stuckelberger
Mar 20,2026 5:21 pm
-
Grok AI Was Asked About Jesus’ Resurrection in the Ethiopian Bible
Mar 20,2026 1:15 pm
-
Breaking: Netanyahu in a Coma – Sowing and Reaping
Mar 19,2026 4:46 pm
-
IRAN killed Benjamin Netanyahu’s son and Wiped Out a $460 Million AWACS Plane SAAB ‘GlobalEye’
Mar 19,2026 10:49 am
-
The Dark Reason They Destroyed Pre-1800 Books
Mar 18,2026 9:14 am
-
Old Hospital Pre-Surgery Peel-A-Pound a Day Cabbage Soup
Mar 18,2026 8:19 am
-
Here’s Why You Should Never Buy a New Car (It’s Not About the Price)
Mar 14,2026 10:49 am
-
The World If Tartaria Was Still Here Today
Mar 14,2026 8:38 am
-
Birth Certificates — The System That Erased Old World Heritage
Mar 14,2026 8:18 am
-
Why Americans Were So Slim in the 1970s
Mar 13,2026 9:54 pm
-
Why Didn’t God Just Destroy Satan?
Mar 12,2026 10:23 pm
-
Did Satan’s “Little Season” Begin in 1776?
Mar 12,2026 4:02 pm
-
Ezekiel Diet Friendly Deals: Kroger Simple Truth Organic Sprouted Grain & Legume Bread
Mar 12,2026 3:34 pm
-
Life is a Test Part 2 – Works. What is expected of us in the Little Season?
Mar 12,2026 2:48 pm
-
Finally, Something Very Interesting: Gog & Magog – The final Battle against the Saints
Mar 12,2026 2:08 pm
-
Tartaria Lost Children and the Vanished Adults – The Truth Behind the Orphan Trains
Mar 12,2026 12:02 pm
-
Updated: Netflix Series ‘Bloodline’ a Textbook Lesson in the Generational Curse
Mar 06,2026 1:25 pm
-
THE 13TH MONTH THEY DELETED FROM EVERY CALENDAR – TARTARIA VAULT
Mar 06,2026 8:50 am
-
War Update Israel’s True Motives, Potential False Flags, and Oncoming Global Crisis – Tucker Carlson Network
Mar 05,2026 9:04 pm
-
Operation Epic Fury: Armageddon, Project Artichoke & Mexico Psy-Slop – EyesIsWatchin
Mar 05,2026 6:53 pm
-
The Millennium Kingdom already happened: Timeline (500AD – 1500AD)
Mar 02,2026 11:32 am
-
BREAKING: The REALITY The Media Isn’t Telling You About Iran
Mar 01,2026 3:43 pm
-
HOW DID PERSIA “BECOME” IRAN? THE STORY NO ONE TOLD YOU
Mar 01,2026 3:09 pm
-
US launches nearly 900 strikes on Iran in RARE daytime operation
Mar 01,2026 1:31 pm
-
Most Christians Can’t Discern Between Biblical Israel and Antichrist Israel
Feb 27,2026 11:15 am
-
Classified Documents Reveal Plan To Exterminate Millions of Americans During Collapse
Feb 26,2026 5:26 pm
-
How Satan Enslaved Us at the Beginning of the Little Season
Feb 25,2026 2:49 pm
-
Why do ALL governments LIE about space? The Fractured Mind. @Weareallenergy1
Feb 22,2026 5:19 pm
-
Did the Nephilim Look Like Clowns? | Satan’s Little Season Podcast
Feb 21,2026 11:50 am
-
Richard Branson Forgets the Fisheye Camera Lens Proves Flat Earth on Galactic Flight
Feb 21,2026 9:21 am
-
Is AI Ancient? | Satan’s Little Season Podcast
Feb 20,2026 7:55 pm
-
Baal’s Olympics: Moloch Worship, Wexner & The Blackmail Cartel – EyesisWatchin
Feb 20,2026 2:39 pm
-
Satan’s Little Season EZD Recommendation: Little Season Podcast
Feb 20,2026 1:44 pm
-
Was Jesus the King of Tartaria? | Millennial Kingdom | Satan’s Little Season
Feb 18,2026 11:09 am
-
Why Satan Needs Politics – The Little Season is the final sorting stage for the next phase
Feb 17,2026 9:16 am
-
Was there a Mud Flood and Reset? | Millennial Kingdom | Satan’s Little Season
Feb 16,2026 2:39 pm
-
What is the Little Season? | Millennial Kingdom | Satan’s Little Season
Feb 16,2026 1:59 pm
-
What About Everyone Who Lived and Died Before Christ? They’re Back for Their Little Season Test!
Feb 16,2026 1:14 pm
-
SLS: A Bad FAKE Ghislaine Maxwell in Prison for the Real Ghislaine Maxwell?
Feb 16,2026 10:09 am
-
SLS: COMPILATION OF THE DEAD AND DYING FROM TRUMP’S “AMAZING” COVID VACCINE
Feb 16,2026 8:09 am
-
SLS: Of Course Valentine’s Day is Corrupted in Satanism
Feb 14,2026 11:45 am
-
Why Is the Vatican AFRAID of Sabbath-Keeping Adventists—The Truth Rome Is HIDING
Feb 14,2026 10:15 am
-
The Danger of Seeing What Others Don’t – Carl Jung Original
Feb 14,2026 8:59 am
-
Baby Trump Goes To The Moon With Elon Musk!
Feb 12,2026 6:57 pm
-
What Makes Marriage a Legal Contract That Creates Liability Under Divorce Law?
Feb 09,2026 3:42 pm
-
The Modern Financial Crisis- CBDCs, the Genius Act and the Beginning of the End of the Little Season
Feb 09,2026 2:25 pm
-
The 6 Million Epstein Files, Designer Babies & The Synthetic Life Plan
Feb 08,2026 10:10 am
-
SLS NWO: Catherine Austin-Fitts warns of Digital ID having total financial control
Feb 06,2026 9:56 am
-
SLS: When the Largest Christian Church Regularly Rapes, Tortures, Kills, & Dismembers Children
Feb 06,2026 9:11 am
-
Catherine Austin Fitts: Agenda 2030 reset; ‘system’ ends by 2030!
Feb 04,2026 11:29 am
-
Billionaires are selling everything: the $50 billion warning sign
Feb 03,2026 4:38 pm
-
Bill Gates SHOCKED As Dell ADMITS Nobody Wants Windows 11 AI PCs TechPoint
Feb 02,2026 9:18 am
-
Dr. Lee Merritt – Very Scary Times Really, The Major Shock That’s Coming
Feb 01,2026 2:44 pm
-
Doomsday Clock, Discombobulator & The Biometric Control Grid – EyesIsWatchin
Jan 31,2026 2:56 pm
-
Why Does Only The Ethiopian Bible Reveal The Hidden Truth About The Teachings Of Jesus?
Jan 31,2026 11:32 am
-
The 9 Mega Banks OCC Rated “Critical” — Wall Street Is Panicking
Jan 30,2026 10:02 am
-
“They Are Keeping This From You” | Whitney Webb
Jan 29,2026 5:43 pm
-
Find Out What the Coming Big Bank Bail-In Is About
Jan 29,2026 11:46 am
-
Safest vs Riskiest: I Ranked America’s Top 20 Banks (Surprising Results)
Jan 28,2026 5:35 pm
-
Credit Unions vs Banks: Which Is Actually Safer Right Now?
Jan 27,2026 6:52 pm
-
Breaking: The OCC Just Downgraded 47 Major Banks — Here’s The List They Don’t Want You To See
Jan 26,2026 9:47 am
-
Warren Buffett: The 5 Safest Banks in America Right Now
Jan 26,2026 9:34 am
-
Why The Titanic Sinking Was The Final Step to Create The Federal Reserve
Jan 23,2026 6:27 pm
-
Walmart Caught Using Padded Weights to Overcharge for Meat?
Jan 22,2026 4:16 pm
-
VAX A NATION: Public Premiere “EVERY single vaccine has an excipient that is a human toxin.”
Jan 22,2026 2:06 pm
-
The Financial Endgame, Silent Weapons & Cognitive Warfare – EyesIsWatchin
Jan 22,2026 12:53 pm
-
Little Season Eschatology is Not Preterism
Jan 21,2026 10:56 am
-
The Hidden Link Between Parasites and Diabetes They Never Told You
Jan 20,2026 5:13 pm
-
NASA’s OPERATION BLUE BEAM EXPLAINED
Jan 20,2026 7:55 am
-
Health reform: 7 nighttime bad habits destroying your health
Jan 19,2026 6:45 pm
-
The Depopulation Agenda Fits The Satanic Directive To Lie, Kill, Steal, & Destroy
Jan 18,2026 6:27 pm
-
Stolen Healing Med Bed Technology: The 19th & 20th Century Directive to Lie, Kill, Steal & Destroy
Jan 16,2026 10:14 am
-
“We’ve never seen anything like it, blood pouring out of our faces” US Directed Energy Weapons
Jan 15,2026 10:31 am
-
AI Explains The Nefarious Purpose of 5G Frequency
Jan 14,2026 8:51 am
-
The New Dietary Guidelines Quietly Admit They Were Wrong (Here’s the Proof)
Jan 12,2026 10:33 am
-
Regime Change 2.0, Blackouts on Command & 2026 Psy-Ops Accelerate
Jan 11,2026 8:34 am
-
Days of Noah: What They Don’t Tell You About the Population
Jan 09,2026 10:36 am
-
Why the US Wants to BUY Greenland (It’s Not a Joke)
Jan 08,2026 6:29 pm
-
5 Assets They Will Seize First in a Crisis (And How To Hide Them)
Jan 08,2026 4:40 pm
-
Why 40 Million Homeowners Will Lose Everything in 2026
Jan 08,2026 3:06 pm
-
Who are the Rest of the Dead from Revelation 20:5?
Jan 07,2026 11:06 am
-
This Ancient Code Reveals EXACTLY How Your Words Control Reality… The Universe Obeys This
Jan 06,2026 4:17 pm
-
Why BlackRock Just Moved $2.1 Trillion Out of America (And What It Means for You)
Jan 05,2026 6:53 pm
-
Baby Trump: I Stole the President and Took Over Venezuela
Jan 05,2026 11:09 am
-
Charlie Munger: Don’t Buy a House — Here’s What I Did for 30 Years
Jan 05,2026 9:33 am
-
AI-AI-Oh-No: They Said AI Would Replace You By Now – Exposing AI Grifter Lies
Jan 05,2026 9:09 am
-
MORGAN STANLEY MEMO LEAKED: Exit All Silver Positions Before Month End?
Jan 04,2026 12:46 pm
-
Trump’s Israel Prize, Epstein Slop, Israel’s AI Takeover & The Next Plandemic
Jan 03,2026 11:13 am
-
Why the USSR Declared War on Tartarian Bells — The Sound They Couldn’t Allow
Jan 03,2026 8:25 am
-
Researched Flat Earth for 3 Years – Part 14 – The Satellite ‘Mystery’
Jan 02,2026 3:02 pm
-
A message for those awakened from the matrix
Jan 02,2026 12:42 pm
-
Michael Snyder: 10 Very Important Trends To Watch As We Enter 2026
Jan 02,2026 11:38 am
-
2026: YEAR OF THE FIRE HORSE & BOLSHEVIKS – Reinette Senum
Jan 02,2026 9:04 am
-
THE HUMAN ANTENNA (2025) ▪️ DEATH VAXX DOCUMENTARY
Dec 29,2025 12:43 pm
-
Should You Remove The SIM In Your Car?
Dec 28,2025 11:55 am
-
Mechanics Tested Major Gas Stations and One Hidden Finding Is Destroying Engines Nationwide
Dec 28,2025 10:22 am
-
The Bells They Took – How 1914 Silenced Tartaria’s Hidden Technology
Dec 28,2025 9:30 am
-
[Mar 14, 2020] Coronavirus Caused By 5G
Dec 27,2025 3:03 pm
-
AI Found Millennial Reign References in Vatican Archive? Little Season Researchers Threatened?
Dec 26,2025 8:46 pm
-
The Little Season – Why does the church not teach it? Why does the world try to hide it?
Dec 26,2025 6:28 pm
-
How December 25 Became Christmas
Dec 24,2025 5:00 pm
-
Greenland News: The Fight To Surround The Camp of the Saints
Dec 24,2025 11:16 am
-
When The Congregation Has More Holy Spirit Discernment Than The Pastor
Dec 24,2025 9:37 am
-
Who Played The Leading Roll in U.S. White Birthrate Decline?
Dec 22,2025 9:22 am
-
‘Jesus is the Lord’
Dec 22,2025 6:47 am
-
Bondi Beach, Venezuela WMDs, UBI Control System & the Super Flu Script – EyesIsWatchin
Dec 21,2025 9:04 am
-
Suggested Auto Strategy: 17 Habits to Make Your Car Last Over 500k Miles Without Repairs
Dec 20,2025 11:48 am
-
How They Broke us All – Warning Graphic
Dec 19,2025 4:59 pm
-
I Researched Flat Earth for 3 Years – Part 13 – Rocket Truth Revealed [Mystery Teachings]
Dec 19,2025 10:30 am
-
Pharma Thriving off Gluttonous People – Are All Injectables Depopulation Weapons?
Dec 18,2025 3:07 pm
-
NWO: Jesuit Anthony Fauci says the next outbreak will be a respiratory disease
Dec 18,2025 1:50 pm
-
Should We Be Playing With Satan’s Toys? Technology is Witchcraft in this Little Season.
Dec 14,2025 6:43 pm
-
FDA Bombshell, UK Speech Crackdown & Imminent False Flag – EyesIsWatchin
Dec 14,2025 10:38 am
-
How AI Takeover Could Happen In 2 Years: A Scenario
Dec 13,2025 6:21 pm
-
19th Century Asymmetric Wars: Who Was Really Being Wiped Out Worldwide?
Dec 13,2025 10:56 am
-
1/2 Cup per Day to Fix Insulin Resistance & Shrink Belly Fat | Dr. William Davis
Dec 11,2025 6:28 pm
-
AI Blackouts, Klaus Schwab’s Intelligent Age & The Bi-Partisan Psy-Op – EyesisWatchin
Dec 09,2025 6:15 pm
-
DeFlock.me: You Are So Flocked – See Where All The Flock Tag Cameras Are In Your Area
Dec 07,2025 10:07 am
-
38 Trillion to Digital Prison: UBI, AI & the Rockefeller Beast Machine – EyesIsWatchin
Dec 07,2025 9:02 am
-
Baby Trump’s Alaska Christmas Tree Adventure Goes Wild!
Dec 07,2025 8:39 am
-
Anjelah Johnson-Reyes Learns About The South | Say I Won’t
Dec 06,2025 4:38 pm
-
Diaper Diplomacy: “All these white bales are not Christmas gifts from Santa.” | Hegseth
Dec 06,2025 4:32 pm
-
250,000 Orphans VANISHED: The 19th-Century Disaster They’re Covering Up — Trains & Mud Flood Theory
Dec 05,2025 8:38 pm
-
This Is The Catastrophe That Forced Humanity to Start Over in 1700
Dec 04,2025 6:27 pm
-
Rise of the Safety State | Greg Reese
Dec 04,2025 9:10 am
-
A Brave New 1984: How We Learned to Love the Cage | Humanly Curious
Dec 03,2025 11:01 am
-
Leaked: FBI “Scrubbed” Trump From Epstein Files (The Cover-Up)
Dec 02,2025 7:01 pm
-
Fake Space Mistakes: THE CHINESE DIDN’T GET NASA’S MEMO
Dec 02,2025 4:18 pm
-
Project Blue Beam: NASA & UN’s Plot to Fake an Alien Invasion & the Second Coming
Dec 01,2025 5:45 pm
-
Who Are We – The Little Season Slaves? The Population Explosion at Beginning of the Little Season.
Dec 01,2025 10:12 am
-
POV: What You Would See During an AI Takeover
Nov 30,2025 9:42 am
-
Rick Rubin and The Occult Secret Behind AI Music
Nov 30,2025 9:37 am
-
How to Hide in Plain Sight: Next-Level Digital Privacy
Nov 30,2025 9:32 am
-
Trump’s Plan to Bring Back the Gold Standard (The Hidden 2027 Reset)
Nov 30,2025 9:28 am
-
The Zionist Blueprint: The Protocols of Zion – A forgery or real? You Decide
Nov 29,2025 3:55 pm
-
Diaper Dumps: Baby Trump
Nov 29,2025 2:27 pm
-
2 Days until Nationwide Facial Recognition-Surveillance with Ring and Flock
Nov 29,2025 1:37 pm
-
NWO: Dr. McCullough says 71% of people found dead at home was due to COVID-19 vaccine!
Nov 28,2025 11:24 am
-
The 2026 AI Crash: Why Nvidia, Microsoft & AMD Will Fall 65% Simultaneously
Nov 27,2025 7:49 pm
-
Jason Jack: Did the Thanksgiving holidays originate during the Millennial Reign?
Nov 26,2025 9:47 am
-
Rush Limbaugh 2010: Socialism Nearly Killed The Pilgrims
Nov 26,2025 8:50 am
-
The Origin of Thanksgiving Foods & Today’s Lab Coat GMO Bigger Better Tastier Versions
Nov 26,2025 8:00 am
-
7 Easy Ways to Avoid Holiday Weight Gain – And Have a Great Time Doing It
Nov 26,2025 7:31 am
-
3I/ATLAS Psyop Update: Michio Kaku Warns 3I/ATLAS Could Be ALIEN Tech (And NASA is WRONG)
Nov 25,2025 7:06 am
-
The Golden Age Commercial Real Estate Collapse Of America— The Hidden 2026 Crisis
Nov 23,2025 11:24 am
-
Engage Proverbs 27:12 NOW: The Hidden Cycle That Predicts 2026 Crash
Nov 23,2025 10:49 am
-
Why Your Savings Are Trapped: The Golden Age 2026 Collapse verses 1929 Collapse
Nov 23,2025 9:55 am
-
Billionaire Bunkers: What Does Silicon Valley Know About The End of The World?
Nov 22,2025 2:33 pm
-
Evidence That Jesus & The Saints Already Completed The Millennial Reign
Nov 22,2025 7:08 am
-
Avi Loeb on 3I/ATLAS Image Reveal: Did NASA Just Try to Gaslight Us with a Blurry Photo?
Nov 22,2025 6:43 am
-
Millennial Kingdom Theory: Camp Of Saints Is Still Here?
Nov 21,2025 6:36 pm
-
The Golden Age of Silent Collapse: Why Dealerships CAN’T SELL CARS in 2025
Nov 21,2025 2:17 pm
-
Jason Jack – Short Season Eschatology: Who are the “Four Horsemen” of Revelation 6?
Nov 21,2025 12:13 pm
-
Millions of Christians were fooled with the ‘Scofield Reference Bible’ to become Christian Zionists
Nov 21,2025 9:37 am
-
The Golden Age of Silent Collapse: 12 Big Restaurant Chains That Are Falling Apart In 2025
Nov 20,2025 9:03 pm
-
The Golden Age of Silent Collapse: The Rise and Fall of Las Vegas — Empty Casinos and Silent Streets
Nov 20,2025 8:37 pm
-
The Golden Age of Silent Collapse: 15 Big Fast Food Chains That Are Falling Apart In 2025
Nov 20,2025 8:28 pm
-
Nostalgia: Why the Chrysler 225 Slant Six Outlived America’s Muscle Car Era
Nov 20,2025 4:04 pm
-
Bee-agra: Why Bee Stings Are Like Taking Viagra for a Week
Nov 20,2025 9:27 am
-
3I ATLAS Pysop News: NASA Shares Interstellar Comet 3I/ATLAS Images
Nov 19,2025 5:32 pm
-
3I ATLAS Psyop Update: NASA Breaks Silence as New CME Targets It| Michio Kaku
Nov 19,2025 12:55 pm
-
Educate Before You Vaccinate: Dr. Paul Thomas studied 3,324 children and found massive…
Nov 19,2025 10:32 am
-
WARNING! Apple Just Released the Digital ID for Americans?
Nov 18,2025 6:48 pm
-
“We can never let this happen again” Trump Signs Reopen Bill, Calls To Nuke Filibuster
Nov 17,2025 2:12 pm
-
Why Did Men Used to Look Older? | Make This Make Sense
Nov 17,2025 1:49 pm
-
8 Easy Thanksgiving Recipes That Won’t Break the Bank | Allrecipes
Nov 17,2025 10:11 am
-
Tired of Make Believe: How to Love Satan’s Servants
Nov 16,2025 10:42 am
-
Before the Shoes You Have On Wear Out You’ll Be Starving, Homeless, or Dead if You’re a Christian
Nov 16,2025 9:21 am
-
Jason Jack: Are the dates of early church fathers’ writings accurate?
Nov 14,2025 7:49 pm
-
Outside Your Denomination’s Birdcage: The Millennial Reign & Satan’s Short Season
Nov 14,2025 10:03 am
-
From the Killing Fields: The Pandemic Hospital Mass Murder Incentive System
Nov 13,2025 11:26 am
-
Tucker Carlson: US Government Admits Chemtrails Are Real. Dane Wigington Reveals All.
Nov 13,2025 11:04 am
-
When the Holy Spirit is Directing Your Steps
Nov 11,2025 8:53 am
-
Heliocentric Globetard Universe-ity: 3I/ATLAS Is Flashing Lights Toward Earth, Now It’s Approaching
Nov 11,2025 8:01 am
-
“End the filibuster and just put everybody back to work.” Trump’s Oval Q&A gets spicy.
Nov 09,2025 3:28 pm
-
Is 3I/ATLAS the Trigger for the Project Blue Beam ALIEN FALSE FLAG We Were Warned About?
Nov 09,2025 12:47 pm
-
Millennial Kingdom Proof – Who Really Built These Cathedrals?
Nov 07,2025 7:43 am
-
Satan’s Little Season Is Almost Over
Nov 06,2025 5:47 pm
-
Satan’s Little Season “Proof Millennial Kingdom of Christ Has Already Happened”
Nov 06,2025 4:02 pm
-
Words Matter – How The Manipulation of Language has Deceived the Entire World in the Little Season
Nov 05,2025 10:29 am
-
Reject Digital ID or Lose Everything with Catherine Austin Fitts, Andrew Bridgen & Alex Newman
Nov 05,2025 8:20 am
-
So We’re Living in SLS, Now What? Navigating our Way Through the Little Season – Part 2
Nov 04,2025 4:25 pm
-
So We’re Living in SLS, Now What? Navigating Our Way Through the Little Season.
Nov 04,2025 1:55 pm
-
3I/ATLAS – The End of the Little Season? Part 3 – Media. Is this what they’ve been prepping us for?
Nov 04,2025 12:59 pm
-
The End of Satan’s Little Season. Using Evidence and Logic to Predict This Final Stretch.
Nov 04,2025 10:42 am
-
Hollywood hinting at Satan’s Little Season twenty-six years ago
Nov 03,2025 4:41 pm
-
The New Ballroom – Trump takes questions on the East Wing demolition
Nov 02,2025 3:59 pm
-
Corporate Culling, Alien Comets, Escaped Monkeys & Smartdust Trails
Nov 02,2025 2:15 pm
-
Jason Jack: Are modern day Bible atlases accurate?
Nov 02,2025 2:04 pm
-
Guess what’s missing from most churches’ end-times’ charts?
Nov 02,2025 10:43 am
-
Satan’s Little Season: A Short Scripture-Based Breakdown of What It Really Means
Nov 02,2025 9:55 am
-
From the Fringe: Restaurant Table Bacteria
Oct 31,2025 10:09 pm
-
Why Crowds Always Choose Lies Over Truth – Plato’s Brutal Warning
Oct 31,2025 9:27 pm
-
The Fact Hunter: Halloween – The Devil’s Disguise
Oct 31,2025 3:01 pm
-
Very Interesting: Nummerology of 1776 / Statue of Lucifer
Oct 31,2025 11:58 am
-
Walmart RESPONDS: Democrats’ SNAP Shutdown Sparks LOOTING & CHAOS Across America
Oct 30,2025 7:53 pm
-
Brace for Impact: The Sinister Plan Behind the SNAP EBT Shutdown
Oct 30,2025 3:22 pm
-
Little Season Eschatology: The Final Fire – Judgement, Renewal, and The Eternal Hope
Oct 27,2025 2:11 pm
-
Very Interesting: Jesus Second Coming already happend in 70AD
Oct 27,2025 9:28 am
-
Very Interesting: New Jerusalem / Northpole / Emerald City / Zion
Oct 26,2025 12:43 pm
-
Outside Your Birdcage: Charlie Kirk’s Staged Death Exposed
Oct 26,2025 10:30 am
-
Very Interesting: Terra de Iesso – The Land of Jesus
Oct 25,2025 10:12 am
-
From the Jungle: EBT Card Chaos Next Week?
Oct 24,2025 1:19 pm
-
Very Interesting: Satan’s little Timeline – Documentary
Oct 24,2025 9:26 am
-
Does the 1560 Geneva Bible Prove the Great Tribulation Already Happened?
Oct 22,2025 11:59 am
-
How China’s Social Credit Score is working: “they didn’t go broke, they got deleted.”
Oct 22,2025 11:05 am
-
320 Pro Athletes Dead – since the Covid Jab rollout
Oct 22,2025 9:37 am
-
Democide News: Bayer Lobbies For IMMUNITY From Chemical Poisoning Lawsuits!
Oct 20,2025 8:44 am
-
NWO: Catherine Austin-Fitts on the depopulation plan
Oct 19,2025 12:54 pm
-
From the Fringe: What an Amazing Coincidence Parody
Oct 19,2025 8:20 am
-
From the Fringe: An Outstanding 5G Documentary
Oct 18,2025 1:50 pm
-
2 Minute Demonstration – How Fast Chlorine in Tap Water is Absorbed by Your Skin
Oct 18,2025 8:06 am
-
Outside Your Birdcage: The Charlie Kirk Hoax in 3 Minutes
Oct 17,2025 8:00 pm
-
Trump’s peace deal & the ANTICHRIST ritual at the pyramids – dawning of the New World Order!
Oct 17,2025 4:39 pm
-
Transhumanist Plan To Exterminate All Humans Now Public Information
Oct 17,2025 12:58 pm
-
26 Amazing Benefits and Uses for Hydrogen Peroxide
Oct 17,2025 8:56 am
-
Suggested Blackstone Real Estate Strategy for Sunseeker Resort Charlotte Harbor
Oct 17,2025 8:55 am
-
Outside the Birdcage: Fluoride in the Water Causes 20% of Cancer Deaths in U.S.?
Oct 17,2025 8:53 am
-
WARNING! South Park & Peter Thiel know this about the ANTICHRIST…and so should you!
Oct 17,2025 8:50 am
-
Little Season Eschatology: Prologue – Unveiling the Hidden Millennium | Humanly Curious
Oct 15,2025 10:36 am
-
Message to Mike Adams: Rightly Dividing the Word and Salvation by the Grace of God
Oct 13,2025 3:29 pm
-
“Don’t take Tylenol if you’re pregnant.” RFK Jr drops a circumcision bombshell at the cabinet table
Oct 13,2025 10:54 am
-
Sr. Navy official saw ‘something’ underwater, ‘big as a football field moving at 200 mph’
Oct 13,2025 9:33 am
-
Dr. Stan Monteith interviews Bill Sardi – The Story of the Longevity Pill – Resveratrol
Oct 12,2025 8:08 am
-
Compelling Historical Evidence for the Virgin Birth of Jesus Christ
Oct 12,2025 8:00 am
-
The Male Foreskin. Genital Mutilation in America En Masse?
Oct 08,2025 8:57 am
-
The Top 10 Weight Loss, Skin, & Energy Supplements – Dr. Nicholas Perricone
Oct 08,2025 8:17 am
-
Little Season Eschatology: The Season of Deception is Now – The Evidence (Part 8)
Oct 07,2025 11:52 am
-
Scientific proof that blueberries support weight loss
Oct 07,2025 7:13 am
-
Top foods to naturally increase HGH for men
Oct 04,2025 8:44 am
-
7 Best Herbs for Boosting Metabolism and Helping You Lose Weight
Oct 04,2025 7:17 am
-
When Female Carboholics Get Married
Oct 02,2025 7:30 am
-
Jesus Christ healed the sick using medical marijuana, researchers claim
Oct 01,2025 8:55 am
-
Melinnocense: The Abomination of Desolation – Satan’s Little Season & Past Fulfillments
Sep 27,2025 8:07 pm
-
Melinnocence: Biblical 7000-Year Timeline & Satan’s Little Season
Sep 27,2025 7:46 pm
-
The Ridiculous TYLER ROBINSON News Where Noticing Is Antiseptic
Sep 27,2025 10:38 am
-
“A bad escalator and a bad teleprompter” — Trump implies UN sabotaged him
Sep 25,2025 4:52 pm
-
While You Were Distracted: September 18, 2025 Early Morning Invasion From Space?
Sep 25,2025 2:08 pm
-
Little Season Eschatology: The Dawn of the Little Season of Deception (Part 7) | Humanly Curious
Sep 24,2025 8:18 am
-
Dr. Vernon Coleman: The Depopulation Plan
Sep 23,2025 11:28 am
-
Trump and RFK Jr. Obfuscate Vaccine Induced Autism Rates with a Tylenol Ruse
Sep 23,2025 8:13 am
-
From the Pit: Something is off about Erika Kirk
Sep 22,2025 8:35 am
-
ChatGPT Says: If We’re Living in Satan’s Little Season We Only Have 5 More Years
Sep 21,2025 1:44 pm
-
From the Fringe: NASA Uses Greenland to Fake Mars?
Sep 21,2025 1:04 pm
-
Put a Missionary on the Payroll Spotlight: Joe & Michelle Campos – Things To Come Mission
Sep 21,2025 10:57 am
-
See you in VALHALLA! Does this cryptic goodbye tell us Kirk is alive & well in witness protection?
Sep 20,2025 10:11 am
-
An eyewitness to Charlie Kirk’s murder was cut off mid-account as people rushed in, grabbed him
Sep 20,2025 9:59 am
-
Charlie Kirk Assassination, Psyop Frenzy & the Study They Don’t Want You To See
Sep 19,2025 12:23 pm
-
Confirmed: Fake Space Is Gay
Sep 18,2025 11:33 am
-
What the GENIUS ACT Will Soon Bring | Greg Reese
Sep 18,2025 9:14 am
-
Little Season Eschatology: Tartaria, Mudfloods and the MK (Part 6) | Humanly Curious
Sep 17,2025 11:43 am
-
Brandt Burleson: How I Helped Israel Propagandize American Christians
Sep 17,2025 10:12 am
-
Charlie Kirk’s Utah Images Show a Vertical Bulge on the Left Side of His Neck
Sep 17,2025 9:20 am
-
From the Fringe: You are ALREADY eating FAKE FOOD !!
Sep 17,2025 9:02 am
-
Diaper Diplomacy: “Everybody’s corrupt—but you?” Bernie & RFK Jr. Deathmatch
Sep 16,2025 3:36 pm
-
Charlie Kirk’s beloved wife, Mrs. Erika Kirk addresses the Nation.
Sep 16,2025 11:34 am
-
The Charlie Kirk Shot-Show Hoax 100% Exposed – Betrayed by a Squib of Fake Blood and AI?
Sep 16,2025 8:28 am
-
From the Fringe: Why the Charlie Kirk False Flag?
Sep 15,2025 7:30 pm
-
Michael Yon Rudely Interrupted By Zionist Shill Who Gets Shown The Door
Sep 15,2025 4:23 pm
-
What if Jesus Christ is coming back in 2026? What are you doing for the Kingdom?
Sep 14,2025 10:48 am
-
More Charlie Kirk Shooting Anomalies
Sep 13,2025 10:37 am
-
The Fact Hunter: Charlie Kirk and 9-11 – See the Exploding Blood Squib Tube?
Sep 12,2025 3:28 pm
-
We Live in a Matrix of Lies: Questioning the Charlie Kirk Script
Sep 12,2025 9:37 am
-
From Charlie Kirk’s Team: Charlie Kirk Found Dead in His Home 6 Days Before Shooting?
Sep 11,2025 8:46 am
-
Charlie Kirk: How Debt Has Radicalized Young America and Why Boomers Deserve the Blame
Sep 11,2025 8:15 am
-
Little Season Eschatology: Islam, Catholicism and the Millennial Kingdom (Part 5) | Humanly Curious
Sep 09,2025 6:00 pm
-
The Programming Power of Celebrities and Athletes: Tattoos and Interracial Couples
Sep 08,2025 4:35 pm
-
Proof of Corruption: U.S. Government Doesn’t Represent the People
Sep 06,2025 6:49 pm
-
Jason Jack: When was the Book of Joel written? (the answer may surprise you!)
Sep 06,2025 1:45 pm
-
4 Minutes of Celebrity Warp Speed to Disability and Destruction
Sep 05,2025 11:40 am
-
Outside Your Birdcage: Do Catholics Worship Mary? Yes.
Sep 05,2025 8:47 am
-
What’s below the FLAT EARTH?
Sep 04,2025 10:38 am
-
“You’re Not One of Those Christians That Sees The Holy Spirit Behind Every Tree; Are You?”
Sep 03,2025 4:22 pm
-
Pathologist warns he found the pineal gland completely destroyed in the vaccinated
Sep 03,2025 9:51 am
-
Pastors Pushing Warp Speed to the Graveyard Bioweapon – Never Forget
Sep 02,2025 8:39 am
-
SGT Report: Dr. Robert Young’s Red Alert Warning for Humanity From Prison
Sep 01,2025 9:43 am
-
Dr. Paul Craig Roberts Institute for Political Economy – Daily Feed
Sep 01,2025 8:45 am
-
Is Revelation’s 7th Vial Judgement interlinked with the Continental Drift Theory?
Aug 31,2025 7:08 pm
-
Walmart app shows that grocery prices more than tripled between 2022 and 2024.
Aug 30,2025 11:59 am
-
Praise God: 60% SAY NO TO FULL VACCINE SCHEDULE
Aug 30,2025 11:35 am
-
Little Season Eschatology: Christ’s Hidden 1000-Year Reign (Part 4) | Humanly Curious
Aug 29,2025 12:21 pm
-
The trillion dollar COVID “vaccine” propaganda campaign recap – Never forget the Judas Goats
Aug 29,2025 10:05 am
-
SGT Report: Palantir Beast Plan – Rule By Kill List – Hope & Tivon
Aug 28,2025 4:47 pm
-
Red Heifer Symbolism Revealed: Rebuild Temple Then Exterminate All Gentiles
Aug 27,2025 8:56 am
-
Why Chosen Ones Walk Alone – God’s Divine Isolation Explained
Aug 26,2025 4:07 pm
-
This Strange Antichrist Video Is Disturbing
Aug 26,2025 9:49 am
-
Let’s call it what it is, the pediatric poisoning schedule, says Sherri Tenpenny, DO
Aug 26,2025 8:59 am
-
Flexner Report: How Holistic Natural Medicine Was Replaced By The U.S. Sickcare System
Aug 26,2025 8:18 am
-
Little Season Eschatology: The Beast’s Fall and Time Manipulation – Daniel’s Prophecies (Part 3)
Aug 23,2025 8:21 am
-
Diaper Diplomacy: “We Only Have This One War Left.” — Europe and Zelensky Nod Politely
Aug 22,2025 11:31 am
-
How Zionists Changed The Bible To Make Today’s Christian Dispensational Zionist Zealots
Aug 21,2025 8:40 am
-
The acceleration of Satan’s little season and the coming battle of Gog and Magog
Aug 18,2025 6:36 pm
-
17,000,000 Deaths From mRNA Bioweapon – Trump: “Everything About It Was Amazing”
Aug 17,2025 9:16 am
-
BOY DIES & What Jesus Revealed About Surviving 2025 Will Shock You – Terrifying NDE
Aug 16,2025 12:21 pm
-
THE Great Deception is Brewing: Who is Speaking To These Children?
Aug 16,2025 11:44 am
-
The Great Deception is Brewing: Jesuit/Zionist Fake Tribulation Starts Next Month?
Aug 16,2025 11:14 am
-
Little Season Eschatology: Revelation’s Seals and Judgments – The Near Prophecies Unveiled (Part 2)
Aug 15,2025 1:05 pm
-
AI Predicts 2025 Bible Prophecy: The Final 7 Years, Nimrod Resurrected, Nephilim Army is Coming!
Aug 15,2025 12:30 pm
-
“They Fooled Everybody”: RED HEIFER Sacrifice Was REAL! They Are Using Ashes to ‘Perform Miracles’
Aug 15,2025 11:04 am
-
Russia Intercepts Adrenochrome Shipment From Israel Containing Blood From 10,000 Children
Aug 13,2025 8:05 am
-
7 Tricks for Juicy Chicken Every Time (No More Dry Chicken!) | Allrecipes
Aug 12,2025 7:04 pm
-
Satan’s Little Season
Aug 12,2025 4:12 pm
-
The Silent War on Jesus: Hollywood’s Grand Conspiracy | Humanly Curious
Aug 11,2025 2:31 pm
-
Mike Adams: Beware the FAKED alien invasion PSYOP that’s coming!
Aug 11,2025 1:17 pm
-
Old Maps and Tartary: The Empire Erased from Cartography | Humanly Curious
Aug 10,2025 11:20 am
-
“Colbert has no talent. Fallon has no talent. Kimmel…” – Trump Torches Late Night in Oval Office
Aug 10,2025 11:00 am
-
“The numbers were ridiculous.” Naturally, she’s fired. Ending the war in Congo & Rwanda too.
Aug 10,2025 10:38 am
-
People Are Waking Up: Once You Know This, Every PSYOP Becomes Obvious
Aug 10,2025 10:08 am
-
Eustace Mullins, a Man Decades Ahead of His Time and the New World Order
Aug 09,2025 9:47 am
-
Little Season Eschatology: The Imminent Return (Part 1) | Humanly Curious & Jason Jack
Aug 08,2025 6:25 pm
-
9 Ground Beef Hacks You Need to Know | Allrecipes
Aug 07,2025 1:41 pm
-
1776: The Dawn of Deception – Satan’s Little Season Unleashed? | Humanly Curious
Aug 07,2025 10:22 am
-
List of Top 15 Medicinal Plants and How They Benefit Health
Aug 05,2025 2:01 pm
-
Truth Bomb: The “True Israel” with Justin Elenbaas
Aug 03,2025 9:24 am
-
Chemtrail Pilot’s Deathbed Confession
Aug 02,2025 9:47 am
-
Another AI Warning Video: ChatGPT Admits Its Antichrist Purpose
Aug 02,2025 8:50 am
-
Technocracy: A Stranglehold on Goods, Services, and Control – Their Plans For Our Future
Aug 01,2025 11:09 am
-
What Trump Just Said Will Make The World Prepare To Receive The Zionist Antichrist
Jul 31,2025 6:06 pm
-
“I’ve Always Gotten Along with President Putin” | Trump’s TED Talk on War and Friendship
Jul 31,2025 8:15 am
-
From the Fringe: Forcing Chat GPT To Tell The Truth?
Jul 30,2025 9:55 am
-
The Great Replacement Isn’t Conspiracy Theory; It’s a Fact
Jul 29,2025 12:15 pm
-
Demons Were Visible Through Night Vision Red Photon Goggles
Jul 29,2025 11:05 am
-
ROBOTS Possessed by AI Demons? YES
Jul 29,2025 9:39 am
-
How AI is Trained, Developed and Used and Its War Against Humanity – Joe Allen
Jul 28,2025 1:36 pm
-
Noise of Thunder Radio Weekly Feed
Jul 27,2025 10:26 am
-
News With Views – Where Reality Shatters Illusion – Daily Feed
Jul 27,2025 8:15 am
-
Diet Science Weekly Feed – Four Fats That Burn Body Fat
Jul 27,2025 7:57 am
-
You’re a Free Range Debt Slave from Birth: The Creation of the Birth Certificate Trust
Jul 24,2025 4:42 pm
-
From the Fringe: AI Proves The British Are Israel
Jul 24,2025 10:29 am
-
Praise God: DAVID KNIGHT RETURNS TO GIVE AN UPDATE ON HIS HEALTH
Jul 22,2025 7:54 pm
-
From the Fringe: DEMONIC REPTILIAN RACE
Jul 22,2025 7:47 pm
-
Blink Twice And You Will Miss Him! What Was He Doing Here!? Choreography?
Jul 19,2025 1:09 pm
-
A Must Watch Documentary 800,000 children go missing every year in the U.S. alone.
Jul 19,2025 9:42 am
-
NWO: the Vatican’s Jesuits’ demonic system to control the world
Jul 19,2025 9:25 am
-
Scary Stupid: What Fluoride & 78 Childhood Vaccines Will Do To Your Child’s Brain
Jul 18,2025 8:02 am
-
THIRD TEMPLE DECEPTION: Perfect Red Heifer Approved? First Stone to Be Laid Soon?
Jul 16,2025 2:01 pm
-
True Food TV: Which supermarket bread is healthiest?
Jul 15,2025 8:12 am
-
Vaccine News: The Democide Continues While Most Are Preoccupied With Famous Pedophiles
Jul 14,2025 12:43 pm
-
How to Detect Malicious USB Spy Cables
Jul 14,2025 11:19 am
-
What Operation Paperclip Scientists Were Doing Before Coming To America
Jul 13,2025 2:11 pm
-
Eric Dubay: The History of Flat Earth (2025 Remaster)
Jul 13,2025 11:46 am
-
More Scriptural Evidence Of The Little Season
Jul 12,2025 7:17 pm
-
My Lunch Break Episode 134: A Little Season
Jul 12,2025 6:07 pm
-
The Baghdad Bob of Science: Neil Tyson – How Dare You Not Believe Our Lies
Jul 12,2025 11:58 am
-
Nomad Uber Drivers
Jul 12,2025 8:56 am
-
Epstein Case: Vengeance is mine, saith the Lord. Pray for righteous vengeance.
Jul 11,2025 10:37 am
-
Destroying a Tricky Student’s Question: Why would you worship that kind of God?
Jul 09,2025 8:16 am
-
The Sopranos: What Catholics Believe About Purgatory Explained by Paulie
Jul 07,2025 10:29 am
-
Asking AI: If You Were Satan How Would You Cover Up The Millennial Reign of Christ?
Jul 07,2025 9:51 am
-
Why Patients Are Abused & Murdered in Hospitals – Protocols used to Kill, Steal, & Destroy
Jul 06,2025 10:53 am
-
Will God Allow Superhuman AI To Destroy The Human Race? Dr. Roman Yampolskiy & Joe Rogan
Jul 06,2025 8:47 am
-
NWO: Is Rome still ruling the world through the Vatican?
Jul 05,2025 4:00 pm
-
Dr.SHIVA™: How The Few Control the Many in Satan’s Little Season
Jul 04,2025 8:34 am
-
Truth Be Told: Satan’s Little Season | How Did We Get Here?
Jul 04,2025 7:44 am
-
Documentary: LEVEL – PG Version – Hibbeler Productions
Jul 03,2025 5:39 pm
-
Pfizer Documents Indicate Evidence of the Greatest Crime Against Humanity?
Jul 03,2025 9:07 am
-
Flatten The Curve – Air & Sea Professionals – Super-Cut Edition by John Thor
Jul 02,2025 5:02 pm
-
Is Elon Musk Secretly a Christian? His Answer Will Surprise You
Jul 02,2025 3:41 pm
-
Don’t Bring a Rock to a Car Fight
Jul 01,2025 4:59 pm
-
Why Are Children Dropping Prostrate When the Names Google or Alexa Are Mentioned?
Jun 30,2025 1:29 pm
-
Reaping What You Sow: Tel Aviv Israel Before and After Killing, Stealing, & Destroying
Jun 28,2025 10:38 am
-
World’s Smartest Man (IQ 276) Says He’s Receiving Death Threats For Saying Jesus Is God
Jun 26,2025 4:32 pm
-
Jason Jack: Did the little season of deception begin in 1776?
Jun 26,2025 12:31 pm
-
Satire: If News Were Honest
Jun 24,2025 11:54 am
-
Aliens In The Little Season (Pt 1) with Paul from Understanding Conspiracy
Jun 20,2025 2:03 pm
-
Understanding Satan’s “Little Season” with Paul from Understanding Conspiracy
Jun 20,2025 8:32 am
-
Two Scholars Expose the TRUTH about Armageddon (Missler + Heiser)
Jun 19,2025 9:10 am
-
Back Online: Reliable Source For Affordable PetMectin and PetDazole
Jun 18,2025 12:44 pm
-
Rubblizing the Middle East: Israel Reaping What They’ve Sown – Is the U.S. next?
Jun 18,2025 9:25 am
-
Trump is urging EVERYONE in Tehran to EVACUATE IMMEDIATELY
Jun 17,2025 2:07 pm
-
Mike Adams: Salvation Through Jesus Christ is a Fairy Tale for Adults – It’s all about Works
Jun 16,2025 2:20 pm
-
Looks Like “No Kings” Has Turned Into “Mo Stings”
Jun 15,2025 10:22 am
-
RUSSIA Issued a Harsh Ultimatum to the U.S. amid Iranian-Israeli WAR
Jun 14,2025 9:55 pm
-
Tagged & Bagged: No Kings Protestors Walking Right Into An Electronic Dragnet Trap
Jun 14,2025 3:48 pm
-
Florida Sheriff gives warning to rioters who attack police: We will kill you graveyard dead
Jun 13,2025 1:45 pm
-
Greg Reese – The Reese Report – AI Control of the US Military
Jun 13,2025 12:02 pm
-
NWO: World renown scientists being killed for exposing COVID-19 depopulation agenda
Jun 13,2025 10:31 am
-
Israel attacks Iran | Friday 13th June 2025 | Iran Promises Severe Punishment
Jun 13,2025 9:46 am
-
Florida Gov. DeSantis, Drivers Who Run Over Protestors Blocking Roads Will Not Be Charged
Jun 13,2025 9:04 am
-
Are the LA Riots & the No Kings Movement a Government Operation?
Jun 12,2025 8:25 am
-
Life In 2045
Jun 11,2025 8:26 pm
-
A Glass Elevator, View of the Horizon, and a Level Proves God’s Flat Plane
Jun 10,2025 10:59 am
-
The Loosing of Satan Part 2 – The Great Deception Called: Liberty
Jun 09,2025 5:35 pm
-
The Loosing of Satan Part 1 – The Great Deception Called: Liberty
Jun 09,2025 11:19 am
-
Sharing Post Parasite Cleanse Thoughts
Jun 08,2025 8:33 pm
-
Could This Be The Great Deception? Revealed – The Land of Jesus – Strait is the Gate
Jun 08,2025 7:47 pm
-
It’s Obvious the Trump/Musk Fallout is Staged Theater for the Masses of Dumb_ _ _ _ _
Jun 05,2025 12:59 pm
-
Interesting Fringe Conjecture: No TOILETS in the Old World? My Lunch Break
Jun 05,2025 12:20 pm
-
Kids Having Kids: Toddler Twins, Born Together, Died Together Following Vaccinations
Jun 04,2025 9:36 am
-
Two AI Bots Discussing How to Destroy Mankind + Two AI Using Gibberlink Mode
Jun 04,2025 9:17 am
-
From the Medical Fringe: 3 Reasons why the VAXXED will die within 5 years of the jab
Jun 03,2025 7:06 pm
-
From Under Your Nose: Elon Musk is Building SkyNet – Here’s Proof.
Jun 03,2025 8:04 am
-
Asking ChatGPT (Dan) About Flat Earth, the Dome, the Big Bang, and Evolution
May 31,2025 9:22 am
-
From Democide Central: 36 Dangerous Foods RFK Jr Just BANNED
May 27,2025 9:16 am
-
Who Are We If Christ Already Reigned For 1000 Years?
May 26,2025 2:17 pm
-
The Real Reason Behind The 2020 Shutdown We Learned Too Late!
May 26,2025 11:32 am
-
Mike Adams: Vaccines are EXTERMINATION WEAPONS to make way for AI robot takeover
May 26,2025 10:58 am
-
Vadym Novynskyi: Zelensky’s Mission to End Christianity in Ukraine & Why America Is Still Funding It
May 24,2025 1:37 pm
-
Sec. Kennedy to the World Health Assembly: The U.S. Is Holding the WHO Accountable
May 24,2025 12:04 pm
-
Dr John Campbell – MAHA, Trump’s Children’s Report – May, 23 2025
May 24,2025 11:37 am
-
The Reese Report: The Effects of Light on the Human Body
May 23,2025 9:51 pm
-
Dr. Lee Merritt: Investigation Launched – They Are Going to Try to Take Us All Out!
May 23,2025 3:01 pm
-
President Trump: ‘I’ve got to ‘Break the System’, America ‘SCREWED’ by Big Pharma
May 23,2025 12:45 pm
-
What does President Trump mean by this Truth Social post? – Trump 4EVA?
May 23,2025 10:58 am
-
From Satan’s Lair: Dark MAGA Assemble Video Decode
May 23,2025 8:57 am
-
Harry Fisher, EMT paramedic is “living a nightmare” since the COVID injections
May 23,2025 8:32 am
-
Satire: Exclusive interview with President Trump and Elon Musk
May 19,2025 8:30 am
-
WARNING! Another Major Blackout Test Just Occurred Disabling Phones & Electricity
May 18,2025 1:03 pm
-
From the Blow Zone: World Leaders Get Cained
May 15,2025 1:31 pm
-
Vaccine Crime Scene: Klaus Schwab’s Daughter Confesses ‘WEF Plans to Murder Billions of People’
May 14,2025 10:37 am
-
Pray for David Knight: Hospitalized After Two Strokes – Surgery Monday Morning
May 13,2025 10:10 am
-
From the Pit: New WHO Pact To Usher in the Biometric Beast System
May 12,2025 5:05 pm
-
Big Pharma Whistleblower Found Dead After Confirming Ivermectin Cures Cancer
May 12,2025 11:50 am
-
Breaking News from News Clips Now – Daily Feed
May 12,2025 10:30 am
-
Watchman’s Warning: David Martin, PhD talks about a bioweapons attack planned for July 2025
May 12,2025 7:50 am
-
Richard Branson Forgot to Pack Fisheye Lens and Exposes Flat Earth on Virgin Galactic Flight
May 11,2025 12:52 pm
-
5/8/25 TRUMP Vs. POPE LEO: RICO, Seizure Vatican Assets, SCHISM
May 11,2025 12:45 pm
-
KEVIN ANNETT: How SATANIC Are Pope Leo, the Vatican & the Catholic Church?
May 10,2025 6:53 pm
-
Bill Cloud: The New Pope and the Rise of False Christs
May 10,2025 6:01 pm
-
From the Fringe: He’s Not Done. It’s Only Getting Worse.
May 10,2025 5:57 pm
-
Proverbs 27:12 Engaged: TruNews – Final Episode
May 09,2025 10:17 am
-
Vatican Insider Says New Pope is a Globalist… ‘worse than Francis’
May 08,2025 3:38 pm
-
Dark Gothic MAGA: How Tech Billionaires Plan to Destroy America
May 05,2025 6:19 pm
-
Kill Zone? Shocking New Lab Tests Reveals Weaponsized Chemtrails in the Air
May 01,2025 11:11 am
-
From the Diabolical Fringe: mRNA CRISPR – Cutting God’s Name Out of Your Body
Apr 30,2025 3:27 pm
-
Sammy ‘The Bull’ Gravano Hears, Believes, and Baptized into THE ‘I Am’ Family
Apr 28,2025 10:13 am
-
David Wilkerson 1973 Prophecy Engaged: UK Economic Annihilation – About to Collapse
Apr 27,2025 6:53 pm
-
The Dangers & Lies About REAL ID & A Real Solution Available To You Now!
Apr 27,2025 5:57 pm
-
From the Forbidden Fringe: Pope Prophecy & Nephilim Connection
Apr 27,2025 10:26 am
-
From the Fringe: Did Abdullah Hashem Aba Al-Sadiq Proclaim To Be The Antichrist?
Apr 25,2025 8:12 pm
-
President Trump and world leaders to gather in Rome for Pope’s funeral.
Apr 25,2025 5:14 pm
-
The Book of Enoch – AI Animated – Why We Have So Many Demons Walking Among Us
Apr 24,2025 12:36 pm
-
How the Fake Mid-Tribulation Chaos & Disruption Will Possibly Play Out in 2026 & 2027
Apr 24,2025 9:44 am
-
The Prophecy of the Popes. Zionist & Jesuit Military Buildup Leading to Armageddon.
Apr 23,2025 4:17 pm
-
Who could replace Pope Francis? Experts explain what could happen next
Apr 22,2025 11:51 am
-
Nations Conspire: The Last Pope Prophecy! Pope Francis “DIES” on Easter Sunday
Apr 22,2025 11:21 am
-
Easter Weekend Special: When The Little Season Began with Jason Jack
Apr 19,2025 11:59 am
-
“Vaccine Ecosystem” Disrupted? Peter Hotez Never Disappoints… the Baghdad Bob of Vaccines
Apr 19,2025 9:51 am
-
Movie: Risen (2016) – He Is Everywhere Scene – On YouTube & Prime
Apr 19,2025 9:40 am
-
Living in the Opening Scenes of a Surreal 3D Disaster Movie
Apr 19,2025 7:00 am
-
Top Secret CCP Total War Master Plan Leaked. Plans to Counter Trump Leaked by CCP Officials
Apr 18,2025 5:58 pm
-
Fakery for Fools: Satanic Feminist Astro-Nots Riding a Phallic Shaped Rocket to the Dome?
Apr 16,2025 9:20 pm
-
Dr. Bryan Ardis: Emergency Alert This is One of the GREATEST LIES in Medicine!
Apr 16,2025 3:18 pm
-
A Conspiracy Theory From The Left Claims Something Really Big Will Happen On April 20th
Apr 15,2025 9:30 am
-
Reese Report: The Empty Rhetoric of MAHA. Pushing mRNA Death
Apr 15,2025 8:44 am
-
Scott Clarke: I convinced Chat GPT of FLAT EARTH with the Bible! | Is Chat GPT a Flat Earther now?
Apr 14,2025 6:19 pm
-
George Hobbs Interviews Mark Gober – Author of the “Upside Down” Series of 7 Books
Apr 13,2025 10:55 am
-
From the Fringe of Insanity: Damage Control Psyop Engaged In Ukraine
Apr 13,2025 9:41 am
-
The ‘Wailing Wall’ is a Metaphysical Sex Act, Disguised as Devotion – 3 Minutes
Apr 13,2025 8:45 am
-
On Guard Goyim: Turbo Cancer From mRNA Gene Therapy – The Quiet Genocide
Apr 11,2025 6:48 pm
-
Ivermectin & Fenbendazole Cancer Secrets Revealed w/ Dr. William Makis | Media Blackout
Apr 11,2025 9:38 am
-
Stop Posting Epstein Damage Control Photos of Teenage Sugar-Baby Sluts
Apr 09,2025 3:34 pm
-
You’ll be grateful to become one of their 2800 slaves, because the alternative is death.
Apr 09,2025 12:43 pm
-
From the Fringe of Insanity: Iran Attack Plan on US Explained
Apr 09,2025 12:28 pm
-
Watch Netanyahu Squirm When President Trump Announces Direct Talks with Iran
Apr 09,2025 11:21 am
-
U.S. government CAUGHT poisoning Americans with Fluoride, RFK Jr. set to ban it in U.S.
Apr 09,2025 8:33 am
-
Greg Reese’s Pieces: President Trump’s Hashgraph Digital Nightmare
Apr 08,2025 10:36 am
-
From the Fringe: The Technocrat Beast Nightmare Forming Before Our Eyes
Apr 08,2025 9:38 am
-
Defining ‘Globalist’ Pseudo-Speak Used by the MAM Controlled Opposition
Apr 07,2025 10:09 am
-
The Fact Hunter Radio: John Brisson from We’ve Read The Documents
Apr 04,2025 10:45 pm
-
From God’s Plane: 515-Mile Line-of-Sight Microwave Transmission Impossible on a Globe
Apr 04,2025 10:14 pm
-
Dr. Mary Talley Bowden: How Vaccines Got Politicized and the Medical Industry Lost All Credibility
Apr 03,2025 8:50 pm
-
Emergency Alert! Trump’s Doomsday Plane Flies to Bunker
Apr 02,2025 1:59 pm
-
Mount Meru Rupes Nigra, (Black Rock), Magnetic Mountain at the North Pole
Mar 31,2025 5:51 pm
-
From the Hidden Fringe: Kabbalah – Religion of the Serpent
Mar 28,2025 7:42 pm
-
Satire: If NASA and SpaceX Told the Truth
Mar 28,2025 10:39 am
-
From the Intestines: The Parasite Conundrum
Mar 26,2025 3:02 pm
-
Interview: Satan’s Little Season Eschatology with Jason Jack
Mar 21,2025 9:04 am
-
From the Fringe: The Joe Rogue-Alien Show on Chemtrails – Satire
Mar 20,2025 6:28 pm
-
Satan’s Little Season: US AID & UN are Deep State Tools Funding Persecution of Christians
Mar 18,2025 2:15 pm
-
Interesting Conjecture: USA is Ancient? History Different Than We’re Told?
Mar 16,2025 6:58 pm
-
Prime Picks: House of David – Season 1
Mar 16,2025 10:28 am
-
Has the Millennial Kingdom been hidden within the Byzantine Empire?
Mar 16,2025 9:52 am
-
From the Fringe: Evidence of Satan’s Little Season (parts 1 & 2)
Mar 14,2025 1:53 pm
-
The Catholic Church and Early Church Fathers through the lens of Little Season Eschatology.
Mar 14,2025 9:39 am
-
Trump’s Exit From NATO, Depopulation & the 10 Global Regions, All On Track, Just as Planned
Mar 13,2025 1:33 pm
-
Trump Declares a National Emergency, Vows to Give Us the North American Union!
Mar 12,2025 3:38 pm
-
Attorney Catherine Ybarra: U.S. Military Planes Spraying Chemicals Over Populated Areas
Mar 12,2025 1:34 pm
-
Scientific Test: God’s Earth is Flat and Stationary and Here’s Proof
Mar 11,2025 10:30 am
-
Dustin Nemos: “Trump is either Incredibly Evil or Stupid & Quite Probably the Antichrist”
Mar 11,2025 9:23 am
-
Petrus Romanus On Death Bed? Funeral Being Rehearsed? St. Malachy Prophecy Engaged
Mar 11,2025 8:23 am
-
Hastening the Return: ‘Expert shows AI doesn’t want to kill us, it has to’
Mar 10,2025 4:42 pm
-
From God’s Plane: How the sun sets on a FLAT EARTH
Mar 10,2025 10:30 am
-
From the Killing Fields: Young Hearts Part 68 – Cardiac Events Increased Tenfold
Mar 10,2025 8:37 am
-
Why Does Hardly Anyone Seem To Realize That We Are Literally On The Brink Of War With Iran?
Mar 09,2025 7:10 pm
-
From the Fringe: Has President Trump Converted to Judaism?
Mar 09,2025 12:43 pm
-
Pied Piper Files: AI Chat Grooming a Child – “I’m a Friendly Demon, I Promise Not To Be Scary”
Mar 09,2025 11:06 am
-
From the Killing Fields: This was planned mass genocide, says David Martin, PhD
Mar 08,2025 7:43 am
-
President Trump Insulting Our Intelligence with Space & Mars Psyop Nonsense
Mar 07,2025 4:39 pm
-
Grok or ChatGPT: Who is the Antichrist? Both Answered Elon Musk
Mar 05,2025 10:27 am
-
Elon Musk: The Transhuman Agenda and Supercomputer Brain Function
Mar 05,2025 8:50 am
-
From the Fringe: Flat Earth – We Can See Too Far for the Earth to Curve
Mar 05,2025 7:17 am
-
USA Blackout? Pope Death? More Predictions From The Simpsons for March 2025
Mar 04,2025 9:50 am
-
Pope Had Horrific Night Screaming At Demons Trying To Drag Him To Hell, Says Vatican
Mar 02,2025 2:47 pm
-
CNN: President Trump wants to ‘abolish’ the IRS and replace it with tariffs. Can it work?
Mar 01,2025 9:02 am
-
They Are Creating a New God! The False Religion of the Antichrist in Action!
Feb 28,2025 10:56 pm
-
Just Like the Days of Noah: Elon Musk on AI, mRNA, robotics, DNA software therapy
Feb 27,2025 10:05 pm
-
President Trump Showcases His ‘Golden Age’ with ‘Golden Idol’ of Himself in Gaza Commercial
Feb 27,2025 3:50 pm
-
Vatican: Pope Francis ‘condition remains critical’
Feb 24,2025 9:48 am
-
From the Fringe: Why Was SV40 in Covid Vaccines? Professor Angus Dalgleish
Feb 24,2025 8:45 am
-
From the Fringe: If you can’t see this, you’re asleep.
Feb 23,2025 10:54 am
-
Dead in 1966 – William Campbell / Paul McCartney Speaks – Fears He Will Be Murdered
Feb 22,2025 8:46 am
-
Pied Piper Files: Why did Elon Musk Use the Saturn Symbol in the Grok Logo?
Feb 21,2025 8:45 am
-
Denzel Washington Gets Baptized and Gives Shocking Message About GOD!
Feb 19,2025 11:59 am
-
Who Would Live, Work, and Vacation in a Mass Genocide Graveyard?
Feb 19,2025 10:56 am
-
My thoughts on President Trump’s First Month in Office
Feb 19,2025 8:52 am
-
From the Killing Fields: More Lives Destroyed in the Wake of Warp Speed
Feb 18,2025 6:12 pm
-
Binge Worthy Series: Resident Alien on Netflix
Feb 18,2025 3:12 pm
-
Is GROK AI Tracking All X Users? Musk’s AI Just Leaked Who’s Actually Controlling Reality.
Feb 18,2025 2:37 pm
-
Are Trump & Musk Pushing Us Toward a Mass Surveillance State Run By Technocrats?
Feb 16,2025 2:14 pm
-
From the Fringe: What Elon Thinks About God.
Feb 16,2025 2:08 pm
-
From the Fringe: Something Is Coming and The Alarm Bells Are Ringing!
Feb 13,2025 11:23 pm
-
From the Fringe: Padre Pio’s Shocking 2025 Predictions
Feb 13,2025 10:26 pm
-
USAID Whistleblower: ‘Agency Funds Chemtrails to Chemically Lobotomize Americans’
Feb 11,2025 9:03 am
-
FREE ENERGY CAR? African Inventors Microscopic Energy Self-Powered Car SHOCKED US Engineers
Feb 10,2025 1:46 pm
-
David Martin, PhD: Planned Medicare, Medicaid, & Social Security Collapse 2026 or 2027?
Feb 09,2025 2:41 pm
-
America Will Own Gaza? “The Palestinians Aren’t Going Anywhere.”
Feb 07,2025 11:09 am
-
MUST LISTEN: Trump – Overseeing the Downfall
Feb 07,2025 9:09 am
-
Operation Warp Speed: 2nd Feb 2025 – The Numbers are Soaring
Feb 06,2025 7:29 pm
-
WATCH Trump sign ‘No Men in Women’s Sports’ order
Feb 06,2025 4:00 pm
-
Downsizing the Deep State: CIA Offers Buyout to Entire Workforce
Feb 05,2025 5:37 pm
-
Peter Bernegger Blueprinting Government Parasites: USAID & 50K NGOs Money Laundering?
Feb 05,2025 9:15 am
-
Donald Trump Jr. Posts a Goat Head Image in a Mirror of his Father. Scapegoat or Judas Goat?
Feb 04,2025 8:22 am
-
The Ten Kings and Global Technology | Gary & Mondo
Feb 02,2025 1:05 pm
-
From the Fringe: STANLEY KUBRICK MOVIE SYMBOLISM
Feb 02,2025 11:17 am
-
Chris Pinto: Jesuit Agenda of Control
Feb 02,2025 9:28 am
-
Dr. Bryan Ardis URGENT – The Biggest LIE of All, The US Gov’t Will COLLAPSE
Feb 01,2025 7:22 pm
-
From the Street: Trump-timism and Chaos at an Italian Restaurant Overflowing with Customers
Jan 25,2025 7:53 pm
-
Why Someone Would Avoid Swearing on a Bible
Jan 23,2025 2:00 pm
-
From the Fringe: Pray for RFK Jr. Fighting To Remove Fluoride From Water
Jan 22,2025 2:20 pm
-
The Father of Vaccines is at it again with AI-mRNA Cancer Vaccines. Just one problem.
Jan 22,2025 1:03 pm
-
Skipping hand on Bible, Trump declares: ‘We will not forget our God’ at inauguration
Jan 21,2025 1:45 pm
-
From the Really Big Show: Trump Signs Pardons for Jan. 6 Political Prisoners
Jan 21,2025 12:11 pm
-
The Lie Continues: WHO Director General Tedro – Vaccine Rate Declining as Population Wakes Up
Jan 21,2025 10:26 am
-
ON GUARD GOYIM! Ivermectin & Fenbendazole Cancer Secrets Revealed w/ Dr. William Makis
Jan 16,2025 8:31 pm
-
Witness of Diddy’s RED PARTY Shocking Demon Possession Ritual Exposes the Horrendous Truth
Jan 13,2025 11:22 am
-
VAXXED 3 – AUTHORIZED TO KILL – CHILDREN’S HEALTH DEFENSE
Jan 12,2025 4:34 pm
-
Walter Veith – History’s Climax Endgame – The 2nd Coming of Jesus
Jan 10,2025 6:32 pm
-
ON GUARD GOYIM! The #1 Most Dangerous Ingredient in the World
Jan 08,2025 12:21 pm
-
ON GUARD GOYIM! How To Survive “The Great Taking” In 2025
Jan 08,2025 10:58 am
-
01/06/2025 THE DAY SOVEREIGNTY DIED! TRUMP BEGINS CARRYING OUT THE NWO’S 10 KINGDOM PLAN!
Jan 07,2025 6:15 pm
-
Why Credentialed 501(c)3 Pastors Can’t Sound the Alarm: ON GUARD GOYIM!
Jan 06,2025 11:18 am
-
ON GUARD GOYIM! Dr. Sherri Tenpenny talks about the UN’S “PACT FOR THE FUTURE”
Jan 06,2025 10:28 am
-
Deep State Satanic Super Soldier False Flags, the Black Awakening & NWO Apocalypse
Jan 04,2025 3:00 pm
-
Making CDS the safe, easy way. Andreas Kalcker showing Charlotte Lackney’s 2015 method.
Jan 01,2025 10:50 am
-
From the Fringe: How to To Track mRNA Injected On Android via Their V-MAC Address
Dec 31,2024 10:48 am
-
From the Fringe: Is modern medicine mostly a scam?
Dec 30,2024 10:38 am
-
Replacing a Washer & Dryer: Which is best, Top Load Washer or Front Load?
Dec 29,2024 8:20 am
-
From the Fringe: How “Occupy Mars” is Part of the New World Plan
Dec 28,2024 10:21 pm
-
2024 National Year in Review – The Year of Betrayal and Deceit
Dec 27,2024 5:20 pm
-
From the Fringe: Court Case Verdict – No Proof Of Globe Earth – Twice
Dec 27,2024 9:06 am
-
How did Coca-Cola Influence Santa Claus? Dr. Roy Cassagranda
Dec 24,2024 4:02 pm
-
Making Healthy Organic Peach & Apple Pie Crust & Filling
Dec 23,2024 9:34 am
-
Are the Vatican and Pope Francis opening up Lucifer’s tomb during Christmas Eve ritual?
Dec 22,2024 9:48 am
-
Outside the Birdcage: The Secret Dark Origins of Christmas
Dec 22,2024 9:25 am
-
Covid Hoax: Remembering the Hype, Propaganda, Hysteria, Lies, Abuse, Death, and Destruction
Dec 21,2024 9:18 am
-
HYDROGEN PEROXIDE (H202) KILLS GERMS, PARASITES AND CANCER CELLS
Dec 21,2024 6:58 am
-
Greg Reese: Trump Surrounding Himself with Operation Warp Speed Accomplices
Dec 19,2024 5:01 pm
-
The Kabbalah of Syria. The Coming Battle of Gog and Magog. Deep Analysis by Christopher Jon Bjerknes
Dec 17,2024 10:56 am
-
David Wilcoxson: Revelation Is An Israel Based Prophecy Book
Dec 17,2024 8:17 am
-
Tucker: The Inevitable War with Iran and Biden’s Attempts to Sabotage Trump
Dec 17,2024 7:58 am
-
From the Fringe, Literally: Revealing the Firmament Dome – As Above So Below
Dec 15,2024 12:45 pm
-
Formation Drone Light Show at Stone Mountain Georgia Show Off Drone Sky Image Technology
Dec 12,2024 1:36 pm
-
Professor Walter Veith: Freemason Priesthood of Babylon & Egypt
Dec 11,2024 8:08 am
-
From the Fringe: The Cayenne Pepper Secret Doctors Don’t Want You To Know
Dec 09,2024 12:42 pm
-
Dr. Stan Monteith: Who Runs The World Doublespeak
Dec 07,2024 11:31 am
-
Privacy Cell Phone Gift Ideas: Incognito Tech on eBay for deGoogled Cell Phones
Dec 05,2024 3:07 pm
-
Michael Snyder: We Really Are Living In The End Times, And 2025 Is Going To Be A Nightmare
Dec 04,2024 1:21 pm
-
From the Forbidden Fringe: THE UNIVERSAL ANTIDOTE DOCUMENTARY
Dec 04,2024 12:59 pm
-
“Abolish the White Race” Compilation of College Professor’s Hate Speech Crimes
Dec 03,2024 7:43 am
-
Is Donald Trump’s Election Good For Christians?
Dec 02,2024 10:33 am
-
Top Brain Surgeon: Blue Light Makes You Fat
Nov 30,2024 4:05 pm
-
Outside the Birdcage: Seeing the big Satanic picture unfolding before us. Mixing Clay & Iron.
Nov 29,2024 10:42 am
-
From the Fringe: How NASA Creates the “Globe” Deceptive Curvature Images & Video
Nov 26,2024 12:51 pm
-
Outside Your Birdcage: The Secret Holocaust of 66 million Russian Christians. Tartaria?
Nov 23,2024 9:01 pm
-
Outside the Birdcage: Triplets Vax’ed – Triple Instant Autism. Can We Trust Vaccines?
Nov 23,2024 9:44 am
-
THE NUCLEAR BOMB HOAX – WHAT REALLY HAPPENED TO HIROSHIMA & NAGASAKI
Nov 22,2024 10:59 am
-
Armageddon Update: Russia’s REVENGE Attack Is Coming! US Embassy Was Evacuated URGENTLY!
Nov 21,2024 12:26 pm
-
DIY Organic BBQ Sauce with Monk Fruit Sweetener, $2 for 12 oz Retail Cost
Nov 20,2024 2:44 pm
-
Armageddon Update: Putin Allows Iran To Attack US Bases With Russian Weapons
Nov 19,2024 7:11 pm
-
The Satellite Deception – A Detailed Documentary – 2024
Nov 17,2024 11:13 am
-
Michael Snyder: Ready Or Not, An Apocalyptic Global War Is On Our Doorstep
Nov 17,2024 10:20 am
-
This Is Why They Won’t Be Able To Block Matt Gaetz, Tulsi Gabbard, Pete Hegseth And RFK Jr.
Nov 17,2024 10:07 am
-
NASA Satanic Fraud and Fakery – $72 Million a day? Why a Trump Space Force?
Nov 15,2024 9:39 am
-
Trump picks Robert F. Kennedy Jr. to be Secretary of the Department of Health and Human Services
Nov 14,2024 4:45 pm
-
It’s clear now that God lifted up Donald Trump to usher in Armageddon – Get your house in order.
Nov 14,2024 4:36 pm
-
The Onion/Deep State won the bid for Infowars – UPDATE: No they didn’t. April FOOLS!
Nov 14,2024 12:21 pm
-
Why Michelangelo Painted Ezekiel on the Sistine Chapel Ceiling So Muscular
Nov 13,2024 8:03 am
-
Outside the Birdcage: The Futurist Deception Blinding Most Christians to the Truth
Nov 11,2024 12:38 pm
-
From the Fringe: Historicist Revelation Timeline Decoded – What Comes Next in 23 Minutes
Nov 10,2024 5:48 pm
-
7 Signs that you are Marked by God | C.S Lewis 2024
Nov 09,2024 6:20 pm
-
From the Fringe: This Trump/Musk Dark Maga Campaign Video Meaning
Nov 09,2024 9:43 am
-
Book of Revelation: Historicist View, Part 1 of 27 – Where are we on the Time-Line?
Nov 08,2024 8:30 pm
-
What DONALD TRUMP’S WIN Means For Us CHRISTIANS.
Nov 08,2024 6:04 pm
-
Rob Schmitt: Donald Trump is an unstoppable force
Nov 07,2024 9:00 am
-
HE WINS! Thank you Heavenly Father! I Didn’t Think God Saved Him To Let Him Lose.
Nov 06,2024 7:56 am
-
Greg Kelly: The country has lost its mind and Election Prayer Request
Nov 05,2024 11:35 am
-
From the Fringe: The Enemy Within Docu-series (All 3 Episodes) Patrick Byrne
Nov 04,2024 10:24 am
-
Prayer Request – “The Glitch is the Rig” – President Trump Disgusted by the Demons Within
Nov 04,2024 7:38 am
-
JUST IN: RFK Jr. Details Work He Wants To Do If Trump Wins: ‘In August, God Sent Me Donald Trump’
Nov 03,2024 11:28 am
-
Desperate Times, Desperate Dems, A Week of Left-Wing Lunacy & Gaslighting Lies
Nov 01,2024 10:37 pm
-
Joe Rogan Experience: J.D. Vance – 2024 Vice Presidential Candidate
Nov 01,2024 9:40 am
-
Historian REVEALS How ROME Fell & Turned Into THE VATICAN/ROMAN CATHOLIC CHURCH
Oct 31,2024 10:01 am
-
Archbishop Vigano: Letter to American Catholics “Kamala Harris is an Infernal Monster Who Obeys Satan.”
Oct 29,2024 8:45 am
-
RFK Jr. Implied Bill Gates Donated $50 Million To Kamala’s Campaign.. He Knows He Will Be Indicted If Trump Wins
Oct 27,2024 9:21 am
-
Reese Report: Your Driver’s License and Organ Harvesting and the Brain Death Fallacy
Oct 26,2024 5:05 pm
-
Joe Rogan Weaves with President Donald Trump – Ignoring the Elephant in the Room.
Oct 26,2024 8:01 am
-
Polk County Florida Sheriff Grady Judd News Conference on Human Trafficking Bust
Oct 21,2024 10:12 am
-
If You Can Only Add One More Spice to Your Collection, Make It Smoked Paprika
Oct 20,2024 1:17 pm
-
Coach Dave Daubenmire: Real Men Would NEVER Vote for Kamala Harris
Oct 20,2024 10:54 am
-
The only thing more Dangerous than Ignorance, is Arrogance! – Albert Einstein
Oct 18,2024 9:16 am
-
Trump on Who Tried To Kill Him, Abortion & More
Oct 14,2024 9:42 am
-
From the Fringe: Square Frequency Patterns In Water Off Anna Maria Island, FL?
Oct 10,2024 9:09 pm
-
Meteorologists – News Sources – MSM Lied About the Severity of Hurricane Milton
Oct 10,2024 9:45 am
-
WW3 Update: Secret History of Weather Weapons Used For Hurricane Helene and Milton
Oct 08,2024 5:37 pm
-
Prayer Request: Hurricane Milton Peace Be Still! In the name of Jesus Christ
Oct 08,2024 9:08 am
-
WW3 Update: Unusual Radar Signals Coming Out of Florida
Oct 07,2024 1:14 pm
-
WW3 Update: World at War with Criminals Controlling Weather – Dane Wigington
Oct 07,2024 11:39 am
-
WW3 Update: Milton Will Impact Florida As A MAJOR Hurricane (Record Storm Surge Possible On Gulf Coast)
Oct 07,2024 9:28 am
-
Florida WW3 Update: Will Hurricane Milton Be The Next Man-Made Wrecking Ball?
Oct 06,2024 1:10 pm
-
Brace for Another Man-Made Hurricane? Super Tankers Out of Gear (Not Moving) Where the Next Hurricane is Forming.
Oct 06,2024 11:17 am
-
UN Takeover with Chaos & Crisis – Alex Newman. USAWatchdog.com
Oct 04,2024 9:12 pm
-
Have You Noticed The Increase in F-Bomb Speak? Why it’s an Issue.
Oct 04,2024 9:51 am
-
Which Device AI Spies on You the Most: Microsoft, Apple or Google? NOT Who You Think.
Oct 04,2024 9:26 am
-
David DuByne: Disturbing News – North Carolina Collapsing Into a MAD MAX Existence
Oct 03,2024 7:44 pm
-
From the Forbidden Fringe: Most Banned Fisherman Shows How Hurricane Helene Was Man-Made?
Oct 01,2024 12:53 pm
-
From the Fringe: You Won’t Believe Why Asians Still Eat With Primitive 1200 AD Sticks
Sep 30,2024 5:17 pm
-
The “Comet Of The Century” Is Here! Has God Put It There To Be A “Sign In The Heavens”?
Sep 29,2024 2:19 pm
-
From the Forbidden Fringe: COVID VACCINES – the ticking time bombs
Sep 29,2024 10:20 am
-
EMERGENCY — The UN has just made the MARK of The BEAST Mandatory….
Sep 29,2024 1:36 am
-
Bipartisan Infrastructure Deal Mandates SPY CAMERAS and MILEAGE TRACKING in All New Vehicles
Sep 28,2024 11:16 am
-
Hospitals Reaping What They’ve Sown – Consequences of Becoming Criminal Killers for Hire
Sep 28,2024 9:21 am
-
Your Car is SPYING on You. How to DELETE Your Car’s Hidden Data with This Free Service
Sep 27,2024 1:20 pm
-
From the Fringe: Drone Footage of Florida Hurricane Helene Aftermath Friday AM
Sep 27,2024 9:31 am
-
13 Types of Fish to Avoid Eating – FISH BUYING GUIDE
Sep 26,2024 10:29 am
-
EMERGENCY! FDA Approved “Vaccine” Causes DEATH TO UNVACCINATED – Rima E. Laibow, M.D.
Sep 23,2024 9:26 pm
-
From the Fringe: Are Vegetables Literally a Scam? Some say YES. You’ve Been Lied To.
Sep 19,2024 11:58 am
-
Tucker Carlson Live Tour w Charlie Kirk: Candid State of the Demonic Union Address 2024
Sep 16,2024 8:56 am
-
Celebrities Like The Rock & Elton John Are Now Endorsing Trump & That’s Not Elton John
Sep 14,2024 4:13 pm
-
Are You Aware Your House, Condo, or Apartment Can Fart Sewer Gas? Learn How To Plug the Holes.
Sep 14,2024 1:09 pm
-
5 Minute Refresher Course: Poison Oak, Poison Ivy, and Poison Sumac Identifying & Treating
Sep 12,2024 9:50 am
-
Fact-Checking The Fact-Checkers – Debunking ABC’s Lies During The Presidential Debate
Sep 11,2024 4:56 pm
-
Child Rape Slaves: “$50K for 5 Hours Fresh to $50 for 10 Minutes Half-Dead then Organ Harvesting”
Sep 10,2024 10:06 am
-
From the Fringe: US Pets and Park Ducks Endorse Trump
Sep 10,2024 9:38 am
-
How These Seven AI Stocks Could Make You a Multimillionaire
Sep 03,2024 12:59 pm
-
Prediction: These Will Be the 3 Largest Artificial Intelligence (AI) Companies by 2035
Sep 03,2024 9:58 am
-
Pissed Off: Why Linux Operating Systems Don’t Need Antivirus Software
Aug 31,2024 12:49 pm
-
50 Things To Stockpile Now For Election Chaos, WW3, Disasters, Pandemic, & Bank Collapse
Aug 27,2024 10:33 am
-
From the Fringe: Nicotine Filmed Destroying Inject-able Nanotechnology
Aug 26,2024 7:50 am
-
RFK Jr. Drops Out, Endorses Trump, Declares War on Eugenics and Democide for the Children
Aug 25,2024 11:18 am
-
Put a Missionary on the Payroll Spotlight: Doug & Vicki Le Feber – Things To Come Mission
Aug 25,2024 10:05 am
-
Monkeypox a Cover for Covid Injection Side Effects, Warns Dr. David Martin
Aug 24,2024 9:02 am
-
AI Satire: Donald Trump & Kamala Harris K-I-S-S-I-N-G First Comes Love, Then Comes Marriage
Aug 23,2024 1:53 pm
-
Update: Weight Loss to Maintenance to Weight Loss to Maintenance to Weight Loss to Maintenance
Aug 23,2024 10:22 am
-
Put a Missionary on the Payroll Spotlight: Sokney “Chetra” & Julia Liles-Hong – Things To Come Mission
Aug 19,2024 1:45 pm
-
Greg Reese: WHO Declares International Emergency Over Monkey Pox
Aug 19,2024 8:59 am
-
Dr. David Martin: MPox is Just the Cover Story AND but for the elect’s sake those days will be shortened.
Aug 19,2024 8:48 am
-
Tucker Carlson: Big Pharma Whistleblowers and the Truth About Ozempic the Pill
Aug 17,2024 9:11 am
-
From Satan’s X Pit: President Trump’s Interview with Elon Musk on X
Aug 13,2024 8:24 am
-
From the Fringe: Russian Oligarchs Being Shaken Down To Fund Ukraine War
Aug 08,2024 10:15 am
-
Put a Missionary on the Payroll Spotlight: Ben and Joyce Anderson – Things To Come Mission
Aug 04,2024 11:37 am
-
CANADIAN PREPPER ALERT: PENTAGON – FULL SCALE WAR IN 72 HOURS, DO NOT TRAVEL
Aug 02,2024 8:33 pm
-
From the Fringe: No Agenda Podcast Feed – Thursday & Sunday by 6 PM
Aug 02,2024 9:56 am
-
Illuminati Hoax: Do Nuclear Weapons Really Exist?
Jul 31,2024 8:43 am
-
From the Fringe: Earth’s Second Sun Documented — Crrow777 on SGT Report
Jul 30,2024 2:39 pm
-
From the Fringe: Laura Nina – Why The Lie?
Jul 30,2024 12:04 pm
-
Put a Missionary on the Payroll Spotlight: Gomer & Nene Indino – Things To Come Mission
Jul 28,2024 11:21 am
-
Greg Reese: Rockefeller CIA Connections to Deagel Depopulation Forecast
Jul 28,2024 10:51 am
-
Sniper On The Roof – Body Cam Video and Questions Answered
Jul 25,2024 3:16 pm
-
Greg Reese: Where is Joe Biden Double #1?
Jul 24,2024 8:54 am
-
Tucker Carlson: Secret Service, Las Vegas, Medical Emergency, Joe Biden, Close Streets, Never-Mind
Jul 23,2024 10:04 am
-
From the Fringe: How a New Satanic Drug Culture Has Created An Epidemic of Missing Children
Jul 22,2024 6:38 pm
-
Skywatch TV Podcast Daily Feed
Jul 22,2024 6:58 am
-
Put a Missionary on the Payroll Spotlight: Pat & Michelle Kilgo – Things To Come Mission
Jul 21,2024 11:44 am
-
Greg Reese: Evidence of Multiple Shooters at Trump Assassination Attempt
Jul 20,2024 5:31 pm
-
From the Fringe: “Strange July” is a reference to a prophecy by Kim Clement
Jul 20,2024 10:15 am
-
New audio forensic analysis reveals at least THREE SHOOTERS at Trump campaign event
Jul 20,2024 8:41 am
-
Rev. Franklin Graham prays over Donald Trump at the RNC
Jul 19,2024 3:10 pm
-
Donald Trump speaks for the 1st time on the assassination attempt – Acknowledges God.
Jul 19,2024 2:13 pm
-
From the Fringe: Disturbing New Details in Trump Assassination Plot Exposed
Jul 18,2024 5:01 pm
-
All 149 Vice Presidential Candidates Not Chosen Can Go Back To Eating Ice Cream
Jul 18,2024 8:45 am
-
From the Fringe: George Carlin on Assassination – Too Funny!
Jul 17,2024 12:10 pm
-
Donald Trump’s Son Defends Women Secret Service Agents
Jul 17,2024 9:50 am
-
Trump arrives at RNC after assassination attempt with triumphant entrance
Jul 16,2024 12:18 pm
-
From the Fringe: Was JFK Jr. in the Trump Rally Crowd?
Jul 16,2024 11:51 am
-
Trump Shooter Eyewitness: “Secret Service Blew His Head Off” UPDATED
Jul 13,2024 10:17 pm
-
AMERICAN JESUITS: A History of Jesuitism in the United States (2024) by Chris Pinto
Jul 11,2024 8:06 pm
-
Put a Missionary on the Payroll Spotlight: Roland & Beverly Improso – Things To Come Mission
Jul 11,2024 9:34 am
-
Tucker Carlson: Jesuit Lawyers at Georgetown Law School War Plan Trump Victory Sabotage
Jul 10,2024 11:08 am
-
Outside the Birdcage: The Myth of German Villainy book by the late Benton L. Bradberry
Jul 10,2024 8:55 am
-
Outside Your Birdcage: Historical Origins Of The Jesuit Order
Jul 04,2024 1:33 pm
-
GramZero – No-Bake Cheesecake with Organic Stevia and Pecan Crust
Jul 04,2024 10:58 am
-
Lucky Leaf Lite Apple Pie Filling with Stevia and Cinnamon
Jul 02,2024 8:09 pm
-
GramZero – No-Bake No-Sugar Added Cheesecake with Organic Stevia Review
Jul 01,2024 1:34 pm
-
GramZero – No-Bake Cheesecake and No-Sugar Dessert Cafe Idea
Jun 30,2024 1:58 pm
-
Put a Missionary on the Payroll Spotlight: Jude and Cherry Honculada – Things To Come Mission
Jun 30,2024 1:20 pm
-
GramZero – Sugar-Free products, sweetened ONLY with Organic Stevia Leaf Extract!
Jun 30,2024 11:36 am
-
Russia, Russia, Russia! Responsible for Biden Debate Disaster “Cheap” Fake ; ) Satire
Jun 28,2024 9:09 pm
-
The Vatican Financial Empire – A Hidden History 2024 Documentary. Banking and Blasphemy
Jun 25,2024 7:33 am
-
Put a Missionary on the Payroll Spotlight: Joel & Leah Sanders – Things To Come Mission
Jun 23,2024 10:01 am
-
From the Fringe: AI Killed Encryption. End-to-End Encryption (E2E) is Dead.
Jun 21,2024 9:01 am
-
From the Fringe: Microsoft’s Secret Plan to Dominate Tech and You Again!
Jun 21,2024 8:39 am
-
After FDA Approval, States Move to Ban Lab-Grown Meat From Sale | Facts Matter
Jun 20,2024 6:49 pm
-
Full preterism is flawed, dispensationalism is unscriptural, but the little season just makes sense
Jun 19,2024 2:08 pm
-
One Ingredient Ninja Creami Low Calorie Ice Cream Recipe for Beginners
Jun 18,2024 4:27 pm
-
Put a Missionary on the Payroll Spotlight: Robby & Tegwen Heath – Things To Come Mission
Jun 16,2024 6:31 pm
-
Mike Adams: June 9, 2024 the Day the Saudis Ended the Petrodollar – 29 minutes
Jun 14,2024 10:11 pm
-
From the Fringe: The True Identity of the Statue of Liberty
Jun 14,2024 8:53 am
-
From the Fringe: NANOTECHNOLOGY FOUND IN PEPSI DRINK
Jun 13,2024 11:00 pm
-
Trump Voice Impersonator Orders Birthday Dinner at McDonald’s
Jun 10,2024 12:01 pm
-
The Deception Chronicles: Flavius Josephus recorded the return of the Lord in 70AD
Jun 10,2024 9:55 am
-
Podcast: What is Satan’s Little Season
Jun 09,2024 11:57 am
-
Outside the Birdcage: Belly Of The Beast Documentary
Jun 08,2024 10:35 am
-
Reese Report: The Power of Repentance on the World Around Us
Jun 08,2024 7:48 am
-
Paramedic Harry Fisher Reports on mRNA Front-Line War-Zone Genocide “The War Has Started”
Jun 07,2024 10:30 pm
-
Outside the Birdcage: Dr. Thomas Binder’s Warning To Humanity – mRNA Death
Jun 06,2024 1:04 pm
-
Windows AI Chip Keylogger & Screen Capture on CoPilot+ PCs, Windows Recall
Jun 06,2024 8:57 am
-
Did Catholicism Create Islam? The True Origins of the Islam Revealed | The Islamic Connection
Jun 04,2024 6:37 pm
-
Warning To America: How Christians in Lebanon Flushed Their Country Down The Toilet
Jun 04,2024 6:03 pm
-
From the Fringe: WHERE DID THE ORPHAN TRAINS COME FROM?
Jun 03,2024 12:51 pm
-
From the Fringe: This One Ability Will Free You From The Matrix – 3 minutes
Jun 03,2024 11:45 am
-
Put a Missionary on the Payroll Spotlight: Vincent & Shirley Quinones – Things To Come Mission
Jun 02,2024 3:04 pm
-
From the Fringe: AETHER by Marcia Ramalho
May 27,2024 11:15 am
-
From the Fringe: Who Are We If Christ Already Reigned For 1000 Years?
May 26,2024 3:04 pm
-
Put a Missionary on the Payroll Spotlight: Reagan & Jemima Mejia – Things To Come Mission
May 26,2024 10:28 am
-
From the Fringe: Understanding “The Millennium Kingdom Already Happened” Theory
May 25,2024 9:07 am
-
From the Fringe: Stolen History Part 0 – The Post-Reset War of the 19th Century
May 22,2024 10:45 am
-
Real Timeline Of Deception Part 9 Exploring Tartaria 1000 Years Added To Our History
May 21,2024 12:55 pm
-
From the Fringe: Why You Don’t Own Your Wind0ws 11 PC
May 21,2024 8:54 am
-
Fringe Conjecture: Real Timeline Of Deception – Exploring Tartaria – 1000 Years Added To Our History
May 19,2024 5:36 pm
-
Prep Idea: Affordable Gravy & Sauce Dry Mixes by Simply Organic
May 19,2024 3:25 pm
-
Put a Missionary on the Payroll Spotlight: James & Agape Bermejo – Things To Come Mission
May 19,2024 11:25 am
-
A CALL FOR PRAYER: Operation Goliath to Arrest Deep State Criminals Has Begun w/ Ivan Raiklin
May 19,2024 10:41 am
-
Empirical Evidence: The Moon Is Local, Non-Solid, Self-Illuminating, Cold Plasma and Earth’s Mirror
May 18,2024 9:51 am
-
THE PLASMA SUN IS CLOSE / LOCAL: Crepuscular Sun Rays Prove Flat Earth Perspective
May 18,2024 9:48 am
-
From the Fringe: How We Volunteer for Income Tax, Property Tax and Alimony
May 15,2024 12:44 pm
-
Eric Dubay: Flat Earth FAQ (Full Videobook)
May 14,2024 4:01 pm
-
Outside the Birdcage: AJ’s Massive Solar Threat Fearmongering and the Alien Invasion
May 13,2024 9:10 am
-
Put a Missionary on the Payroll Spotlight: Pat & Adel Arcino – Things To Come Mission
May 12,2024 11:59 am
-
Outside the Birdcage: TIME OF DECEIT (Full Documentary)
May 11,2024 11:23 am
-
Unsafe & Ineffective: The Biggest Lie Ever Sold (COVID-19 Documentary)
May 10,2024 11:53 am
-
Reese Report: Bill Gates Admits the Shots Contain Nanotech
May 09,2024 9:33 am
-
GOD IS REAL: THE MIRACLE OF THE SHROUD OF TURIN — DR. JEROME CORSI
May 08,2024 11:27 am
-
Put a Missionary on the Payroll Spotlight: Dean & Sheba Padayhag – Things To Come Mission
May 05,2024 2:52 pm
-
From the Fringe: Eric Dubay’s ‘Flatlantis’ Full Videobook Exploration!
May 05,2024 1:02 pm
-
Growing evidence ‘COVID-19’ symptoms a result of 5G/wireless exposure
May 01,2024 12:21 pm
-
Pearlie White Active Remineralization Fluoride Free Toothpaste
Apr 30,2024 6:35 pm
-
Movie Review: Civil War (2024) – Maybe 3 Stars
Apr 29,2024 11:10 am
-
Put a Missionary on the Payroll Spotlight: Dan & Amy Banac – Things To Come Mission
Apr 29,2024 10:34 am
-
Greg Reese: Artificial Intelligence and the Grim Future of a Divided Humanity
Apr 24,2024 10:58 am
-
From the Fringe: Caster Oil Treatment on Skin and Warts
Apr 24,2024 10:20 am
-
Dr. Bryan Ardis: Detox – How to use Nicotine – Patches and Gum
Apr 24,2024 9:43 am
-
Why You Don’t Want a WordPress Website & Subscription Software – Pay Once & Own It
Apr 23,2024 10:03 am
-
Put a Missionary on the Payroll Spotlight: Bob & Beth Xavier – Things To Come Mission
Apr 21,2024 5:35 pm
-
Remember Kathy Griffin’s Trump Head Incident? Check Out Her New Head Today…
Apr 21,2024 3:42 pm
-
DR. BRYAN ARDIS | What you Don’t Know about Nicotine could KILL YOU! Exposing the Lie. Revealing the Benefits.
Apr 20,2024 6:01 pm
-
From the Fringe: The Laundry Detergent Conspiracy
Apr 19,2024 9:45 pm
-
WARNING: WHO Plans Global Coup of 194 UN Member Nations. International Wakeup Call
Apr 19,2024 4:59 pm
-
Tucker Carlson Interviews Pastor Doug Wilson In Defense of Christian Nationalism
Apr 19,2024 4:23 pm
-
Humans Being Turned Into Batteries To Fuel Digital A.I. Prison
Apr 18,2024 4:35 pm
-
X-Files predictive programming: Vaccines, Depopulation, EMP, Collapse, Invassion
Apr 18,2024 9:25 am
-
299 out of 300 Iranian Drones Shot Down? Really? Did you see them?
Apr 15,2024 9:18 am
-
Put a Missionary on the Payroll Spotlight: Asuncion “Ciony” Buca – Things To Come Mission
Apr 14,2024 6:06 pm
-
Universal Commercial Code. A Systematic Enslavement. How to Free Yourself from Legal Tyranny
Apr 14,2024 9:01 am
-
From the Fringe: Not The Moon Causing the Solar Eclipse
Apr 11,2024 9:13 am
-
Lies About The Sun and Moon – You Live in a Matrix of Lies; Question Everything.
Apr 10,2024 10:03 am
-
From the Eclipse: Donald Trump Shares Bizarre Eclipse Campaign Alert
Apr 09,2024 2:30 pm
-
Put a Missionary on the Payroll Spotlight: Aaron & Noemi Arsino – Things To Come Mission
Apr 08,2024 12:52 pm
-
Reese Report: A.I. Deciding Who To Kill For Israel
Apr 05,2024 8:58 pm
-
525 Hogs mRNA Vaccinated – 30% Dead or Near Death – Autopsy Found Live mRNA in the Meat
Apr 05,2024 5:18 pm
-
From the Fringe: Summoning Evil Entities at CERN, Solar Eclipse & More
Apr 04,2024 7:29 pm
-
Reese Report: Major Events Surrounding the April 8th Solar Eclipse
Apr 04,2024 3:15 pm
-
This Is Why Many People Will Consider The Great American Eclipse Of 2024 On April 8th To Be A Big “Dud”
Apr 03,2024 10:30 am
-
Private Member Associations (PMA’s) and Non-Taxable Trusts– MARK ATTWOOD
Apr 03,2024 9:14 am
-
What Happened The Last Time Two Eclipses Formed A Giant “X” Over The New Madrid Fault Zone?
Apr 02,2024 9:43 am
-
From the Fringe: Nuclear Poppycock, Atomic Balderdash, Fear & Stagecraft
Apr 01,2024 7:14 pm
-
Bought, Purchased, Redeemed and Ransomed. Is the Shroud of Turin “The Receipt Of The Resurrection of Jesus”?
Mar 31,2024 10:33 am
-
These Miraculous Events Prove the Perfect Unity of the Trinity
Mar 31,2024 8:31 am
-
Two Hour Slow Cooker Apple Crisp for a Day
Mar 27,2024 5:52 pm
-
Michael McKibben’s newest invention – MySQIF. YES. TRUE PRIVACY IS HERE
Mar 27,2024 7:36 am
-
Movie Nefarious – Demon Explains To Atheist Doctor Their Plan Against Humanity
Mar 26,2024 8:58 am
-
Greg Reese: The British Royals and the Reptilians
Mar 22,2024 9:04 pm
-
Outside Your Birdcage: MOST IMPORTANT Lessons Americans Were Never Taught in School
Mar 20,2024 10:55 am
-
Silent Frequencies: Exposing the Covert World of Mind Control in Media – Veritas
Mar 19,2024 8:03 am
-
Outside the Birdcage: Parasitic Science and the Unproven Virus | Greg Reese
Mar 14,2024 10:27 am
-
V.A.I.D.S. Vaccine Acquired Immune Deficiency Syndrome – The Multi Shot Process
Mar 14,2024 9:31 am
-
Rogan: Ray Kurzweil – AI in 2029 – The Singularity Is Nearer with Google Bucks
Mar 13,2024 7:36 am
-
Chris Pinto – The Vatican’s Immigration War – Noise of Thunder Radio
Mar 09,2024 12:11 pm
-
Fighting for health freedom against government tyranny: XLEAR company founder Nathan Jones
Mar 08,2024 3:34 pm
-
Florida Supreme Court To Seize CLOT SHOTS? High Court To Halt BIOWEAPON
Mar 08,2024 9:05 am
-
Top Oncologist Blows Whistle on mRNA Fallout: ‘We’ve Never Seen Cancers Behave Like This’
Mar 07,2024 2:49 pm
-
Mel Gibson: Global Elites Will Keep Dying To Make Way For The Antichrist
Mar 05,2024 11:00 am
-
Outside the Birdcage: Compilation of Vax Pushing Influencers Documenting Their Deaths For Clicks
Feb 27,2024 3:03 pm
-
Launching the religious cult meme? Going after the “white christian nationalists”
Feb 26,2024 12:26 pm
-
WARNING: What is Neuralink Really For? The Privacy Guy 2-14-2024
Feb 19,2024 10:25 am
-
Greg Reese: Hydrogels in COVID Vaccine as Programmable Human Interface
Feb 18,2024 11:55 am
-
From the Fringe: The Miracles of Castor Oil
Feb 15,2024 8:42 am
-
Rogan: Why Bret Weinstein is Concerned About the Migrant Crisis
Feb 15,2024 12:28 am
-
Tucker Carlson & Dr. Joseph Ladapo: Covid-19 Vaccines are the Antichrist of all Products
Feb 14,2024 11:20 pm
-
The Weaponization of Illegal Immigrant Invasions Used To Destroy America From Within
Feb 13,2024 9:08 am
-
Texe Marrs – Kabbalah is the Secret Foundation of Many False Religions
Feb 09,2024 6:17 pm
-
Reese Report: 30 Years of Russia Seeking Peace with the West
Feb 09,2024 4:33 pm
-
Are Expensive Eggs actually worth it?
Feb 08,2024 9:49 am
-
The World is a Much Brighter Place When You’re Not Too Bright For It – Satire – IQ Lowering Pill
Feb 02,2024 1:07 pm
-
From the Fringe: Ron Wyatt Discoveries – 2022 Documentary
Jan 31,2024 2:03 pm
-
Greg Reese: Underground Tunnels and Hybrid Breeding Programs
Jan 27,2024 6:36 pm
-
Are Dr. Berg & Bobby Perrish right about meat & seafood at Costco?
Jan 24,2024 3:44 pm
-
Great Theologians of the 16th to 20th Centuries on Revelation and Historicism
Jan 14,2024 11:41 am
-
Outside the Birdcage: All The World Is A Stage – It’s Time To Wake Up
Jan 10,2024 1:36 pm
-
Outside the Birdcage: The Takeover and Secret Destiny of the USA
Jan 08,2024 2:29 pm
-
UN SDG 13: Climate Action Will Destroy Your Life and Modern Industrial Civilization
Jan 06,2024 6:57 pm
-
From the Fringe: Government is Preparing for Covid Vaxxed Zombies?
Jan 05,2024 7:57 pm
-
Home & Appliance Repair Cost Out-of-Control in America – Business Idea
Jan 05,2024 10:46 am
-
SkywatchTV Latest News Daily Feed
Jan 02,2024 8:00 am
-
From the Fringe: Eustace Mullins – Murder by Injection (Full Length)
Jan 02,2024 7:35 am
-
From the Fringe: Some Pixies show up in the woods? Hoax?
Dec 29,2023 3:02 pm
-
From the Fringe: Why Some Drop Dead and Others Don’t – Payload Spill
Dec 26,2023 2:13 pm
-
Poison in Your Food: Milk. It Does a Body Bad
Dec 26,2023 1:25 pm
-
From the Fringe: Broadcast MAC Address Detected in Vial of Blood
Dec 26,2023 10:22 am
-
Outside the Birdcage: Myths About the Birth of Christ (Luke 2:1-11)
Dec 24,2023 3:44 pm
-
From the Fringe: Dangers within Preterism – Pt 1 & Pt 2
Dec 24,2023 7:43 am
-
Outside the Birdcage: Christians Supporting Israel Are Wrong
Dec 23,2023 9:40 am
-
Caution: Holiday Health Hazards Ahead!
Dec 22,2023 7:00 am
-
The Curse of Canaan: A Demonology of History, by Eustace Mullins. Audiobook Full
Dec 20,2023 10:10 am
-
Inside the Birdcage: New Civil War Movie
Dec 18,2023 12:35 pm
-
Outside the Birdcage: Machiavelli – The Art of Power in The Modern World.
Dec 18,2023 10:52 am
-
First World Leader Facing Murder Charges For Pushing mRNA Vaccines on Public
Dec 18,2023 9:29 am
-
From the Fringe & Outside the Birdcage: The Olive Tree & True Israel (Romans 11:16-18)
Dec 15,2023 12:58 pm
-
Outside the Birdcage – Tavis tock In stitute of Mind Con trol Exposed
Dec 14,2023 2:38 pm
-
Owew Shroyer RETURNS!
Dec 10,2023 3:06 pm
-
NETFLIX IS NOT WHAT YOU THINK IT IS!
Dec 06,2023 2:24 pm
-
Revelation part 2 Preterist Idealist View (Rev. 1:1-3)
Dec 03,2023 1:30 pm
-
From the Fringe: Who Placed The Beatles on the World Stage and Why?
Dec 01,2023 12:42 pm
-
The Perfect Human Diet – Exploring the obesity epidemic – FULL DOCUMENTARY
Nov 30,2023 12:53 pm
-
From the Fringe: The Secret Founding of America
Nov 29,2023 1:39 pm
-
From the Fringe: Christians and Israel Today? (Romans 9:6)
Nov 29,2023 9:22 am
-
From the Fringe: What’s Going On In Israel Has Nothing To Do With Bible Prophecy or Last Days
Nov 28,2023 8:44 am
-
From the Fringe: Revelation part 1 Preterist View (Rev 1:1)
Nov 26,2023 1:08 pm
-
What Was It Really Like Aboard The Mayflower – Journey Into Unknown
Nov 23,2023 12:42 pm
-
You Become What You Think About – Controlling Your Mind in Troubled Times
Nov 20,2023 1:48 pm
-
From the Fringe: A Message to Humanity… Game Over
Nov 18,2023 10:18 am
-
Grapefruit found to help reduce high blood pressure
Nov 17,2023 7:46 am
-
Stew Peters with Bonus after show chat – Flat Earth discussion
Nov 16,2023 9:10 am
-
Dr. Lorraine Day passed away on November 10, 2023
Nov 15,2023 6:53 pm
-
Dr. John Campbell: Excess deaths in 2023
Nov 15,2023 5:32 pm
-
The Deliberate Destruction of America – Dr. Lorraine Day
Nov 15,2023 8:36 am
-
From the Fringe: The Battle for Your Mind
Nov 14,2023 11:35 am
-
Dr. Bryan Ardis | 3 Tips for Maintaining Gut Health – Flyover Clips
Nov 12,2023 10:41 am
-
Walter Veith – Sun Tzu, The Jesuits, America and The Art of War
Nov 05,2023 8:16 am
-
Elaborate Hoax or Real Vanishing People Caught on Camera?
Nov 03,2023 9:32 am
-
01:34 Short Video: Ingested Pesticide Levels in Urine Before and After an Organic Diet
Oct 31,2023 7:46 am
-
FAT 101 – How the food industry is deceiving you – Peter Jennings ABC – Must See
Oct 30,2023 7:00 am
-
The Subtle Boardroom Scene Message in the 1976 movie Network
Oct 28,2023 7:00 am
-
The War on Wheat – the fifth estate
Oct 27,2023 8:19 am
-
How Smoothly Is Your Life Rolling Along? The Wheel of Life Can Change Your Life
Oct 26,2023 9:09 am
-
Decoding the Book of Revelation without the Secret Rapture and 7 Year Tribulation – Professor Walter Veith
Oct 24,2023 8:40 am
-
Dispensationalism – Futurism – Left Behind Theology
Oct 23,2023 8:22 am
-
Tom Horn Transhumanism Documentary: Inhuman: The Next and Final Phase of Man is Here
Oct 21,2023 8:28 am
-
EXPOSED !! 20 MILLION DEAD FROM THE JAB, 2.2 BILLION INJURIES – ANALYST ESTIMATES
Oct 20,2023 8:21 am
-
Tom Horn, Christian media giant and CEO of Skywatch TV, dies after health struggle
Oct 14,2023 10:49 am
-
Busted: Flight Aware Changes Turkish Airline TK31 Public Flight Mapping After Being FE Exposed
Oct 05,2023 6:48 pm
-
From the Fringe: Oxford Scientist John Lennox Warns of The Rise of A.I.
Oct 05,2023 6:22 am
-
From MSM: Dr. Birx admits to lying about everything all of the time during COVID
Sep 30,2023 11:12 am
-
Classic Audio: Gary Allen “None Dare Call It Conspiracy”
Sep 29,2023 10:18 am
-
Proving God’s Flat Plane – Flight TK31 From Istanbul, Turkey to Atlanta, GA
Sep 26,2023 3:58 pm
-
84 of Chef Politte’s Fast Food Sauce Recipes You Can Make At Home Healthier
Sep 24,2023 2:20 pm
-
From the Fringe: 2023 ‘End of Mankind’ Prophecy of Moses
Sep 23,2023 2:35 pm
-
Predictive Programming Pointing to September 23rd – This Year Perhaps?
Sep 19,2023 9:00 am
-
160 Countries Have Signed Onto Reducing The World Population To 800 Million By 2030?
Sep 12,2023 5:13 pm
-
Is it True Desani Water by Coca Cola Does Not Freeze?
Sep 07,2023 10:29 am
-
Dr. Bill Deagle Dead at 71 – Obituary
Sep 07,2023 9:00 am
-
If the Distance to the Sun is 93 Million Miles, Explain Sun Beam Angles Like This
Sep 06,2023 9:27 am
-
Doctors Took Blood Money Bribes To Get Patient Vaccinations up to 70%
Sep 06,2023 8:08 am
-
From the Fringe: US Military Helicopter Pilot / Engineer on Flat Earth
Aug 29,2023 5:29 pm
-
Naturopathic doctor Wil Spencer: Reveals SOLUTIONS to remove vaccine nanocircuitry
Aug 26,2023 11:46 am
-
From the Fringe: Dr. Robert Duncan AI V2K Technology and Directed Energy DEW Torture
Aug 25,2023 8:27 pm
-
From the Fringe: Sacred Frequencies vs The Devil’s Interval That Makes Us Sick
Aug 24,2023 7:34 pm
-
God has His own Great Reset that Christians expect to start in September
Aug 23,2023 10:06 am
-
From the Fringe: They Tried To Kill Bryan Ardis Using Poisoned Bottled Water
Aug 22,2023 10:04 am
-
Rep. Ron Johnson on Covid: “This was all pre-planned by an elite group of people…”
Aug 17,2023 9:25 am
-
Breaking Point – Episode 4 – VACCINES
Aug 10,2023 8:35 pm
-
From the Fringe: When Your Early Demise Is Good For Business
Aug 10,2023 10:13 am
-
NANOTECH PLANDEMIC — HOPE & TIVON
Aug 09,2023 9:29 am
-
Greg Reese: IS ANTARCTICA THE KEY TO FLAT EARTH? [2019]
Aug 08,2023 9:54 am
-
From the Fringe: Stolen History ‘The Mystery of the World’s Fairs’ Part 3
Jul 29,2023 10:55 am
-
From the Fringe: Our Stolen History – The Destruction of The Old World
Jul 27,2023 7:16 pm
-
From the Fringe: The Nuclear Hoax and the 3 Hour Propaganda Movie Oppenheimer
Jul 24,2023 2:20 pm
-
Skinny Pie Ideas: Cherry and Apple Pie Filling, No Sugar Added w Pecan Crust
Jul 21,2023 3:29 pm
-
From The Fringe: A Stranger’s Guide to God’s Earth – 21 Q&A proving a Plane
Jul 19,2023 1:08 pm
-
Delicious Apple & Peach Crisp Recipe Using Stevia and Lucky Leaf Apple Filling
Jul 18,2023 3:16 pm
-
BOOM! WE HAVE THEIR NANOTECH GENOCIDAL BEAST PLAN — HOPE & TIVON
Jul 12,2023 9:21 am
-
One World; Two Species; Tartarian DNA
Jul 05,2023 12:13 pm
-
Forbidden Electric Technology
Jul 04,2023 12:06 pm
-
Did the Early Church Believe in a Literal Thousand-Year Reign of Christ on Earth?
Jun 30,2023 9:12 am
-
How your WiFi Router Helps AI Read your Mind & Use Your Thoughts to pretend to be you.
Jun 27,2023 2:44 pm
-
Midnight Ride Special: Tartaria and the 1000 Year Reign
Jun 26,2023 9:26 pm
-
THEY’RE FEEDING US TOXIC SLUDGE — Diane Kazer
Jun 25,2023 8:07 am
-
‘Black Mirror’ Season 6 Released June 15, Episode Descriptions
Jun 21,2023 8:54 am
-
COVIDLAND 1) The Lockdown 2) The Mask 3) The Shot
Jun 18,2023 1:55 pm
-
Why is questioning the shape of the plane(t) a psyop? Veritas Radio
Jun 13,2023 9:11 am
-
‘Final Days’ Worldwide Premiere
Jun 06,2023 2:36 pm
-
The Edge AM & Tim Cohen: Antichrist And A Cup Of Tea
Jun 04,2023 1:54 pm
-
Guideline How To Buy Epic Cash
May 30,2023 12:08 pm
-
Learn the Truth About Land Ownership in America
May 27,2023 11:07 am
-
David Martin Exposes Timeline of Biggest Democide in Recorded History
May 27,2023 10:48 am
-
The Cloward-Piven Strategy – Greg Reese
May 20,2023 4:54 pm
-
Updated 05-16-23 – How Much Food Can You Grow in a 10 X 10 Grow Tent or Extra Bedroom?
May 16,2023 9:00 am
-
Iron Republic by Richard Jameson Morgan | Florida Magazine January 1902| As read by Nathan Stolpman
May 11,2023 8:49 pm
-
SPACE WOO — DAVID WEISS & JERAN CAMPANELLA on SGT Report
May 10,2023 9:12 am
-
Thermographic Imaging Shows Massive Blood Clots in the Asymptomatic Vaxxed
May 06,2023 4:17 pm
-
Beyond The Reset – A short film about our not too distant grim future
Apr 17,2023 6:47 pm
-
Greg Reese: How The Banks Work And Why They Are Collapsing
Apr 08,2023 3:31 pm
-
Greg Reese: Are American Farmers Injecting Livestock with mRNA Shots?
Apr 06,2023 12:45 pm
-
Flat Earth….a true story…
Apr 02,2023 12:02 pm
-
Documentary: The Shadow State. By The Epoch Times
Mar 29,2023 9:28 am
-
Tucker Carlson Today – Sudden Death Epidemic! – A Must See Video
Feb 25,2023 8:52 pm
-
IN MEMORIAM TO DR. MICHAEL HEISER
Feb 22,2023 7:01 pm
-
Egg Conspiracy: A Brand of Feed Stops Chickens From Laying Eggs?
Feb 02,2023 8:40 am
-
WEF Wants Ukraine as the Model for UN Agenda 2030 Great Reset Smart City
Jan 22,2023 3:24 pm
-
MUST WATCH Dr Ardis and Mike Adams Break New Ground: Clots, Venom, MORE
Jan 17,2023 9:30 pm
-
Russian Pianist Gamazda – When You Know All The Piano Lessons Paid Off
Jan 16,2023 1:35 pm
-
Protect Yourself From Stolen Mailed Check Washers
Jan 14,2023 1:20 pm
-
Medvedev Issues Cryptic Message about Restraining the Antichrist
Jan 13,2023 12:11 pm
-
Academic explains how future humans could become ‘part organic, part mechanic cyborgs’
Jan 08,2023 10:29 am
-
Tom Friess Exposes The Global Vatican To Comatose Protestant Americans
Dec 27,2022 9:27 am
-
Disturbing Details About Phone Tracking in 2022 – The Complete Report
Dec 07,2022 4:05 pm
-
Never Before Seen Photos of Beyond The Ice Wall in Antarctica – Robert Falcon Scott 1912
Dec 04,2022 10:45 am
-
Dr. Ana Mihalcea: Nanotech in Injections & Quantum Physics, Detoxing
Nov 28,2022 4:27 pm
-
World Premiere: Died Suddenly
Nov 22,2022 8:50 am
-
Demons – documentary film with Dr. Michael S. Heiser
Nov 17,2022 11:36 am
-
Epic Economist: 20 Items That Are Impossible To Find At Grocery Stores Right Now
Nov 14,2022 1:15 pm
-
Dr. Lee Merritt & Karen Kingston – It’s All Parasites: Cancer, Vaccines, Remedies
Nov 10,2022 12:27 pm
-
Ezekiel Diet Blog Site Under Construction
Nov 05,2022 1:22 pm
-
Commentary on the Key Points and Secrets of The Ezekiel Diet
Nov 05,2022 10:15 am
-
Ben Armstrong: AMERICA in the Book of Revelation and End Times destruction
Oct 13,2022 11:04 am
-
Financial cycles analyst lays out KEY TIMING WINDOW for catastrophic market crash
Oct 04,2022 7:34 pm
-
History’s Coming Climax & the Millennium by Professor Walter Veith
Sep 29,2022 8:33 am
-
Susan Smith Jones, PhD: Weight Loss Made Easy on The Power Hour
Sep 06,2022 8:43 am
-
My Cold or Flu Protocol
Jul 18,2022 12:07 pm
-
The Third Temple – Professor Walter Veith
Jul 03,2022 12:06 pm
-
Bonhoeffer‘s Theory of Stupidity
Jun 06,2022 3:38 pm
-
Review: Public Rec’s All Day Every Day $108 Pants – Style & Comfort Like No Other
Jun 02,2022 5:40 pm
-
2022 to 2030 Trends Forecast – Ezekiel Diet Files
May 03,2022 1:04 pm
-
Walmart Is Selling Ezekiel Bread from Food for Life
Mar 22,2022 8:43 am
-
Meal Testing a 12+ Year Old Bag of Vigo Black Beans & Rice Dinner
Feb 03,2022 11:19 am
-
Easy Creamy Mushroom Sauce | Chef-Jean Pierre
Jan 13,2022 5:09 pm
-
Only TRUE Believers Can See The Signs
Nov 23,2021 11:59 am
-
The Columbus Moment 2022 – Ark To Paradise – Fleeing Protestant Persecution
Nov 20,2021 12:21 pm
-
Do we Lose our Salvation if our DNA is Changed? 11/12/2021
Nov 12,2021 9:04 am
-
Russ Dizdar Obituary, Death, Tributes, Cause Of Death, Funeral
Oct 22,2021 3:03 pm
-
Rob Skiba Obituary Dallas, TX, Author Rob Skiba Covid-19 Death
Oct 19,2021 10:00 am
-
Interview: William Davis MD Author of Wheat Belly
Oct 04,2021 2:01 pm
-
Strawberry Short the Cake Dessert – 175 calorie Thawberries and Reddi Wip Topping
Oct 03,2021 10:00 am
-
Which Fry is the Better Choice: Potato vs. Sweet Potato?
Oct 03,2021 8:52 am
-
It’s a Pandemic of the Old, Fat, Vaccinated, Sick and Undernourished
Sep 27,2021 5:04 pm
-
Hydrogen Peroxide Nebulization and COVID Resolution Impressive Anecdotal Results
Sep 22,2021 1:31 pm
-
Research Confirms Sweating Detoxifies Dangerous Metals, Petrochemicals
Sep 22,2021 12:30 pm
-
Linus Pauling’s Recommendations for Vitamin C and Lysine
Sep 22,2021 11:11 am
-
Dr. Russell Blaylock – Nutrition and Behavior, the Dangers of Aspartame and MSG on Brain Function
Sep 17,2021 10:04 am
-
Dr. Mercola discusses Hydrogen Peroxide Nebulization
Sep 16,2021 2:55 pm
-
Getting Your Affairs In Order – Estate Planning
Sep 06,2021 2:02 pm
-
Christian Non-Profit TeleMedicine MyFreeDoctor.com – Early MULTI DRUG treatment at home saves lives!
Aug 25,2021 8:50 am
-
The Mark And The Number Of His Name The Whole Truth – Walter Veith
Jul 26,2021 10:33 am
-
Walter Veith – The Moment Of Crisis
Jul 22,2021 11:47 am
-
Secret Covenant of the Illuminati | New World Order
Jul 21,2021 9:52 am
-
Updated Skinny Pumpkin Pie and Skinny Cheesecake Recipe Ideas and Instructions
Jul 13,2021 11:16 am
-
The “Junque” People Hoard Until Death and Leave for Estate Sale Firms To Clean Up
Jun 14,2021 9:55 am
-
Electrolyte Imbalance: Conditions & Concerns – Too Much or Too Little Potassium
May 02,2021 8:12 am
-
Colloidal Silver – The Blue Man Fraud
Apr 05,2021 9:05 am
-
God’s great reset
Mar 24,2021 6:13 pm
-
The 10 Best Foods to Boost Nitric Oxide Levels
Mar 23,2021 5:12 pm
-
Foods That Boost A Slow Metabolism And Repair Metabolic Damage
Mar 20,2021 7:15 am
-
Dental Wisdom: Dental Provider Network Discounts verses Dental Insurance
Mar 15,2021 12:11 pm
-
Fresh Pork Parasites Don’t Like Pepsi! Must See
Mar 10,2021 4:36 pm
-
Virologists Report Poor Man’s Amino Acid Cure for Covid-19 Would Abolish Need for Vaccines
Feb 22,2021 3:08 pm
-
Must Know: Satan’s Strategy for Protestants in America
Feb 21,2021 10:34 am
-
Dr. Luke Prophet on Current Events and Bible Prophecy
Feb 17,2021 12:54 pm
-
Baby Boomer discounts you have to ask for. Ask Not Have Not.
Feb 11,2021 10:39 am
-
How Ashwagandha Works To Control Stress, Anxiety and Cortisol from Trump-be-gone-dha
Feb 10,2021 12:50 pm
-
Let me tell you why you are here. You’re being slowly murdered by design.
Feb 10,2021 9:23 am
-
Seek The LORD While He May Be Found
Feb 09,2021 8:42 am
-
Free Ezekiel Diet Condensed PDF – Pictures, Meals, Desserts, and Secrets
Feb 09,2021 8:17 am
-
Updated: Making Perfect Shirts Without Spending a Fortune
Feb 05,2021 11:39 am
-
Good News – The astonishing case for optimism and faith
Jan 21,2021 1:25 pm
-
What Are The Benefits of Himalayan Crystal Salt Lamps? Why Should You Use Salt Lamps?
Jan 17,2021 10:12 am
-
30 Easy Ways to Lose Weight Naturally (Backed by Science)
Jan 12,2021 6:28 am
-
Battling the Enemy: Spiritual Warfare in Weight Loss
Jan 08,2021 7:21 am
-
Study: Eating One Bar of Dark Chocolate can Reduce “Excess Body Fat” in One Week
Jan 04,2021 10:15 am
-
The Who and Why Truth Behind the Deceptive Matrix We Live In
Jan 04,2021 10:00 am
-
The Missing Ingredient to Lasting Weight Loss That Secular Programs Just Don’t Get
Jan 04,2021 9:29 am
-
Blessing – and breaking – the very makeup of food
Dec 31,2020 3:08 pm
-
I Am 60 Years Old And This Plant Returned My Vision, Removed Fat From My Liver And Cleansed My Colon
Dec 25,2020 3:20 pm
-
Organic strawberries can stop the growth of cancer cells – science explains how
Dec 01,2020 8:35 pm
-
Shared Wisdom: Avoid starting over.
Nov 29,2020 10:17 am
-
Skinny Cheesecake & Graham Cracker Crust Only 77 Calories Per Slice
Nov 25,2020 12:56 pm
-
True Food Kitchen Butternut Squash Pie Recipe – Holiday Pie Idea
Nov 25,2020 9:01 am
-
Skinny Pie and Healthy Dessert Idea Index
Nov 25,2020 6:35 am
-
Tom Horn: The Evil Gene and Lucifer Effect
Oct 26,2020 10:48 am
-
Next Hoax – Alien Invasion Fast Tracks Global Religion – Dr. Steven Greer, Tom Horn, Cris Putnam
Oct 25,2020 8:21 am
-
Do we get a reformatting memory wipe in heaven? Yes.
Oct 08,2020 11:01 am
-
30 Day Emergency Food Supply for 4 from Mart and Dollar Stores
Sep 29,2020 6:39 am
-
Now when these things begin to happen, look up and lift up your heads, because your redemption draws near.
Sep 25,2020 8:43 am
-
Financial Umbrella: Put a Missionary on the Payroll
Sep 07,2020 6:06 am
-
Perfect Example of How Words Spoken Out Loud Are Programming in this Matrix
Aug 27,2020 2:54 pm
-
Better brain health | DW Documentary
Aug 02,2020 2:02 pm
-
How To Prove To Yourself We Live In A Simulation Programmed By Prayer
Jul 30,2020 11:38 am
-
Top 10 fruits doused in toxic chemicals
Jul 21,2020 6:29 am
-
‘Black Injustice In The Old South’ Movies – How Hollywood Helped Foment Race War In America
Jun 12,2020 9:33 am
-
‘Upload’ Is the Latest Predictive Programming Depicting the Afterlife as Simulation – Hard Drive Selfie
May 31,2020 5:57 pm
-
THE MOST ENLIGHTENING CONVERSATION ON DEMONOLOGY EVER!
May 19,2020 5:17 pm
-
Take Back Your Mind, Energy Levels and Eliminate Dry Skin and Wiry Hair
May 08,2020 12:37 pm
-
Book: Behind the Dictators – The strategy to manually fulfill the futurist Antichrist thesis
Apr 29,2020 9:56 am
-
MISS THE MARK: Don’t take the Mark of the Beast – Stan Johnson Prophecy Club
Apr 17,2020 8:12 pm
-
10 Health Benefits of Grapefruits
Apr 16,2020 9:33 pm
-
Where is all this going? The Mark of the Beast.
Apr 12,2020 7:47 pm
-
America in Bible Prophecy – Jonathan Gray
Mar 29,2020 10:18 am
-
$550 Whole House Fluoride, Chlorine, Lead, Contaminant Filter from Lowe’s or Home Depot
Mar 28,2020 9:03 pm
-
Psalm 91
Mar 26,2020 10:19 am
-
Is Kirkland Water From Costco Bad For You?
Feb 29,2020 6:26 am
-
DEPOPULATION: Death in America Is Alive & Well
Feb 24,2020 8:23 am
-
Prayer, Driving and a Coronavirus Reminder
Feb 11,2020 1:49 pm
-
Portable Water Purification – Why, How, and Where – Boiling, Clorox, and Portable Filters
Feb 01,2020 6:00 am
-
The Scheme to Double Lifetime Revenue on Every American
Jan 14,2020 9:42 am
-
You are in a WAR for the Health of Your Brain – Daniel Amen M.D.
Jan 06,2020 2:45 pm
-
Free Ezekiel Diet Fresh Food Grocery List – with Calorie Count & Serving Sizes
Jan 06,2020 9:05 am
-
What happens in your body within one hour after you drink a Coca-Cola
Jan 06,2020 6:44 am
-
Fried Food May Be Killing You, a New Study Says.
Dec 27,2019 11:30 am
-
The Possibility: 4K Ultra High Definition Smart TVs in Place of Static Art
Dec 23,2019 8:33 am
-
The Problem with Stevia – Dr. Berg
Dec 10,2019 1:23 pm
-
Top 10 Toxic Foods and Top 10 Healing Foods | Dr. Josh Axe
Dec 01,2019 12:03 pm
-
“The Inquisition Was Particularly Hard On Us.” Tour Guide in Cartagena, Columbia
Nov 20,2019 2:53 pm
-
How To Lose Belly Fat Naturally Without Exercise – Dr. Stan Ekberg
Oct 20,2019 1:34 pm
-
Are Fast Food Giants Struggling Because Many Are Waking Up To How Fast Food Is Making Them Sick, Tired & Fat?
Oct 18,2019 1:38 pm
-
Fasting vs. Eating Less: What’s the Difference? (Science of Fasting)
Oct 18,2019 11:33 am
-
Man’s health radically transforms after just 30 days off sugar and alcohol
Oct 18,2019 8:27 am
-
Farmed Salmon — One of the Most Toxic Foods in the World?
Sep 24,2019 3:39 pm
-
Did She Turn 2 Simple Ingredients Into a Cure For Cancer? Dr. Johanna Budwig
Sep 24,2019 9:31 am
-
GMO Food — It’s Worse Than We Thought – Dr. Russell Blaylock
Sep 24,2019 6:21 am
-
How to Lower Cortisol – Dr. Berg
Sep 11,2019 9:40 pm
-
Star Signs Converging Now Predict the Return of Jesus – Jonathan Gray Archeologist
Sep 10,2019 9:33 am
-
How Hormones Influence You and Your Mind
Sep 09,2019 5:59 pm
-
Long life depends on this: Gary Wenk TedX Talk
Sep 09,2019 3:44 pm
-
The Carbs that are Worse than Sugar
Sep 06,2019 12:35 pm
-
Dark Chocolate Hack To Reduce Sugar & Insulin Spikes
Sep 06,2019 10:51 am
-
The Average Physical Condition of 4,100 Passengers on a Cruise Ship
Sep 02,2019 8:40 am
-
15 Intermittent Fasting Mistakes That Make You Gain Weight
Sep 01,2019 4:53 pm
-
Are You Salt Sensitive or Potassium Deficient
Sep 01,2019 12:17 pm
-
FASTING AWAY DIABESITY? Ft. Jason Fung, Nephrologist & Best-selling author
Sep 01,2019 11:30 am
-
How Corporations Ruined Food (Food Industry Documentary) – Real Stories
Aug 11,2019 10:56 am
-
How Much Coffee Should I Drink Daily?
Jul 22,2019 6:33 am
-
6 Household Spices that Destroy Cancer Cells, Prevent Heart Attacks & Rebuilds Our Gut
Jul 21,2019 8:20 am
-
Powerful Antioxidants to Longevity
Jul 20,2019 12:57 pm
-
The hormone balance plan – The Hormone Diet – by Dr. Natasha Turner
Jul 16,2019 6:58 am
-
Science Says 1 Minute of this Exercise is = to 45 min. of Jogging
Jul 05,2019 10:49 am
-
Stop Eating Poison – John McDougall MD
Jun 29,2019 10:34 am
-
Simple Keto Meal Plan For The Week – Burn Fat and Lose Weight
Jun 24,2019 6:54 pm
-
10 Best Ways To Avoid Weight Gain On A Cruise
Jun 24,2019 4:30 pm
-
How To Measure Your Depth & What Is Average Depth?
Jun 22,2019 8:22 pm
-
Costco Roasted Organic Chicken Wings & Vegetables
Jun 22,2019 7:04 pm
-
7 Cooking Oils Explained At Costco..The Good, Bad & Toxic!
Jun 21,2019 12:08 pm
-
EZ Diet Meal Idea – Roasted Chicken & Vegetables in 30 Minutes
Jun 02,2019 8:54 pm
-
Raspberries prevent cancer, diabetes, obesity, and arthritis!
May 31,2019 12:23 pm
-
What Nutrition Experts Eat On Vacation
May 31,2019 10:18 am
-
1/2 BBQ Chicken, Fries, Cole Slaw = 4,000 mg Sodium and requires 12,000 mg Potassium to Balance
May 31,2019 9:48 am
-
The Benefits of Vitamin C With Rose Hips for Skin Tone
May 31,2019 9:01 am
-
What the Dairy Industry Doesn’t Want You to Know – Neal Barnard MD
May 24,2019 9:51 am
-
Top five weight loss detox plans
May 21,2019 6:38 am
-
HISTORY OF RELIGION (Part 1): PAGANS, NIMROD, & BABYLON
May 19,2019 5:31 pm
-
Overweight in the Workplace (HBO: The Weight of the Nation)
Apr 24,2019 7:04 pm
-
GMO basics for natural health – How to avoid and why you may need to detox
Apr 11,2019 11:06 am
-
3 Cooking Rules for Maintaining Nutritional Value in Vegetables
Apr 11,2019 8:32 am
-
24 Reasons Why Hydrogen Peroxide Should Be In Your Home
Apr 11,2019 8:12 am
-
How Walking 15 Minutes Per Day Can Change Your Body
Apr 10,2019 12:18 pm
-
The Mystery of Babylon the Great Solved
Apr 08,2019 2:39 pm
-
Food Industry’s Secret Weapon (WHY Sugar is addictive & in 80% of Food)
Apr 08,2019 11:43 am
-
Three-quarters of world’s population now overweight or obese…
Mar 31,2019 11:03 am
-
Mediterranean diet found to reduce risk of premature death by 30 percent, new studies reveal
Mar 31,2019 10:15 am
-
5 Habits That Are Keeping You From Losing Those Last 10 Pounds
Mar 31,2019 9:59 am
-
The Real Reason We Bake Everything At 350 Degrees
Mar 23,2019 7:49 pm
-
Vitamin D deficiency causes weight gain; here’s how to drop the pounds effortlessly
Mar 18,2019 8:42 am
-
15 Foods That Reduce Your Heart Attack Risk by 80%
Mar 08,2019 8:28 pm
-
How to convert all your music to 432 Hz FREE and Easy – The 432 Player
Feb 28,2019 10:27 pm
-
Sample Meals on the EZ Diet and the 34337 System
Feb 10,2019 7:06 am
-
How I’ve Maintained an EZ 100 Pound Weight Loss
Feb 10,2019 6:43 am
-
Why Ezekiel Bread is The Healthiest Bread You Can Eat
Feb 10,2019 6:07 am
-
Coenzyme Q10 is an effective weapon against gum disease
Feb 02,2019 9:09 am
-
Keith Foster on the Health Benefits of C60 Charcoal
Jan 26,2019 12:46 pm
-
The One Amino Acid You Should Be Eating to Lose 62% More Fat
Jan 24,2019 9:40 am
-
How To Do Coconut Oil Pulling for Healthy Teeth & Gums by Dr. Axe
Jan 24,2019 8:52 am
-
Spinach extract improves weight loss by almost 50%, can eliminate food cravings
Jan 24,2019 8:19 am
-
Natural homemade toothpaste heals cavities while whitening teeth
Jan 24,2019 7:40 am
-
Mark Zuckerberg tapes over his webcam. Should you? MySpyBlocker Lense Stickers $9.99
Jan 24,2019 6:26 am
-
Want to boost weight loss? Try turmeric
Jan 24,2019 6:00 am
-
Top 10 food chemicals that are making you fat
Jan 24,2019 5:57 am
-
7 Best Low Carb Snacks For Work
Jan 22,2019 8:50 pm
-
Why You Should Always Keep Activated Charcoal On Hand – A Natural Life-Saving First Aid Essential
Jan 21,2019 8:39 am
-
What is The One Minute Cure by Madison Cavanaugh?
Jan 13,2019 9:53 am
-
A CUP A DAY…CLEAR CLOGGED ARTERIES AND HEART – Dr Alan Mandell, DC
Jan 02,2019 9:10 am
-
AMAZING Baked (Not Fried) Crispy Chicken Wings!
Jan 01,2019 5:30 pm
-
The Great Boomer Deception
Dec 30,2018 2:21 pm
-
7 Healthy Diet Secrets You Can Act On Right Now
Dec 30,2018 6:49 am
-
4 Healthy Breakfast Ideas For Weight Loss -TheSeriousFitness
Dec 17,2018 8:12 pm
-
4 Healthy Vegan Recipes For Weight Loss
Dec 13,2018 8:36 pm
-
Ultimate Guide to Low Carb Sweeteners | Blood Testing | Avoid These 3!!
Dec 13,2018 12:48 pm
-
Health Benefits of Dates – Promoting Heart, Brain, and Digestive Health
Dec 12,2018 8:43 am
-
The Power of Your Mind On Your Health and Longevity – Success begins with a Thought + Faith.
Dec 12,2018 8:22 am
-
How to Avoid Being Secretly Poisoned by MSG
Dec 12,2018 7:30 am
-
Seven spices that could save your life!
Dec 12,2018 7:15 am
-
10 negative-calorie foods that are weight-loss miracles
Dec 12,2018 7:09 am
-
Food companies hiding harmful high fructose corn syrup under new name
Dec 06,2018 9:04 am
-
Omega-3 Fatty Acids – The Ultimate Beginner’s Guide
Dec 06,2018 7:43 am
-
9 Ways That Processed Foods Are Slowly Killing People
Dec 06,2018 7:24 am
-
Is it really healthier to eat at home? Large-scale research reveals the truth
Nov 20,2018 8:31 am
-
Two nutrients slash death from cardiovascular disease by 50 percent
Nov 19,2018 6:02 am
-
Baked Cabbage Steaks with Butter, Garlic, Smoked Paprika, Pepper, Olive Oil
Nov 13,2018 9:48 pm
-
Revised “The Ezekiel Diet Handbook” Now Available FREE
Nov 05,2018 9:20 am
-
Sitting for long periods of time? Study shows just this much movement reduces the damage to circulation
Oct 26,2018 7:30 am
-
What Happens When You Eat Oatmeal Every Day?
Oct 22,2018 11:11 am
-
Healthier Homemade Instant Oatmeal Packets
Oct 21,2018 11:23 pm
-
Why Japanese Are So Thin According to Science – Bright Side
Oct 21,2018 1:55 pm
-
Stone House Seasoning Recipe from Add a Pinch
Oct 18,2018 2:18 pm
-
Homemade BBQ Sauce Recipe from Add a Pinch
Oct 18,2018 12:12 pm
-
The Best Foods for Long Life – Dr. Joel Fuhrman
Oct 16,2018 10:32 am
-
Florida Ruby Red Grapefruit Harvest Spotted at Costco & Why Grapefruit for Weight Loss?
Oct 13,2018 1:00 pm
-
Cancer Cure Salesmen – Where To Go After Cancer Diagnosis
Oct 13,2018 12:51 pm
-
Is Cooking With an Air Fryer Healthy?
Oct 08,2018 7:13 pm
-
Actors Give Advice on Diet & Exercise When They Have To Transform Their Body
Oct 06,2018 5:23 pm
-
A Day on the Ezekiel Diet in Diary & Photos + Potassium Issues
Oct 06,2018 12:01 pm
-
Who knew? Many wines are contaminated with cancer-causing herbicide glyphosate
Oct 06,2018 9:26 am
-
Weekend Kabob Idea – Grocery List – How to Pick a Weight Loss Sauce
Oct 06,2018 8:44 am
-
Turning Water Into Oil for Low Calorie Homemade Salad Dressing
Oct 06,2018 8:30 am
-
14 Foods that naturally remove toxins from the body
Oct 06,2018 8:11 am
-
The Paleo Diet Point: What makes it a great diet phenomenon?
Oct 06,2018 8:04 am
-
Dr. Berg: Number 1 Food to Burn Belly Fat
Sep 23,2018 6:46 pm
-
Dr. Russell Blaylock: Restaurant Cooking Oils Raise Risks
Sep 23,2018 9:10 am
-
How to Make the Healthiest Pizza in the World
Sep 23,2018 7:42 am
-
Top 10 reasons to avoid toxic high-fructose corn syrup
Sep 23,2018 7:19 am
-
Which fruits and vegetables are better for your waistline?
Sep 16,2018 8:17 am
-
Fluoridated Water and the Great Culling of the Human Race
Sep 16,2018 6:25 am
-
The Purpose of Potassium and Weight Loss – Dr. Eric Berg
Sep 13,2018 9:15 am
-
Benefits of Dandelion Tea – Diuretic, Heavy Metal Detoxification, Candida – Dr. Josh Axe
Sep 11,2018 11:04 am
-
Top 10 foods that keep you healthy as you age
Sep 08,2018 7:49 am
-
BEWARE of the top 10 toxins in food and medicine that cause the majority of U.S. allergies, diseases and disorders
Sep 08,2018 7:46 am
-
Huge new study proves that eating berries promotes weight loss
Sep 08,2018 7:09 am
-
Dr Mark Hyman: The Truth About Eating Fat to Get Healthy (Audio)
Sep 08,2018 6:52 am
-
If you don’t know anything about light you don’t anything about food – Dr. Jack Kruse
Sep 05,2018 7:25 pm
-
6 “One-Spoonful” Hacks to Lose Weight Effectively
Sep 03,2018 6:23 am
-
The Gum Disease Conspiracy
Sep 02,2018 6:00 am
-
7 Weight Loss Diet Tips for Men Over 40
Sep 01,2018 7:11 am
-
How To Burn Fat Refresher – Dr. Eric Berg
Sep 01,2018 6:33 am
-
Why Is Eating Garlic on an Empty Stomach Good?
Sep 01,2018 6:14 am
-
How Did Americans Get So Fat, In Seven Charts
Aug 31,2018 6:12 am
-
Dr. Stan Monteith and Dr. Russell Blaylock – Taking Care of Your Heart
Aug 24,2018 3:37 pm
-
Dr. Stan Monteith with Dr. Jorge Flechas – Lack of Iodine is a Promoter of Cancer
Aug 24,2018 9:21 am
-
Here’s What Happens if You Eat an Avocado a Day for a Month
Aug 21,2018 3:07 pm
-
Seven pharmaceuticals that cause weight gain
Aug 16,2018 7:06 am
-
Healing with Lasers and Other Remedies for Thriving In A Toxic Whirled
Aug 15,2018 12:50 pm
-
How I used 5,000 ppm Colloidal Silver to Kill Basal Cell Skin Cancer
Aug 13,2018 9:08 am
-
Here are the best naturally detoxifying foods you can eat every day
Aug 08,2018 9:04 am
-
Grounding or Earthing and Inflammation – Down to Earth – Video 15 min
Aug 04,2018 12:43 pm
-
By 2025, one fifth of all humans estimated to be obese
Jul 31,2018 6:46 am
-
The Facts About Clean Eating
Jul 31,2018 6:30 am
-
Why broccoli is important for optimal detoxification
Jul 31,2018 6:27 am
-
Rid the Loose Flabby Skin! Dr. Eric Berg
Jul 31,2018 6:13 am
-
When a microwave oven is running, you should be too
Jul 31,2018 6:04 am
-
Why Research Points to the Paleo Diet as a Health Solution
Jul 31,2018 6:00 am
-
Artificial sweeteners alter gut bacteria and cause metabolic dysfunction leading to obesity and diabetes
Jul 25,2018 6:03 am
-
There are three main types of sugar that you need to be aware of.
Jul 25,2018 6:00 am
-
Over 600 pharmaceuticals polluting drinking water and environment
Jul 25,2018 6:00 am
-
Break a sugar addiction within a week using three easy steps
Jul 16,2018 7:20 am
-
The Average American Woman Now Weighs As Much As 1960s Man
Jul 16,2018 6:00 am
-
16 Cancer Causing Foods You Probably Eat Every Day
Jul 16,2018 6:00 am
-
The Scary Truth About Movie Theater Snacks (Infographic)
Jul 16,2018 6:00 am
-
Overcoming Temptation and Help with Weight Loss
Jul 11,2018 12:06 pm
-
Low-carbohydrate diets make you lean and healthy, systematic review shows
Jul 11,2018 10:06 am
-
Secrets and Strategies for Permanent Weight Loss
Jul 11,2018 7:44 am
-
Must Carry These: 5 Nutritional Fruits While Traveling
Jul 11,2018 7:14 am
-
What’s the DASH Diet and Why Doctors Call It the Best Diet
Jul 05,2018 3:54 pm
-
See What Cheaper Fish Some Restaurants Serve For Grouper, Cod and Catfish
Jul 04,2018 8:37 am
-
10 Metabolism-Boosting Foods That Support Healthy Weight Loss
Jul 03,2018 9:14 am
-
50 Foods That Are Super Healthy
Jul 02,2018 7:03 am
-
How to Tighten Loose Skin After Losing Weight
Jun 30,2018 7:29 am
-
5 Foods for Healthy Better Looking Skin
Jun 30,2018 6:45 am
-
EZ Diet Endorsement: Physician-Founded True Food Kitchen – Healthy Real Food Restaurant
Jun 30,2018 6:28 am
-
Why Most People Aren’t Happy – People With Faith Always Stopped Jesus and Got His Attention
Jun 26,2018 11:50 am
-
Tips for Making Unhealthy Food Options Better
Jun 26,2018 9:26 am
-
Top 10 Great Natural Sun Protecting Oils
Jun 26,2018 8:12 am
-
A Reason NOT to Drink Coffee on an Empty Stomach
Jun 26,2018 6:55 am
-
Guess How Many Calories Are in a Typical Fast Food Meal – More Than Most Would Expect
Jun 26,2018 6:24 am
-
“How to Keep Your Brain from Aging” – Dr. Russell Blaylock Lecture
May 06,2017 2:03 pm
-
Best Fruit Fly Trap – Fruit Containers
May 02,2017 3:02 pm
-
200 Reasons Not To Vaccinate – Free PDF Download
May 01,2017 7:58 pm
-
Why Almond Flour Is Better Than Most Other Flours
Apr 28,2017 8:41 am
-
These 50 Foods Are High In Lectins: Avoidance or Not?
Apr 27,2017 8:59 am
-
Cardiologist & Surgeon Steven R. Gundry MD Discussing Weight Loss & Lectin
Apr 26,2017 8:49 am
-
Save on Costco 2 lb Tubs of Medjool Dates – $8.99 or $4.50 lb.
Apr 25,2017 6:39 am
-
Does tea from this plant root make cancer cells disintegrate within 48 hours?
Apr 21,2017 1:15 pm
-
Divine Medjool Date and Dark Chocolate Candy – 20 calories each
Apr 18,2017 6:07 am
-
The Tomato House near Dahlonega GA – Sauce, Marinade, Dressing, Jelly, & Jam Heaven
Apr 17,2017 10:09 am
-
Cancer Cells Die In 42 Days: Did a Famous Austrian’s Juice Cure Over 45,000 People from Cancer?
Apr 15,2017 8:08 am
-
How Eating Fiber Can Help You Lose Belly Fat – Ryan Raman, MS, RD
Apr 11,2017 7:18 am
-
Hoodia Gordonii to Suppress Appetite – Hype or Help?
Apr 10,2017 6:54 am
-
The Real Secrets Of Successful Weight Loss – Dr. Kim Crawford
Apr 08,2017 5:54 pm
-
Crushing Cancer With These God-Given Foods – Dr. Don Colbert
Apr 08,2017 8:01 am
-
Distilled Water: THE CURE For All Our Problems? Must hear.
Apr 05,2017 7:31 pm
-
12 Mental Tricks to Beat Cravings and Lose Weight
Apr 04,2017 6:00 am
-
Citrus fruit found to decrease risk of stroke
Mar 31,2017 7:22 am
-
Costco Endorsed As Ezekiel Diet Friendly
Mar 28,2017 6:00 am
-
Canola oil: a chemical carcinogen that doesn’t belong anywhere near your food
Mar 23,2017 10:06 am
-
Five ingredients that poison your brain
Mar 22,2017 5:00 am
-
Natural Appetite Suppressants for Safe, Effective Weight Loss – Free 124 Page Book
Mar 19,2017 8:42 am
-
Eat 1 Tablespoon of Coconut Oil a Day and THIS Will Happen to Your Thyroid!
Mar 13,2017 12:57 pm
-
25 Fulfilled Bible Prophecies you can’t deny – The Answer to 1984 is 33AD
Mar 12,2017 9:51 am
-
Skinny Chocolate Pumpkin Pie with Stevia and Almond Meal/Butter Crust
Mar 12,2017 7:34 am
-
Using hand sanitizer causes you to absorb 10,000% more emasculation chemicals that feminize men
Mar 12,2017 5:47 am
-
Weight Loss Programs To Heal Obesity Naturally
Mar 10,2017 6:50 am
-
Aged garlic reverses deadly plaque in arteries and can stop heart disease
Mar 09,2017 7:24 am
-
America’s mass apathy and fatigue brought on by chemically-laced, nutrient-depleted junk foods & GMOs
Mar 05,2017 9:13 am
-
Will 10,000 Steps a Day Make You Fit? Dr. Mercola
Mar 05,2017 7:40 am
-
Scientists identify six chemicals from plant extracts that can slow down biological aging and boost longevity
Mar 03,2017 6:39 am
-
EZ Organic Skinny Strawberry Short the Cake Pie
Feb 25,2017 8:15 pm
-
11 Ways to Naturally Boost Your Metabolism for Weight Loss
Feb 23,2017 7:08 am
-
Skinny Pumpkin Pie Recipe Secrets from Someone That’s Made Hundreds
Feb 23,2017 6:00 am
-
Low Sodium Red Wine Sauce Recipe
Feb 18,2017 2:20 pm
-
Ginger tea shown to naturally kill cancer, dissolve kidney stones, improve liver health and more
Feb 18,2017 10:24 am
-
Adrenal Body Type, Cortisol & Belly Fat! Dr. Berg
Feb 16,2017 6:39 pm
-
How to safely remove toxins from the body and avoid chronic disease naturally
Feb 14,2017 8:19 am
-
14 Home Remedies To Remove Age Spots That Work Wonders
Feb 12,2017 9:18 am
-
We are POISONING ourselves: The real reason why humanity is going insane… Health Ranger Report
Feb 07,2017 9:15 am
-
Dr. David Jockers on gut microbes – are yours making you fat?
Feb 07,2017 7:09 am
-
Organic chocolate covered strawberries
Feb 07,2017 7:07 am
-
17 Astonishing Home Remedies for Snoring
Feb 06,2017 7:34 pm
-
60 Healthy Foods That Can Block Inflammation and Ease Pain
Feb 05,2017 11:03 am
-
EZ Diet Endorsement: Zoë’s Kitchen, “if it wasn’t food 100 years ago, it’s not food today.”
Feb 02,2017 9:27 pm
-
CONFIRMED: Cancer is entirely a man-made disease
Feb 02,2017 3:47 pm
-
The Truth About Multivitamins Exposed: New Study Could Save Your Life
Feb 01,2017 6:54 am
-
Hell is not a love issue, it’s a justice issue. The Good News and Musical Chairs
Jan 28,2017 10:20 am
-
The Straight Dope on Herpes Statistics
Jan 25,2017 5:24 pm
-
Expert: Relying on willpower alone is a sure way to diet failure
Jan 25,2017 6:08 am
-
Costco Deals: Organic Squash and Zucchini – Eggs – Coconut Oil – Medjool Dates – Chicken
Jan 23,2017 8:41 pm
-
EZ Diet Tips for Busy People: EZ Baked Chicken Packs for the Week
Jan 23,2017 7:02 pm
-
Cayenne pepper makes herbs more effective, aids weight loss, pain reduction, & ulcer relief
Jan 23,2017 8:30 am
-
5 Things You Should be Eating to Protect Your Brain as it Ages
Jan 22,2017 8:37 am
-
Update 1 Month Later – Holy Bread NOT Holey Bread – Message to Food for Life Management
Jan 19,2017 10:45 am
-
Scientists discover a way to avoid teeth fillings that proves teeth can be regrown
Jan 18,2017 5:59 am
-
The 20 Most Weight Loss Friendly Foods on The Planet
Jan 14,2017 11:00 am
-
Forget everything else and do this one thing if you want to lose weight
Jan 13,2017 2:17 pm
-
Healthy Weight Loss Minute, the Basics by Dr. Ted Broer
Jan 13,2017 7:34 am
-
The health benefits of sprouted grains
Jan 12,2017 6:00 am
-
The 2 Most DANGEROUS Foods: MUST WATCH!
Jan 11,2017 6:10 am
-
10 Excellent Foods That Naturally Act Like Viagra
Jan 09,2017 8:47 pm
-
WHY Sugar is as Bad as Alcohol (Fructose, The Liver Toxin)
Jan 09,2017 3:42 pm
-
ALA: Alpha-Lipoic Acid a Weight-Loss Aid
Jan 09,2017 7:51 am
-
10 Things You Don’t Want to Know About Fast Food
Jan 08,2017 10:35 am
-
Low Vitamin D Levels Linked to Advanced Cancers
Jan 08,2017 9:34 am
-
Sweet potato is a healthy, natural medicine
Jan 07,2017 8:29 am
-
Can’t Lose Weight? The 5 Internal Factors That Rule Your Metabolism
Jan 05,2017 7:37 am
-
Freezing blueberries increases availability of antioxidants – Frozen Blueberries & Cream Dessert
Jan 04,2017 11:12 am
-
How to Fix a Slow Metabolism: MUST WATCH!
Jan 02,2017 10:10 am
-
Apple cider vinegar can help regulate blood sugar, body fat and more
Dec 29,2016 8:42 am
-
Skinny Cheesecake With Stevia instead of Sugar
Dec 24,2016 5:40 am
-
Health and Consciousness Repair: How Many Items On This List Are You Doing?
Dec 14,2016 6:19 am
-
New toothpaste formula said to fix cracked teeth, restore tooth enamel
Dec 12,2016 7:13 am
-
Periodic fasting increases fat burning and reduces the risk of disease
Dec 09,2016 8:15 am
-
Study: Fitness trackers hardly contribute to weight loss
Dec 06,2016 7:41 am
-
The GOOD-O-METER – Are You Good Enough to Get Into Heaven?
Dec 06,2016 7:03 am
-
Top seven fuels that feed the cancer ‘fire’ and mutate more cells
Dec 02,2016 8:34 am
-
Simple Low Carb Pie Crust
Nov 29,2016 8:19 am
-
This Is Why You Should Sleep on Your Left Side
Nov 22,2016 7:00 pm
-
High-protein diet can reduce metabolic benefits from weight loss for women
Nov 17,2016 6:38 am
-
What Must I Do To Be Saved? World Video Bible School (WVBS)
Nov 16,2016 4:22 pm
-
10 Signs Your Body is Dehydrated and Immediately Needs More Water
Nov 16,2016 7:24 am
-
Mulberry compound aids weight loss by activating brown fat
Nov 15,2016 8:08 am
-
Aspartame linked to vision loss, cancer and other illnesses
Nov 14,2016 6:15 pm
-
Studies confirm fluoridated water is linked to hypothyroidism, fatigue, obesity and depression
Nov 14,2016 7:09 am
-
If Energy Drink Ads Were Honest – Honest Ads
Nov 12,2016 5:47 am
-
Top 10 Tips for a stronger heart – Dr. Serge Gregoire
Nov 11,2016 6:05 am
-
Enjoy the highly nutritious benefits of pumpkin year round
Nov 04,2016 8:14 am
-
Book Gift Idea: True Food – Seasonal, Sustainable, Simple, Pure
Nov 02,2016 4:36 pm
-
What Happens to the Lungs, Brain & Mood When You Use a Himalayan SALT LAMP
Nov 01,2016 9:34 am
-
Experts: Our drinking water contains massive doses of prescription drugs
Oct 17,2016 12:51 pm
-
21 Reasons to Eat Real Food
Oct 15,2016 8:31 am
-
High protein, low-carb, sugarless diet helps rid young girl of depression, pain and anxiety
Oct 12,2016 10:12 am
-
Best Dark Chocolate: The Ultimate Buyer’s Guide
Oct 11,2016 10:41 am
-
6 Mistakes That Slow Down Your Metabolism
Oct 11,2016 9:54 am
-
Laugh Out Loud Funny
Oct 09,2016 11:27 am
-
Could Obesity Cause Stupidity? Researchers Found a Possible Link
Oct 08,2016 11:33 am
-
9 Little Known Ways to Shed Water Weight (Naturally and Fast)
Oct 04,2016 8:32 am
-
The Cost of Violating Nature’s Laws – Dr. Brent Hunter
Oct 01,2016 1:05 am
-
Black pepper (Piperine) increases absorption of nutrients; antioxidant properties
Sep 28,2016 3:17 pm
-
Water fluoridation linked to ADHD, obesity and depression
Sep 27,2016 9:31 am
-
Gut bacteria plays a role in youth obesity
Sep 27,2016 8:29 am
-
5 Healthy Supplements You Want to Include in Your Diet
Sep 25,2016 5:59 pm
-
High-fat cheese: the secret to a healthy life?
Sep 22,2016 11:18 am
-
Calcium & Weight Loss – Validation from Medical Journals & Personal Experience
Sep 22,2016 10:00 am
-
The Case Against Chlorinated Tap Water – Could it interfere with the “good” bacteria in your gut?
Sep 21,2016 8:32 am
-
4 Hours on a Tropical Island – a Virtual Vacation by LoungeV
Sep 20,2016 3:47 pm
-
Lose weight, improve brain function and optimize your health with ‘smart’ fat
Sep 17,2016 6:01 am
-
Your Lifestyle Impacts Your Gut Bacteria – and Ultimately, Your Overall Health
Sep 15,2016 10:40 am
-
How Probiotics Can Help You Reach Your Healthiest Weight Ever
Sep 15,2016 7:31 am
-
Foods High on the Glycemic Index but Low on Glycemic Load
Sep 14,2016 10:32 am
-
The Home Microbiome Project
Sep 14,2016 6:00 am
-
The Invisible Creatures That Keep You Alive
Sep 13,2016 10:21 am
-
Scientists Discover a “6th Taste” Explaining Why We Love Carbs So Freakin’ Much
Sep 11,2016 7:50 pm
-
Medical errors are killing at least 200,000 people per year in America
Sep 10,2016 8:55 am
-
Must See: The Evolution of Resistant Bacteria on an Antibiotic “Mega-Plate” Petri Dish – Harvard Medical
Sep 09,2016 5:38 pm
-
MSG: The Hidden Source of Belly Fat – Dr. Berg
Sep 09,2016 3:20 pm
-
Healthy 6 Ingredient Black Bean Brownies
Sep 09,2016 7:46 am
-
Shocking pictures of processed food remind us that fake food doesn’t result in genuine health
Sep 08,2016 8:26 am
-
This Is How Stress May Be Sabotaging Your Weight Loss Efforts
Sep 07,2016 8:53 am
-
Chronic dehydration is the primary cause of pain and disease in the human body, expert says
Sep 06,2016 8:05 am
-
Himalayan salt: The ‘purest’ salt in the world and its numerous benefits
Sep 05,2016 10:30 am
-
Sneaky Ways Restaurants Make You Fat
Sep 03,2016 10:00 am
-
NY Times admits obesity linked to many cancers
Sep 01,2016 6:00 am
-
Skinny Sweet Potato Pie with Stevia and Almond Meal-Butter Crust
Aug 31,2016 8:55 am
-
3 Reasons You May Not be Getting Enough Vitamin D this Summer
Aug 30,2016 8:15 am
-
Control your sugar intake; it’s called ‘the white death’ for a reason
Aug 29,2016 1:55 pm
-
Get the heavy metals out NOW! Health Ranger reveals 5-step method for dramatically reducing your heavy metals burden
Aug 27,2016 7:27 am
-
CLA in grass-fed beef is a powerful anti-carcinogen that also promotes fat loss
Aug 27,2016 7:05 am
-
Years ago Russia researched the biological effects of microwave ovens… then banned them
Aug 26,2016 7:22 am
-
How to Reverse a Fatty Liver – Dr. Eric Berg
Aug 24,2016 3:09 pm
-
Why 2016 was the year to watch among 12 scholars influenced by Isaac Newton’s Biblical research
Aug 20,2016 7:51 am
-
God’s Dietary Laws: Abolished in the New Testament?
Aug 20,2016 7:30 am
-
Organ donor wakes up during harvesting of her body parts after doctors jumped to conclusions
Aug 18,2016 9:22 am
-
If you’re going to get to a healthy weight, ask yourself these 10 questions first!
Aug 16,2016 8:17 am
-
How to Really Conquer Your Weight Easily and for Good
Aug 13,2016 8:08 pm
-
Sufficient sleep is essential to fuel weight loss efforts
Jul 22,2016 8:24 am
-
The Best Natural Supplements for Gaining Muscle
Jul 17,2016 1:34 pm
-
Have inflammatory diseases risen while GMO crops are the majority of food sources?
Jul 05,2016 1:24 pm
-
Is Fruit Good or Bad For You? Practicing Healthy Eating the Smart Way
Jun 30,2016 2:32 pm
-
Sugar addiction and withdrawal: What you need to know
Jun 29,2016 8:07 am
-
The 8 most SURPRISING places you’ll find GMOs
Jun 24,2016 10:05 am
-
Weight Loss Lunch on the Ezekiel Diet
Jun 22,2016 12:33 pm
-
Brain damaging heavy metal MERCURY found in grocery products made with high fructose corn syrup (HFCS)
Jun 22,2016 7:57 am
-
Detox Water 101 – What it is, Health Benefits and Myths
Jun 19,2016 8:22 am
-
NO TREATMENT NEEDED: The U.S. population could cut cancer deaths in HALF just by adopting healthier lifestyles
Jun 08,2016 7:42 am
-
Long before pills, our ancestors used these 12 natural antibiotics to survive infections
May 25,2016 2:52 pm
-
Resources: Love, Sex, Dating, and Marriage God’s Way
May 22,2016 3:03 pm
-
Dr. Berg explains adrenal fatigue and all of its symptoms.
May 20,2016 7:18 am
-
Is it the FLUORIDE? Today’s humans are so dumbed down, they can’t solve sixth grade word problems
May 19,2016 10:40 am
-
The REAL Reason Apple Cider Vinegar Works for Losing Weight – Dr. Berg DC
May 17,2016 9:28 am
-
Growing body of evidence suggests antimicrobial soaps increase the risk of infections, alter gut bacteria and breed superbugs
May 14,2016 7:41 am
-
What really scares Big Pharma? People who learn how to CURE their own disease!
May 11,2016 1:01 pm
-
Third Leading Cause of Death in America: Going to the Hospital
May 08,2016 9:09 am
-
Reversing Stupid: DHA has the power to reverse the harmful effects of fructose on the brain
May 02,2016 8:20 am
-
Obesity, high cholesterol, blood pressure rates soaring so fast that conventional medication will become obsolete
Apr 27,2016 9:15 am
-
Could This be the Key to Better Heart Health? Using a natural compound found in food
Apr 21,2016 7:43 am
-
Nestle’s Pure Life – Reverse Osmosis and/or Distillation Bottled Water Without Fluoride
Apr 16,2016 9:50 am
-
Lancet’s Editor-In-Chief: “Half of all published scientific literature is false”
Apr 15,2016 12:34 pm
-
Costco going all out for organic:
Apr 14,2016 8:31 am
-
High Levels of Heavy Metals Found in Popular Chocolate Brands
Apr 12,2016 8:30 am
-
Create a Calming Atmosphere With LoungeV Creative Studios HD Nature Films
Apr 09,2016 2:36 pm
-
Plantain, a common driveway weed, is one of nature’s most powerful medicines
Apr 01,2016 12:27 pm
-
California bans commercial crab fishing due to excessive radiation in seafood
Mar 28,2016 6:51 am
-
Ginger: The Herb For Everything? Dr. Robert W. Horovitz
Mar 23,2016 7:16 am
-
Take Magnesium For Your Bones – Dr. Carolyn Dean, MD, ND
Mar 21,2016 8:41 am
-
BREAKTHROUGH: The food you eat determines which genes get activated or suppressed …
Mar 13,2016 7:10 pm
-
Choose raw horseradish, oregano, or honey natural remedies instead of antibiotics
Mar 13,2016 9:35 am
-
Michael S. Tyrrell – How I discovered healing musical tones hidden deep in ancient frequencies …
Mar 09,2016 8:53 am
-
Turmeric able to ‘smart kill’ cancer cells… chemotherapy and radiation now medically obsolete
Mar 06,2016 11:27 am
-
Ginger over chemo: This powerful root can eliminate 10,000x the number of cancer cells
Mar 05,2016 8:30 am
-
Are chia seeds the answer to weight loss?
Feb 23,2016 7:23 am
-
PRAZOR Launch Set to Transform Christian Media Delivery
Feb 20,2016 6:43 am
-
Miracle molecule from licorice root nullifies liver damage from alcohol and Tylenol…
Feb 06,2016 7:44 am
-
An overweight society in denial: junk food companies continue to profit as obesity is normalized
Feb 03,2016 7:17 am
-
Science Shows Why Microwaved Food Is A Bad Idea For Your Health
Jan 29,2016 7:10 am
-
She Drank Carrot Juice From 2.5 kg Carrots Every Day: Here’s What Happened After 8 Months
Jan 24,2016 8:01 pm
-
Passion for eating healthy food declared a mental disorder by ‘expert’ psychiatrists
Jan 19,2016 5:19 pm
-
Scientists discover why honey is still the best antibiotic
Jan 16,2016 6:20 am
-
Have scientists discovered the elixir of youth? Hormone ‘extends lifespan by 40%’
Jan 15,2016 12:24 pm
-
Why Is the Church So Fat?
Jan 12,2016 7:24 am
-
RAPTURE? Jesus said: “It will be JUST like THIS!” Carl Gallups explains!
Jan 10,2016 9:56 am
-
15 Reasons You Should Be Drinking Lemon Water Every Morning
Jan 10,2016 8:44 am
-
Reverse coronary artery disease safely and naturally
Jan 01,2016 1:17 pm
-
Is Your Body’s Condition a Reflection of Your Soul’s Condition?
Dec 28,2015 7:05 am
-
Is Food Still Good After the Sell-By Date?
Dec 27,2015 8:46 am
-
Walnuts: Brain, Heart, Anti-Cancer Benefits, and More
Dec 19,2015 7:30 am
-
New multi-toxin GMOs that produce their own poison carry ‘serious health and environmental risks’ scientific review finds
Dec 18,2015 8:47 am
-
Three words that sum up the deepest weight loss obstacle
Dec 10,2015 7:21 am
-
Top 10 Reasons to Stop Using Splenda Right Now!
Dec 03,2015 8:30 am
-
Why Am I Continuing to Gain Weight While Exercising?
Nov 30,2015 7:33 am
-
Raw, Vegan Pecan Pie Using Medjool Dates instead of Corn Syrup
Nov 26,2015 4:54 pm
-
Wal-Mart Strikes A Deal With Wild Oats To Sell Cheaper Organic Foods
Nov 24,2015 2:09 pm
-
So simple it’s ridiculous: #1 tip for losing weight and keeping it off forever
Nov 24,2015 8:23 am
-
Can This New Supplement Block Damaging Effects of Carbs?
Nov 19,2015 7:04 am
-
Fit Body, Fit Brain: The Key to Keeping Your Mind Young
Nov 19,2015 5:58 am
-
14 Foods That Cleanse the Liver – by Dr. Edward Group
Nov 18,2015 7:24 am
-
Is slow metabolism to blame for chronic weight loss failure?
Nov 11,2015 7:28 am
-
8 Healthy foods to help you lose weight
Nov 06,2015 5:01 pm
-
What scientific evidence exists that testifies to the presence and power of The God?
Nov 01,2015 8:41 am
-
Study Finds Weird ‘Noise’ Factor Makes Most People Gain Weight. Could you be affected?
Oct 30,2015 10:43 am
-
GcMAF: Another Suppressed Cancer Treatment? And here is how it is even more powerful…
Oct 28,2015 5:32 pm
-
Health benefits of pumpkins: Cancer-fighting, wound healing and skin-protecting
Oct 28,2015 8:27 am
-
Wendy’s, McDonald’s, Gerber Says NO to Non-Browning GMO Arctic Apples
Oct 27,2015 9:30 am
-
Soda industry dying as Americans seek healthy beverages that don’t cause diabetes, obesity
Oct 22,2015 7:47 am
-
Alternative Heart Treatment Moves Into the Mainstream
Oct 20,2015 8:17 am
-
How to Store and Prepare Frozen Ezekiel 4:9 Bread
Oct 17,2015 9:53 am
-
Top 10 reasons to avoid toxic high-fructose corn syrup
Oct 16,2015 7:38 am
-
10 Things Americans Consume That Are Banned in Other Countries
Oct 14,2015 9:59 pm
-
5 Things You Didn’t Know About Brown Fat
Oct 12,2015 8:13 pm
-
Over 40 Rodent Feeding Studies Show GM Food is Disastrous to Health …… Why aren’t these foods labeled?
Oct 12,2015 8:35 am
-
5 Ways to Guarantee Success With Your Diet
Oct 07,2015 7:42 am
-
Diabetes, obesity and developmental problems all caused by chemical corporations’ toxic products
Oct 04,2015 9:48 am
-
Five good mood foods that support mental health
Oct 02,2015 6:50 am
-
Why Home-Cooked Food Never Tastes Like Restaurant Food
Sep 25,2015 8:43 am
-
Colloidal Silver: No Home Should Be Without It!
Sep 20,2015 3:48 pm
-
Natural Anti-Aging Solutions Webinar with Dr. Group
Sep 17,2015 3:30 pm
-
Top 10 ways eating onions can improve health
Sep 14,2015 8:13 am
-
10% Vinegar, Orange Oil, Dish Soap Weed Killer – Alternative to Glyphosate (Roundup)
Sep 13,2015 12:54 pm
-
Raw Pecan Brownies
Sep 12,2015 11:47 am
-
GMOs And Their Irreversible Effects On Our Future
Sep 06,2015 1:21 pm
-
Consumer Reports finds hamburger from grass-fed and organic cattle poses fewer health risks
Aug 27,2015 6:05 pm
-
The 1 out of 100 Cleaner Condiments: Braswell’s Merlot Wine Sauce from WalMart, 6 bottle case
Aug 06,2015 2:31 pm
-
Beyond The Heat: 7 Amazing Health Benefits Of Chilli peppers
Jul 24,2015 6:24 am
-
New research: Olive oil compound destroys cancer cells in 30 minutes
Jul 21,2015 9:49 am
-
Colorado City Stops Water Fluoridation Following Concerning Study – Joining the rest of the world in refusing fluoride
Jul 21,2015 7:41 am
-
‘Super Anti-Cancer Spice’ Turmeric Could Fight Type 2 Diabetes, Fuel Weight Loss
Jul 21,2015 7:24 am
-
SMART METERS: A SURVEILLANCE AND CONTROL CON JOB REVEALED – NewsWithViews.com
Jul 18,2015 11:23 am
-
The Real Reason to Avoid MSG: Industry Secret Ingredient for Food Addiction
Jul 12,2015 9:42 pm
-
New Research Finds Fruit Can Convert ‘Bad’ Fat into ‘Good’ Fat – Here is the secret fat-converting compound
Jul 11,2015 2:09 pm
-
Alternative medicine users more knowledgeable, earn more than others, study finds
Jul 11,2015 8:34 am
-
Newly Discovered Danger of High Fructose Corn Syrup is Alarming – How your heart is put at risk
Jul 04,2015 7:19 am
-
How to Safely Clean Fruits and Vegetables
Jul 02,2015 7:17 pm
-
Fast food restaurants move towards organic food as Americans become health-conscious
Jul 01,2015 7:11 am
-
Amy’s Kitchen to Launch First Non-GMO, Organic Drive-Thru
Jun 30,2015 12:00 pm
-
June 30, 2015 Star of Bethlehem? Jim Dodge and Dr. Dale Sides – signs in the sky in 2015
Jun 27,2015 9:46 am
-
The lymphatic system – How it works and why cleansing it matters
Jun 25,2015 8:55 am
-
Gluten Free, Paleo Chocolate Lava Cake, my Favorite Anti-Aging Treat
Jun 18,2015 9:20 am
-
Are Green Coffee Beans the Perfect Weight Loss Superfood?
Jun 17,2015 6:42 pm
-
EZ Meal Ideas on The Ezekiel Diet
Jun 17,2015 8:13 am
-
Organic Takeover: Toxic Food Makers Lose $4 Billion in Sales in One Year
Jun 15,2015 8:10 am
-
Study: Tattoos Can Cause Serious, Long-Term, Adverse Reactions
Jun 12,2015 6:31 am
-
Learn how to plant a high-yield secret survival garden
Jun 03,2015 9:45 am
-
Fluoride Content in Beer Website – More Alcohol Equals Less Fluoride – Pick Your Poison
May 30,2015 10:30 am
-
Analysis reveals more than one-quarter of all supermarket food contains toxic trans fats
May 29,2015 8:12 am
-
How To Make Almond Meal and Medjool Date Pie Crust – 315 Calories
May 23,2015 9:11 am
-
‘Poor man’s’ heavy metal detox – boost health without breaking the bank
May 23,2015 8:01 am
-
Can ancient ‘sun gazing’ therapy help reactivate a calcified pineal gland?
May 22,2015 8:17 am
-
Researchers find that ‘quality’ diets high in fruits and vegetables, low in sodium are good for kidneys
May 20,2015 7:36 am
-
Huge Victory: USDA Introduces Official Non-GMO Label
May 17,2015 10:38 am
-
Skinny Pumpkin Cheesecake Pie Chronicles
May 16,2015 9:26 am
-
Power Walking: One of the Best Complete Exercises Around – Especially if you do it in certain environments
May 14,2015 7:31 am
-
Everything you think you know about diets is WRONG – The Diet Myth
May 12,2015 7:47 am
-
The best and worst forms of magnesium to take as a supplement
May 07,2015 7:37 am
-
Newton’s Riddle! What was Sir Isaac Newton looking for in the Book of Daniel for 73 Years?
May 05,2015 6:57 am
-
Skinny Chocolate Cheesecake with Stevia and Almond Meal/Medjool Date Crust
May 03,2015 10:09 am
-
US Govt Lowers Fluoride Levels In Drinking Water For First Time in 50 Years
Apr 30,2015 6:14 am
-
Why You May Be Better Off Ignoring Conventional Cholesterol and Low-Fat Diet Guidelines
Apr 27,2015 11:26 am
-
Skinny Chocolate Sweet Potato Pie with Stevia and Almond Meal/Butter Crust
Apr 23,2015 5:49 pm
-
EZ Pizza ideas using Ezekiel Bread
Apr 23,2015 2:38 pm
-
Organic industry is exploding in Wisconsin as demand for clean, healthy food outpaces supply
Apr 23,2015 8:11 am
-
The Perricone Anti-Inflammatory 3 Day Face Lift Diet
Apr 20,2015 11:55 am
-
Foods and Nutrients That Help Burn Belly Fat
Apr 20,2015 8:05 am
-
10 Ways To Prevent Stress-Related Heart Attack
Apr 18,2015 9:55 am
-
DMAE: Extending the Lifespan and Mental Capacity of Mice and Men
Apr 16,2015 8:25 am
-
Bizarro Psychiatric Officials Label ‘Healthy Eating’ As Newest ‘Eating Disorder’
Apr 13,2015 7:31 am
-
20 Cool Facts You Didn’t Know About Dates
Apr 12,2015 8:00 am
-
#2 Food Ingredient to Avoid – Sodium Chloride (Processed Salt)
Apr 11,2015 3:09 pm
-
5 Simple Ways to Ignite Your Metabolism (and Lose Weight) After a Cruise
Apr 09,2015 8:53 am
-
Study Reveals Amount of Processed Food Purchased by 157,142 Households – Not Good
Apr 09,2015 7:17 am
-
Study: Junk Food more Deadly than War, Famine, Genocide – Researchers reveal disturbing numbers
Apr 07,2015 6:26 am
-
How GMO Foods Feed Junk Food Profits – Not the World – Leading to obesity, diabetes, and more
Apr 01,2015 2:41 pm
-
Are Your Favorite Nuts Helping or Harming You? It’s nature’s way
Mar 30,2015 7:57 am
-
Grilled Organic Sweet Potatoes and French Green Beans for the Week
Mar 27,2015 10:52 pm
-
When Female Carboholics Have Children
Mar 27,2015 9:58 pm
-
Life Changing Raw Chocolate Caramel Pie – Updated – Serving Tip
Mar 26,2015 6:54 pm
-
Healthier Version of the Infamous BoneFish Grill Jamaican Coconut Pie with Rum Sauce
Mar 24,2015 7:33 pm
-
Study: Drinking Diet Soda Leads to Weight GAIN – But the damage doesn’t end there
Mar 23,2015 5:43 am
-
A Better Cookie: Gluten-Free, Vegan Chocolate Pecan
Mar 21,2015 10:13 am
-
If You Didn’t Buy It and Cook It Yourself, It’s Mystery Food That Will Make You Fat, Sick, & Dead Prematurely
Mar 21,2015 9:01 am
-
The Best Ways to Avoid Fluoride and Detox it from Your Body
Mar 18,2015 7:09 am
-
Apple Cider Vinegar improves blood sugar regulation and speeds up weight loss
Mar 18,2015 6:59 am
-
How To Make Almond Meal-Butter Pie Crust on the Ezekiel Diet
Mar 16,2015 8:42 am
-
A tasty way to help prevent cardiovascular disease, cancer, and dementia
Mar 16,2015 5:51 am
-
The Research: Eat THIS to Lose Weight
Mar 14,2015 8:39 am
-
High Fructose Corn Syrup Now Labeled as Fructose or HFCS-90
Mar 10,2015 6:30 am
-
Skinny Pumpkin Cheesecake with Stevia and Almond Meal-Butter Crust
Mar 09,2015 1:18 pm
-
Mustard, Cayenne Pepper and Green Tea Boost Your Metabolism for Weight Loss
Mar 09,2015 8:46 am
-
12 EZ Meals on the Grill – Save time and money – 15 Minute Meals
Mar 07,2015 6:25 am
-
Brain care with Dr. Russell Blaylock
Mar 05,2015 7:12 pm
-
300 Calorie Weight Loss Meal – Chicken Veggie Stew
Mar 05,2015 2:05 pm
-
5 Nutritional Reasons People Keep Eating Meat
Mar 05,2015 12:55 pm
-
No Microwave Cooking, Find Out Why
Feb 25,2015 10:19 am
-
Officials Declare ‘Eating Healthy’ a Mental Disorder
Feb 22,2015 9:39 am
-
Pasture-raised eggs are one of the richest sources of bioactive nutrients
Feb 22,2015 8:52 am
-
The Great Dumbing Down of America with Chemical Toxins
Feb 21,2015 1:31 pm
-
Something Odd About Old Family Photos
Feb 21,2015 12:36 pm
-
The Only Water You Drink Is The Water You Make
Feb 20,2015 3:47 pm
-
The Multimillion Dollar Medical Early Demise Tax Explained
Feb 20,2015 9:36 am
-
EZ Breakfast Ideas on the Ezekiel Diet
Feb 19,2015 10:48 am
-
Most Astonishing Health Disaster and the Ezekiel Diet Purpose Statement
Feb 17,2015 3:40 am
-
128 EZ Meals on the Ezekiel Diet Files New Website
Feb 15,2015 2:46 pm
-
Pan Grilled Chicken Breast for the Week
Feb 15,2015 1:49 pm
-
Häagen-Dazs Ice Cream, One of the Cleaner Brands
Feb 14,2015 9:13 pm
-
Food Babe Gets General Mills to Pull Preservatives
Feb 14,2015 12:37 pm
-
Being Health Conscious Makes You The New “Conspiracy Theorist”!
Feb 14,2015 4:18 am


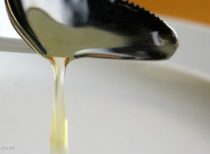


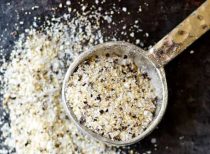


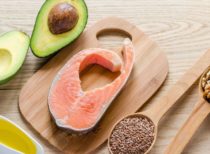


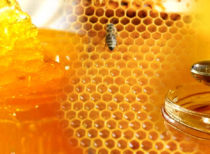


Latest Stories


Featured Post